PREPARING THE LAWN TRACTOR
AWARNING: Before beginning preparation,
B | F |
| select a firm and level surface which is large |
C | enough to accommodate the snow blade |
D | |
| E |
| attachment and tractor. Engage brake lock. |
NOTE: When preparing the lawn tractor for assembly of snow blade attachment, store all items removed with the mowing deck.
1.Allow engine, muffler and exhaust deflector to cool before beginning.
2.Disconnect the spark plug wire(s) from the spark plug(s) and ground against the engine.
3.Remove the mowing deck as instructed in the belt removal section of the owner's manual for the lawn tractor.
SECTION 1: ASSEMBLY
INSTRUCTIONS
NOTE: Right hand (R.H.) and left hand (L.H.) are deter- mined from the operators position while seated on the tractor.
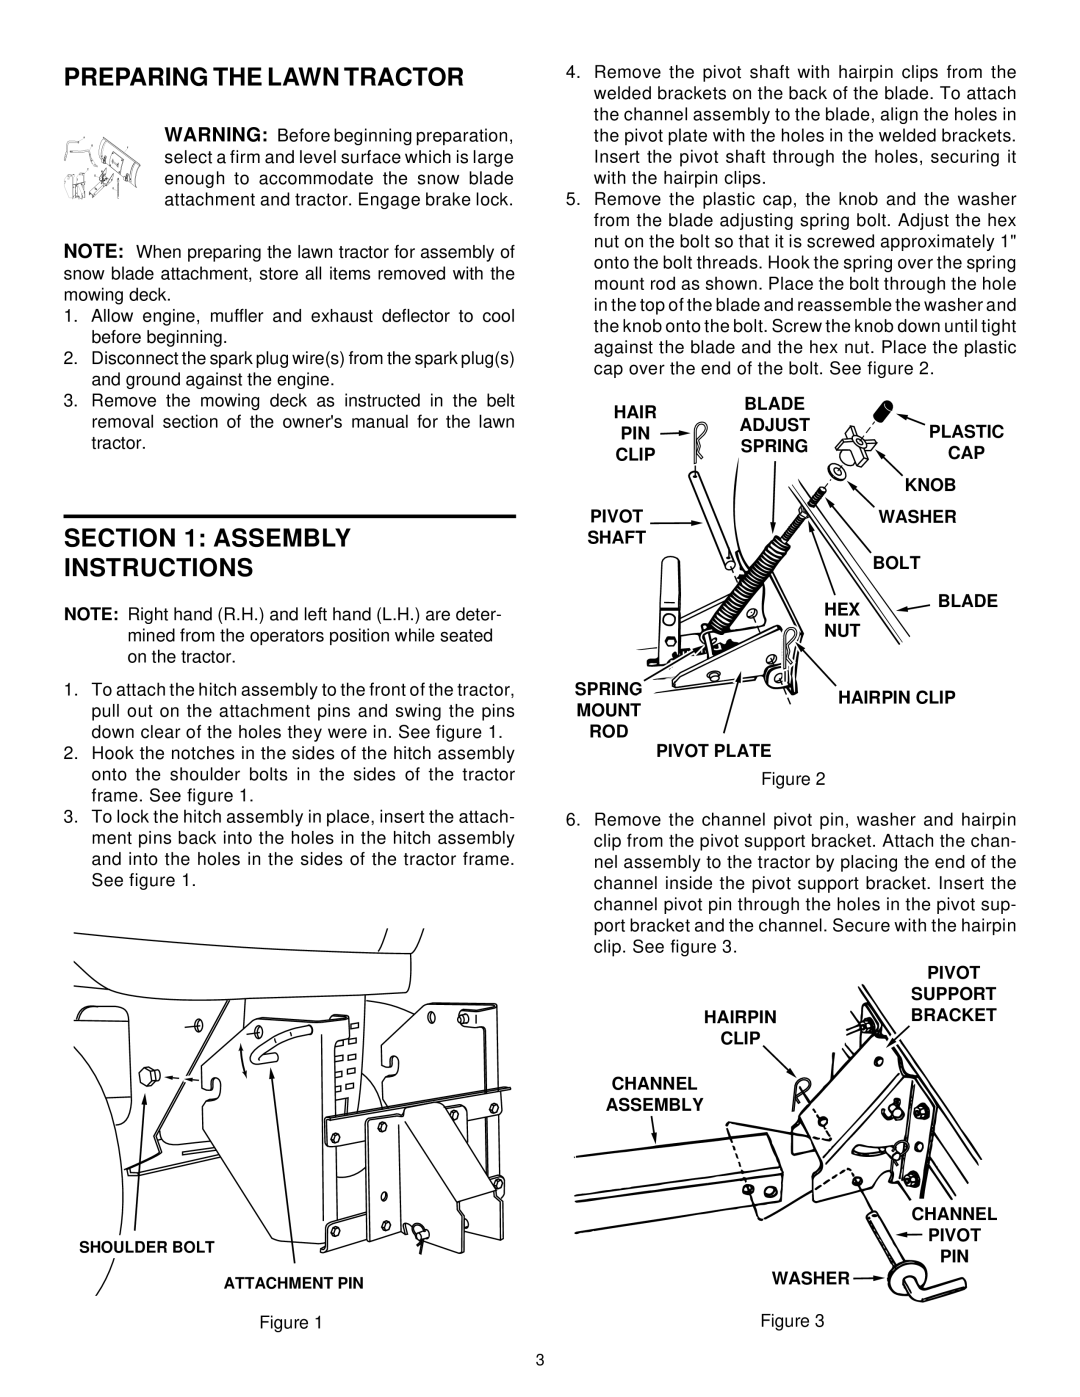
1.To attach the hitch assembly to the front of the tractor, pull out on the attachment pins and swing the pins down clear of the holes they were in. See figure 1.
2.Hook the notches in the sides of the hitch assembly onto the shoulder bolts in the sides of the tractor frame. See figure 1.
3.To lock the hitch assembly in place, insert the attach- ment pins back into the holes in the hitch assembly and into the holes in the sides of the tractor frame. See figure 1.
SHOULDER BOLT
ATTACHMENT PIN
Figure 1
4.Remove the pivot shaft with hairpin clips from the welded brackets on the back of the blade. To attach the channel assembly to the blade, align the holes in the pivot plate with the holes in the welded brackets. Insert the pivot shaft through the holes, securing it with the hairpin clips.
5.Remove the plastic cap, the knob and the washer from the blade adjusting spring bolt. Adjust the hex nut on the bolt so that it is screwed approximately 1" onto the bolt threads. Hook the spring over the spring mount rod as shown. Place the bolt through the hole in the top of the blade and reassemble the washer and the knob onto the bolt. Screw the knob down until tight against the blade and the hex nut. Place the plastic cap over the end of the bolt. See figure 2.
HAIRBLADE
PIN | ADJUST | PLASTIC | |
SPRING | |||
CLIP | CAP | ||
| |||
|
| KNOB | |
PIVOT |
| WASHER |
SHAFT
|
| BOLT | |
| HEX | BLADE | |
|
| ||
| NUT |
| |
SPRING | HAIRPIN CLIP | ||
MOUNT | |||
|
| ||
ROD | PIVOT PLATE |
| |
|
| ||
| Figure 2 |
| |
6.Remove the channel pivot pin, washer and hairpin clip from the pivot support bracket. Attach the chan- nel assembly to the tractor by placing the end of the channel inside the pivot support bracket. Insert the channel pivot pin through the holes in the pivot sup- port bracket and the channel. Secure with the hairpin clip. See figure 3.
| PIVOT |
| SUPPORT |
HAIRPIN | BRACKET |
CLIP |
|
CHANNEL
ASSEMBLY
CHANNEL
 PIVOT
PIVOT
PIN
WASHER 
Figure 3
3
