Check the adjustment of the auger control as follows:

When the auger control is released and in the disengaged “up” position, the cable should have very little slack. It should NOT be tight.

In a well-ventilated area, start the snow thrower engine as instructed earlier in this section under the heading Starting Engine. Make sure the throttle is set in the FAST position.

While standing in the operator’s position (behind the snow thrower), engage the auger.

Allow the auger to remain engaged for approximately ten (10) seconds before releasing the auger control. Repeat this several times.

With the engine running in the FAST position and the auger control lever in the disengaged “up” position, walk to the front of the machine.

Confirm that the auger has completely stopped rotating and shows NO signs of motion.

IMPORTANT: If the auger shows ANY signs of rotating, immediately return to the operator’s position and shut off the engine. Wait for ALL moving parts to stop before re-adjusting the auger control.

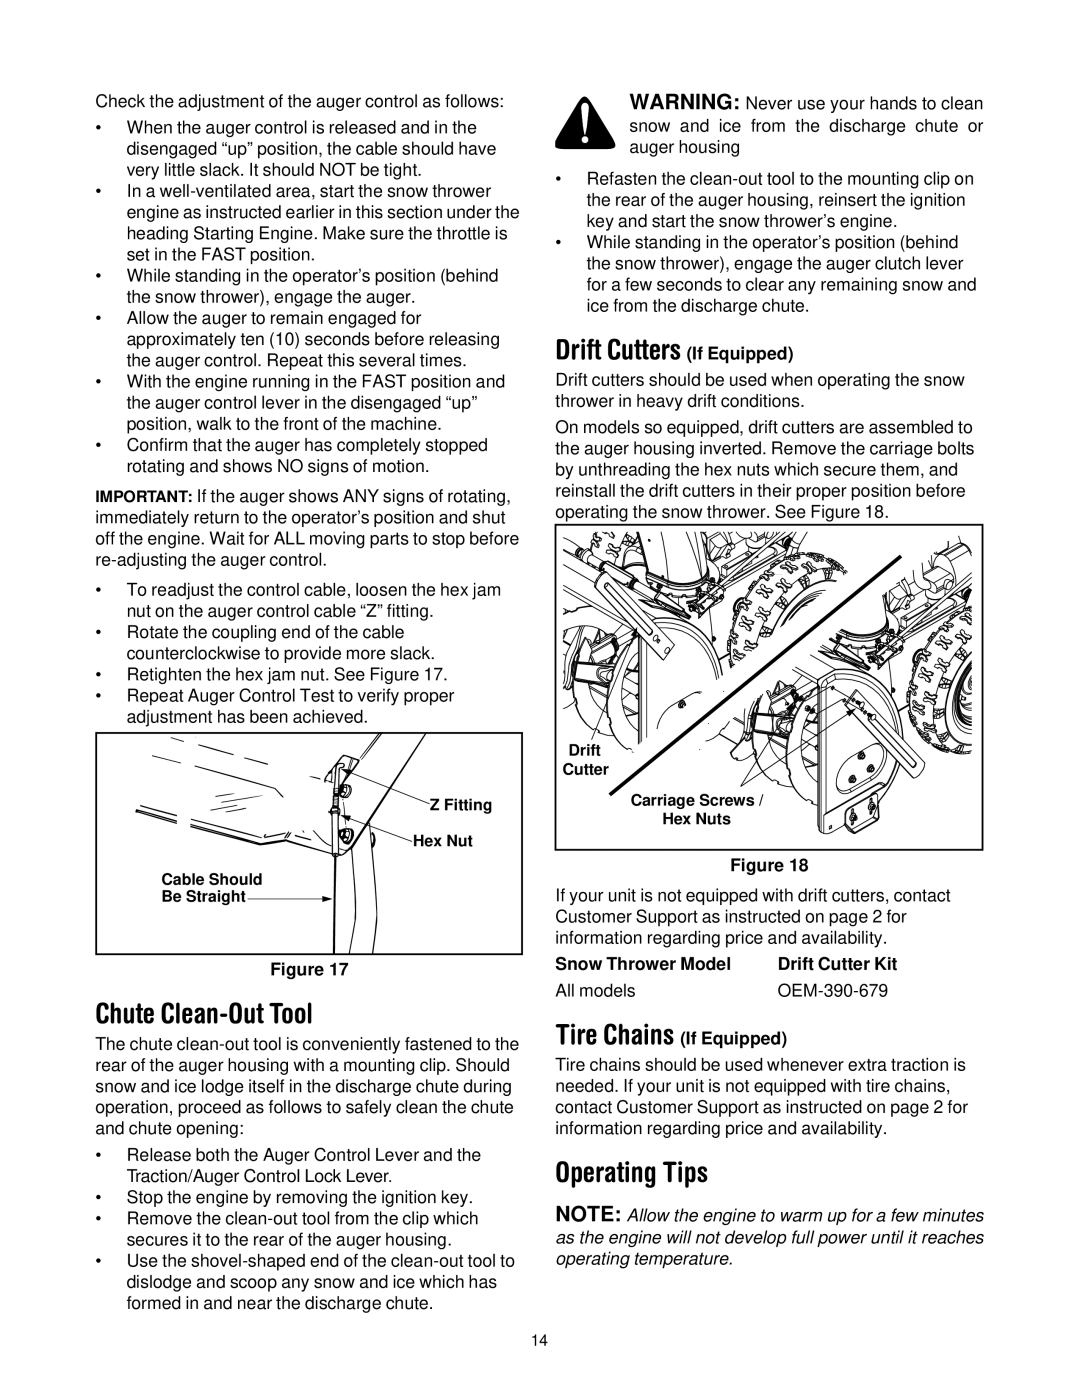
To readjust the control cable, loosen the hex jam nut on the auger control cable “Z” fitting.

Rotate the coupling end of the cable counterclockwise to provide more slack.

Retighten the hex jam nut. See Figure 17.

Repeat Auger Control Test to verify proper adjustment has been achieved.

Z Fitting

Hex Nut

Cable Should

Be Straight

Figure 17

Chute Clean-Out Tool

The chute clean-out tool is conveniently fastened to the rear of the auger housing with a mounting clip. Should snow and ice lodge itself in the discharge chute during operation, proceed as follows to safely clean the chute and chute opening:

Release both the Auger Control Lever and the Traction/Auger Control Lock Lever.

Stop the engine by removing the ignition key.

Remove the clean-out tool from the clip which secures it to the rear of the auger housing.

Use the shovel-shaped end of the clean-out tool to dislodge and scoop any snow and ice which has formed in and near the discharge chute.

WARNING: Never use your hands to clean snow and ice from the discharge chute or auger housing

Refasten the clean-out tool to the mounting clip on the rear of the auger housing, reinsert the ignition key and start the snow thrower’s engine.

While standing in the operator’s position (behind the snow thrower), engage the auger clutch lever for a few seconds to clear any remaining snow and ice from the discharge chute.

Drift Cutters (If Equipped)

Drift cutters should be used when operating the snow thrower in heavy drift conditions.

On models so equipped, drift cutters are assembled to the auger housing inverted. Remove the carriage bolts by unthreading the hex nuts which secure them, and reinstall the drift cutters in their proper position before operating the snow thrower. See Figure 18.

Drift

Cutter

Carriage Screws /

Hex Nuts

Figure 18

If your unit is not equipped with drift cutters, contact Customer Support as instructed on page 2 for information regarding price and availability.

Snow Thrower Model

Drift Cutter Kit

All models

OEM-390-679

Tire Chains (If Equipped)

Tire chains should be used whenever extra traction is needed. If your unit is not equipped with tire chains, contact Customer Support as instructed on page 2 for information regarding price and availability.

Operating Tips

NOTE: Allow the engine to warm up for a few minutes as the engine will not develop full power until it reaches operating temperature.

14

Page 14
Image 14
MTD 644E, 664G manual Chute Clean-Out Tool, Drift Cutters If Equipped, Operating Tips

664G, 644E specifications

The MTD 644E and 664G tractors represent a significant leap in agricultural technology and efficiency, designed for diverse farming applications. Known for their robust build and advanced features, these models cater to both small and large-scale agricultural operations.

Starting with the MTD 644E, it is powered by a state-of-the-art diesel engine, providing a reliable performance that enhances productivity. The engine delivers impressive horsepower, allowing farmers to tackle various tasks effortlessly. Its fuel efficiency is a standout feature, ensuring reduced operational costs while still meeting demanding farm requirements. The 644E also features a compact design, making it highly maneuverable in tight spaces while maintaining a sturdy construction that guarantees durability in rugged conditions.

On the other hand, the MTD 664G offers slightly higher horsepower, making it suitable for more intensive agricultural work. This model is equipped with a more advanced engine management system that optimizes performance and fuel consumption, ensuring that farmers can work longer hours without frequent refueling. The 664G’s larger frame accommodates additional implements, expanding its versatility for tasks including plowing, tilling, and harvesting.

Both models are built with user-friendly controls, allowing operators to focus on their tasks without unnecessary distractions. The ergonomic seating and intuitive interface are designed to minimize fatigue during long working days. Additionally, these tractors come with a range of safety features, including effective braking systems and visibility enhancements that prioritize operator safety.

Technologically, both the 644E and 664G incorporate precision farming features that allow for better resource management. Implement compatibility enables seamless integration with various agricultural tools, giving users flexibility in their operations. Regular software updates ensure that the tractors remain at the forefront of agricultural technology, further enhancing performance and efficiency.

In summary, the MTD 644E and 664G tractors are tailored for modern farmers seeking reliability and efficiency. Their powerful engines, compact designs, and cutting-edge technology make them indispensable tools on any farm, capable of handling a multitude of agricultural tasks with ease and precision.