MAINTENANCE AND REPAIR INSTRUCTIONS

SAW CHAIN REPLACEMENT/INSTALLATION

WARNING: Whenever handling the saw chain,

always wear work gloves for protection against sharp cutting edges.

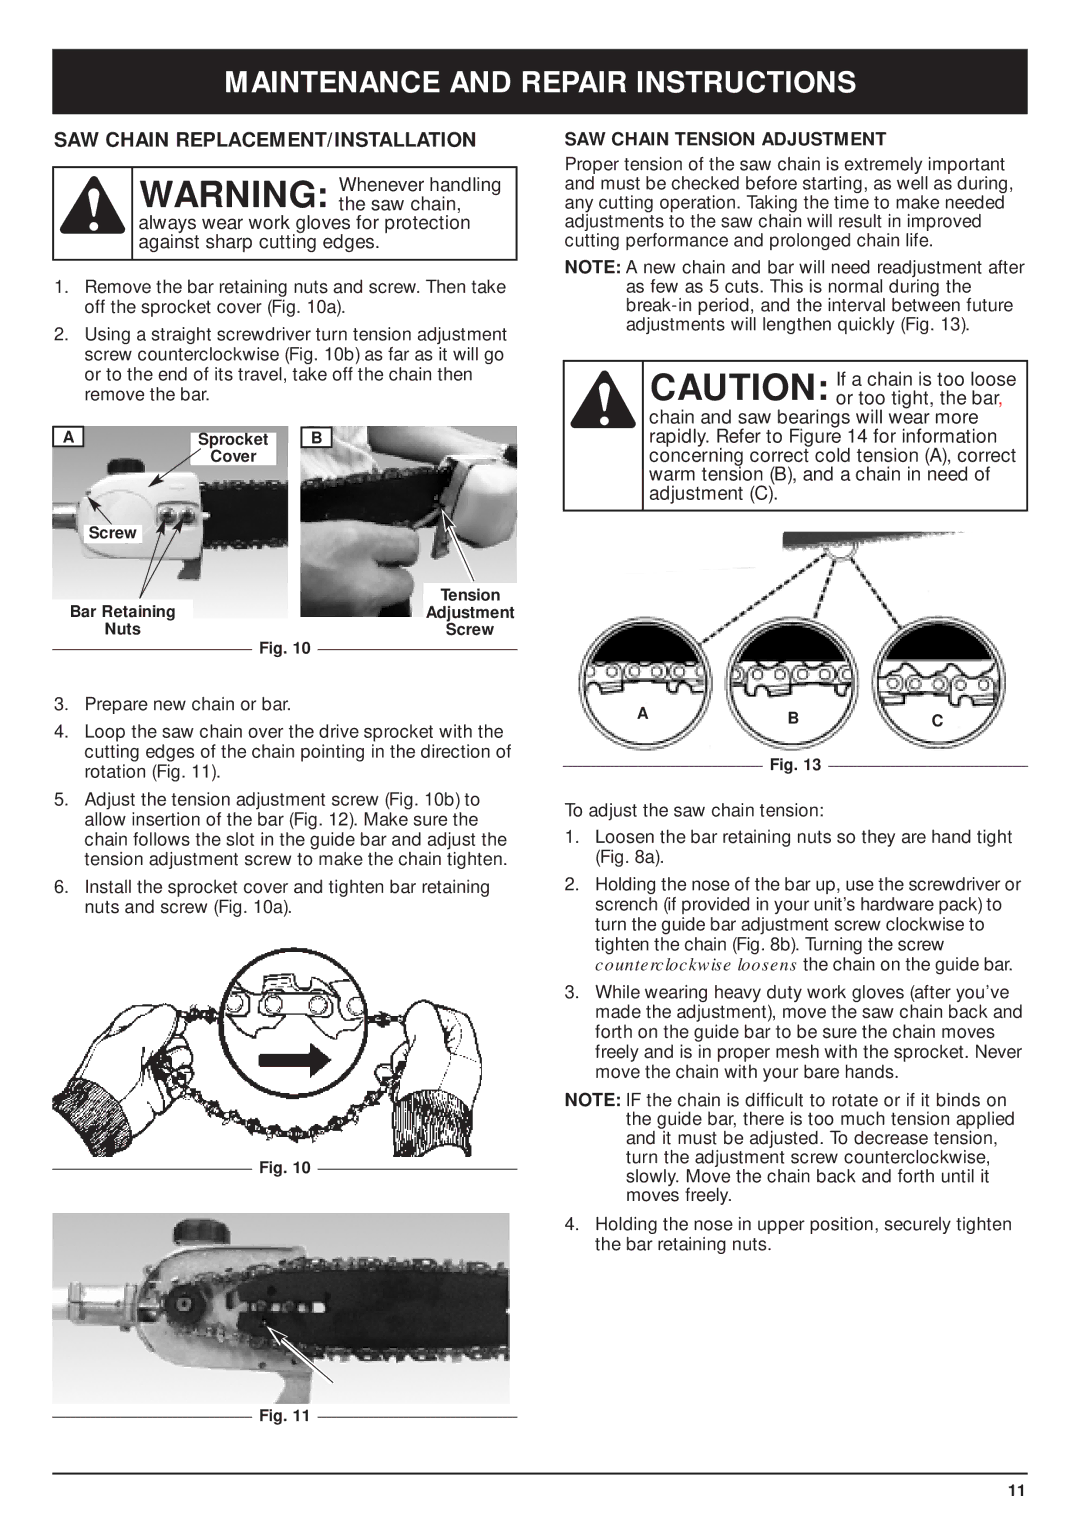
1.Remove the bar retaining nuts and screw. Then take off the sprocket cover (Fig. 10a).

2.Using a straight screwdriver turn tension adjustment screw counterclockwise (Fig. 10b) as far as it will go or to the end of its travel, take off the chain then remove the bar.

A


B


Sprocket


Cover


Screw


Tension

Bar Retaining


Adjustment


Nuts


Screw


Fig. 10


3.Prepare new chain or bar.

4.Loop the saw chain over the drive sprocket with the cutting edges of the chain pointing in the direction of rotation (Fig. 11).

5.Adjust the tension adjustment screw (Fig. 10b) to allow insertion of the bar (Fig. 12). Make sure the chain follows the slot in the guide bar and adjust the tension adjustment screw to make the chain tighten.

6.Install the sprocket cover and tighten bar retaining nuts and screw (Fig. 10a).

Fig. 10

SAW CHAIN TENSION ADJUSTMENT

Proper tension of the saw chain is extremely important and must be checked before starting, as well as during, any cutting operation. Taking the time to make needed adjustments to the saw chain will result in improved cutting performance and prolonged chain life.

NOTE: A new chain and bar will need readjustment after as few as 5 cuts. This is normal during the break-in period, and the interval between future adjustments will lengthen quickly (Fig. 13).

CAUTION: If a chain is too loose or too tight, the bar,

chain and saw bearings will wear more rapidly. Refer to Figure 14 for information concerning correct cold tension (A), correct warm tension (B), and a chain in need of adjustment (C).

ABC

Fig. 13

To adjust the saw chain tension:

1.Loosen the bar retaining nuts so they are hand tight (Fig. 8a).

2.Holding the nose of the bar up, use the screwdriver or scrench (if provided in your unit’s hardware pack) to turn the guide bar adjustment screw clockwise to tighten the chain (Fig. 8b). Turning the screw counterclockwise loosens the chain on the guide bar.

3.While wearing heavy duty work gloves (after you’ve made the adjustment), move the saw chain back and forth on the guide bar to be sure the chain moves freely and is in proper mesh with the sprocket. Never move the chain with your bare hands.

NOTE: IF the chain is difficult to rotate or if it binds on the guide bar, there is too much tension applied and it must be adjusted. To decrease tension, turn the adjustment screw counterclockwise, slowly. Move the chain back and forth until it moves freely.

4.Holding the nose in upper position, securely tighten the bar retaining nuts.

Fig. 11

11

Page 11
Image 11
MTD PS720r manual Maintenance and Repair Instructions, SAW Chain REPLACEMENT/INSTALLATION, SAW Chain Tension Adjustment

PS720r specifications

The MTD PS720R is a robust and versatile piece of outdoor power equipment designed for both professional landscapers and dedicated homeowners. This model excels in various gardening tasks, including pruning, trimming, and clearing tasks. It combines power and efficiency to deliver exceptional performance in yard maintenance.

One of the standout features of the PS720R is its powerful 25cc two-stroke engine. This engine is designed to provide reliable performance while maintaining a lightweight form factor, making it easy to handle during long hours of use. The power-to-weight ratio is optimized for effective cutting without causing excessive fatigue to the user.

The ergonomics of the MTD PS720R are also noteworthy. It features a padded double-handle design that not only enhances user comfort but also improves control during operation. This design minimizes vibrations, allowing for extended use without discomfort. The inclusion of a harness further redistributes weight, ensuring stability and reducing strain.

Another critical aspect of the PS720R is its advanced cutting technology. The trimmer head is equipped with a dual-line system that allows for efficient cutting of grass and weeds, significantly minimizing trimming time. The cutting swath is generous, enabling users to cover more ground in less time, making it ideal for larger yards or professional landscaping jobs.

Maintenance is straightforward with the MTD PS720R. The easy-access air filter and the fuel system allow for quick cleaning and refueling, ensuring that users can spend more time working and less time on upkeep. This emphasis on ease of use extends to the tool’s starter mechanism, which is designed for smooth and reliable starting, even after extended periods of storage.

The durability of the PS720R is another critical feature. Constructed with high-quality materials, this trimmer not only withstands the rigors of regular use but also resists wear from tough working conditions. This longevity makes it a wise investment for anyone looking to maintain their yard efficiently.

In summary, the MTD PS720R is a feature-rich, user-friendly, and durable outdoor trimmer. With its powerful engine, ergonomic design, advanced cutting technology, and easy maintenance, it represents an excellent choice for both residential and commercial applications. Whether tackling tough weeds or fine-tuning beautiful landscapes, the PS720R stands out as a reliable tool for achieving a well-manicured yard.