CONTROLS AND CONNECTIONS
(2)
(1)
(3)
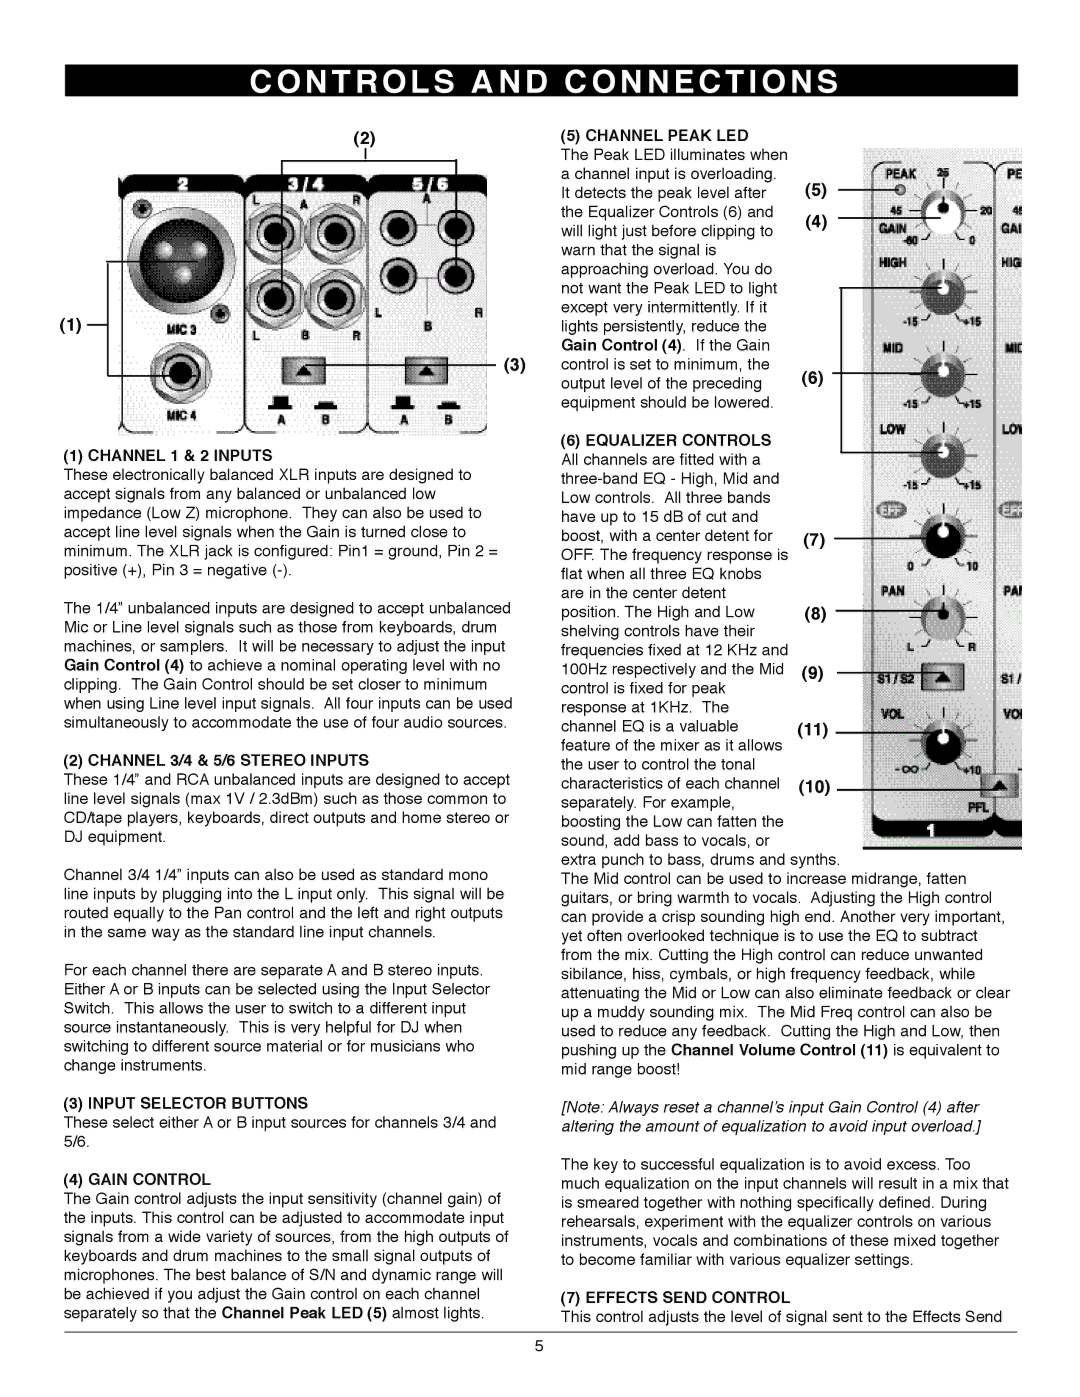
(1) CHANNEL 1 & 2 INPUTS
These electronically balanced XLR inputs are designed to accept signals from any balanced or unbalanced low impedance (Low Z) microphone. They can also be used to accept line level signals when the Gain is turned close to minimum. The XLR jack is configured: Pin1 = ground, Pin 2 = positive (+), Pin 3 = negative
The 1/4” unbalanced inputs are designed to accept unbalanced Mic or Line level signals such as those from keyboards, drum machines, or samplers. It will be necessary to adjust the input Gain Control (4) to achieve a nominal operating level with no clipping. The Gain Control should be set closer to minimum when using Line level input signals. All four inputs can be used simultaneously to accommodate the use of four audio sources.
(2) CHANNEL 3/4 & 5/6 STEREO INPUTS
These 1/4” and RCA unbalanced inputs are designed to accept line level signals (max 1V / 2.3dBm) such as those common to CD/tape players, keyboards, direct outputs and home stereo or DJ equipment.
Channel 3/4 1/4” inputs can also be used as standard mono line inputs by plugging into the L input only. This signal will be routed equally to the Pan control and the left and right outputs in the same way as the standard line input channels.
For each channel there are separate A and B stereo inputs. Either A or B inputs can be selected using the Input Selector Switch. This allows the user to switch to a different input source instantaneously. This is very helpful for DJ when switching to different source material or for musicians who change instruments.
(3) INPUT SELECTOR BUTTONS
These select either A or B input sources for channels 3/4 and 5/6.
(4) GAIN CONTROL
The Gain control adjusts the input sensitivity (channel gain) of the inputs. This control can be adjusted to accommodate input signals from a wide variety of sources, from the high outputs of keyboards and drum machines to the small signal outputs of microphones. The best balance of S/N and dynamic range will be achieved if you adjust the Gain control on each channel separately so that the Channel Peak LED (5) almost lights.
(5) CHANNEL PEAK LED |
| |
The Peak LED illuminates when |
| |
a channel input is overloading. | (5) | |
It detects the peak level after | ||
the Equalizer Controls (6) and | (4) | |
will light just before clipping to | ||
| ||
warn that the signal is |
| |
approaching overload. You do |
| |
not want the Peak LED to light |
| |
except very intermittently. If it |
| |
lights persistently, reduce the |
| |
Gain Control (4). If the Gain |
| |
control is set to minimum, the | (6) | |
output level of the preceding | ||
equipment should be lowered. |
| |
(6) EQUALIZER CONTROLS |
| |
All channels are fitted with a |
| |
| ||
Low controls. All three bands |
| |
have up to 15 dB of cut and |
| |
boost, with a center detent for | (7) | |
OFF. The frequency response is |
| |
flat when all three EQ knobs |
| |
are in the center detent |
| |
position. The High and Low | (8) | |
shelving controls have their |
| |
frequencies fixed at 12 KHz and |
| |
100Hz respectively and the Mid | (9) | |
control is fixed for peak |
| |
response at 1KHz. The |
| |
channel EQ is a valuable | (11) | |
feature of the mixer as it allows |
| |
the user to control the tonal |
| |
characteristics of each channel | (10) | |
separately. For example, |
|
boosting the Low can fatten the sound, add bass to vocals, or
extra punch to bass, drums and synths.
The Mid control can be used to increase midrange, fatten guitars, or bring warmth to vocals. Adjusting the High control can provide a crisp sounding high end. Another very important, yet often overlooked technique is to use the EQ to subtract from the mix. Cutting the High control can reduce unwanted sibilance, hiss, cymbals, or high frequency feedback, while attenuating the Mid or Low can also eliminate feedback or clear up a muddy sounding mix. The Mid Freq control can also be used to reduce any feedback. Cutting the High and Low, then pushing up the Channel Volume Control (11) is equivalent to mid range boost!
[Note: Always reset a channel’s input Gain Control (4) after altering the amount of equalization to avoid input overload.]
The key to successful equalization is to avoid excess. Too much equalization on the input channels will result in a mix that is smeared together with nothing specifically defined. During rehearsals, experiment with the equalizer controls on various instruments, vocals and combinations of these mixed together to become familiar with various equalizer settings.
(7) EFFECTS SEND CONTROL
This control adjusts the level of signal sent to the Effects Send
5