C O N T R O L S A N D C O N N E C T I O N S
FRONT PANEL
(1)(2)
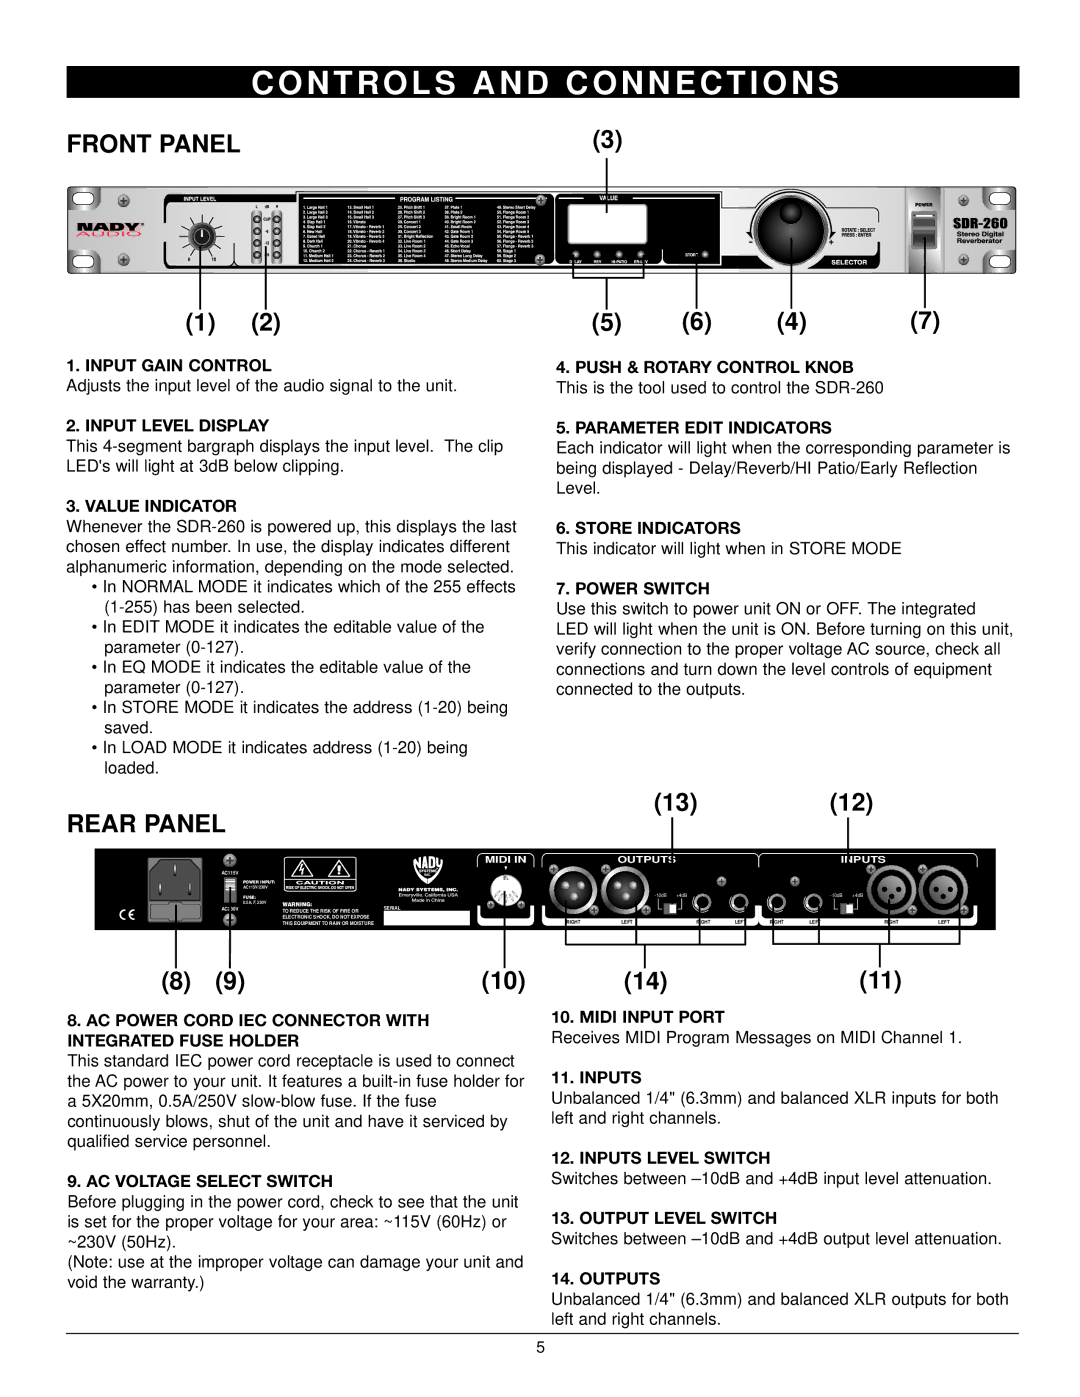
1.INPUT GAIN CONTROL
Adjusts the input level of the audio signal to the unit.
2. INPUT LEVEL DISPLAY
This
3. VALUE INDICATOR
Whenever the
•In NORMAL MODE it indicates which of the 255 effects
•In EDIT MODE it indicates the editable value of the parameter
•In EQ MODE it indicates the editable value of the parameter
•In STORE MODE it indicates the address
•In LOAD MODE it indicates address
(3)
(5) | (6) | (4) | (7) |
4.PUSH & ROTARY CONTROL KNOB
This is the tool used to control the
5.PARAMETER EDIT INDICATORS
Each indicator will light when the corresponding parameter is being displayed - Delay/Reverb/HI Patio/Early Reflection Level.
6. STORE INDICATORS
This indicator will light when in STORE MODE
7. POWER SWITCH
Use this switch to power unit ON or OFF. The integrated LED will light when the unit is ON. Before turning on this unit, verify connection to the proper voltage AC source, check all connections and turn down the level controls of equipment connected to the outputs.
REAR PANEL
MIDI IN
AC115V
|
|
| POWER INPUT: |
|
| |
|
|
| AC115V/230V |
|
| |
|
|
| FUSE: |
|
| |
|
|
| 0.5A, F, 250V | WARNING: | SERIAL | |
AC230V | ||||||
| ||||||
| TO REDUCE THE RISK OF FIRE OR | |||||
|
|
|
|
| ||
|
|
|
| ELECTRONIC SHOCK, DO NOT EXPOSE |
| |
|
|
|
| THIS EQUIPMENT TO RAIN OR MOISTURE |
| |
| (13) | (12) |
| |
| OUTPUTS |
| INPUTS |
|
| +4dB |
| ||
RIGHT | LEFT | RIGHTLEFTRIGHTLEFT | RIGHT | LEFT |
(8) | (9) | (10) | (14) | (11) |
8.AC POWER CORD IEC CONNECTOR WITH INTEGRATED FUSE HOLDER
This standard IEC power cord receptacle is used to connect the AC power to your unit. It features a
9.AC VOLTAGE SELECT SWITCH
Before plugging in the power cord, check to see that the unit is set for the proper voltage for your area: ~115V (60Hz) or ~230V (50Hz).
(Note: use at the improper voltage can damage your unit and void the warranty.)
10. MIDI INPUT PORT
Receives MIDI Program Messages on MIDI Channel 1.
11. INPUTS
Unbalanced 1/4" (6.3mm) and balanced XLR inputs for both left and right channels.
12. INPUTS LEVEL SWITCH
Switches between
13. OUTPUT LEVEL SWITCH
Switches between
14. OUTPUTS
Unbalanced 1/4" (6.3mm) and balanced XLR outputs for both left and right channels.
5
