UHF 10 RECEIVER

1.Powering the Receiver

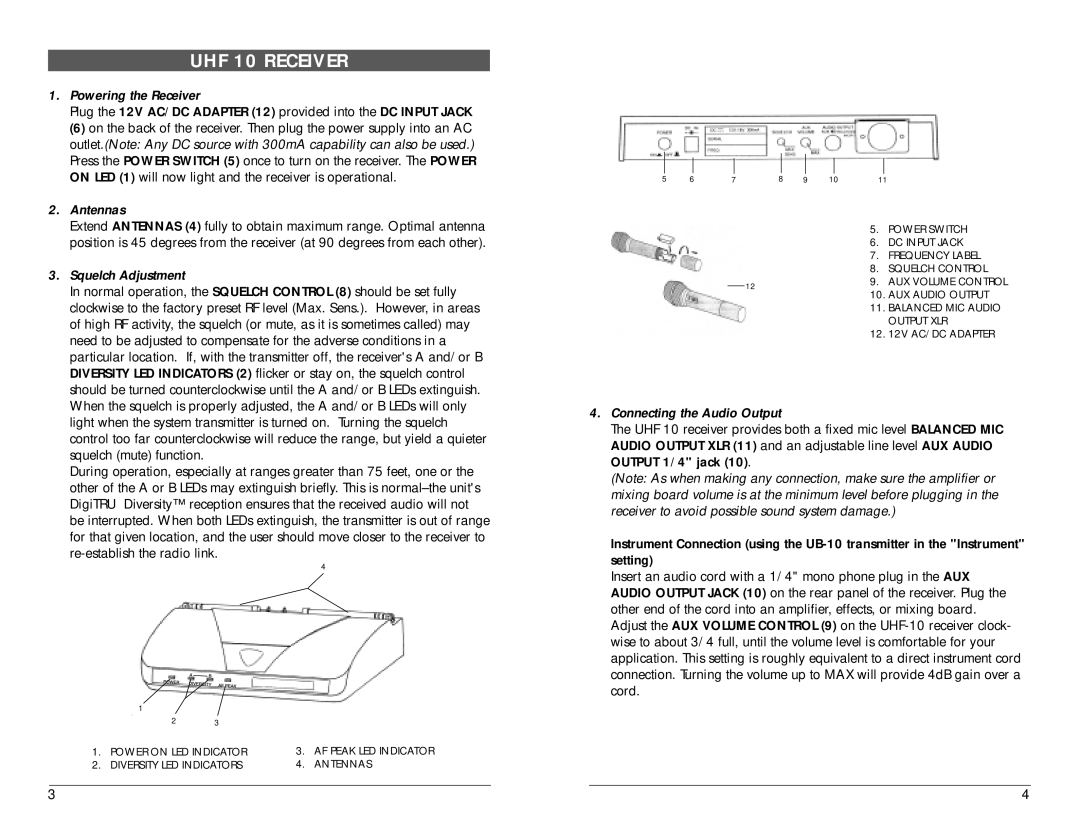
Plug the 12V AC/DC ADAPTER (12) provided into the DC INPUT JACK

(6) on the back of the receiver. Then plug the power supply into an AC outlet.(Note: Any DC source with 300mA capability can also be used.) Press the POWER SWITCH (5) once to turn on the receiver. The POWER ON LED (1) will now light and the receiver is operational.

2.Antennas

Extend ANTENNAS (4) fully to obtain maximum range. Optimal antenna position is 45 degrees from the receiver (at 90 degrees from each other).

3.Squelch Adjustment

In normal operation, the SQUELCH CONTROL (8) should be set fully clockwise to the factory preset RF level (Max. Sens.). However, in areas of high RF activity, the squelch (or mute, as it is sometimes called) may need to be adjusted to compensate for the adverse conditions in a particular location. If, with the transmitter off, the receiver's A and/or B DIVERSITY LED INDICATORS (2) flicker or stay on, the squelch control should be turned counterclockwise until the A and/or B LEDs extinguish. When the squelch is properly adjusted, the A and/or B LEDs will only light when the system transmitter is turned on. Turning the squelch control too far counterclockwise will reduce the range, but yield a quieter squelch (mute) function.

During operation, especially at ranges greater than 75 feet, one or the other of the A or B LEDs may extinguish briefly. This is normal–the unit's DigiTRU Diversity™ reception ensures that the received audio will not be interrupted. When both LEDs extinguish, the transmitter is out of range for that given location, and the user should move closer to the receiver to re-establish the radio link.

4


1


2

3


1.

POWER ON LED INDICATOR

3.

AF PEAK LED INDICATOR

2.

DIVERSITY LED INDICATORS

4.

ANTENNAS

5 678 9 1011


5.

POWER SWITCH


6.

DC INPUT JACK


7.

FREQUENCY LABEL


8.

SQUELCH CONTROL

12

9.

AUX VOLUME CONTROL

10. AUX AUDIO OUTPUT


11. BALANCED MIC AUDIO


OUTPUT XLR


12.

12V AC/DC ADAPTER

4.Connecting the Audio Output

The UHF 10 receiver provides both a fixed mic level BALANCED MIC AUDIO OUTPUT XLR (11) and an adjustable line level AUX AUDIO OUTPUT 1/4" jack (10).

(Note: As when making any connection, make sure the amplifier or mixing board volume is at the minimum level before plugging in the receiver to avoid possible sound system damage.)

Instrument Connection (using the UB-10 transmitter in the "Instrument" setting)

Insert an audio cord with a 1/4" mono phone plug in the AUX AUDIO OUTPUT JACK (10) on the rear panel of the receiver. Plug the other end of the cord into an amplifier, effects, or mixing board. Adjust the AUX VOLUME CONTROL (9) on the UHF-10 receiver clock- wise to about 3/4 full, until the volume level is comfortable for your application. This setting is roughly equivalent to a direct instrument cord connection. Turning the volume up to MAX will provide 4dB gain over a cord.

3

4

Page 3
Image 3
Nady Systems manual UHF 10 Receiver, Powering the Receiver, Antennas, Squelch Adjustment, Connecting the Audio Output

UHF 10 specifications

Nady Systems has long been recognized for its innovative audio solutions, and their UHF 10 wireless microphone system exemplifies the brand’s commitment to quality and performance. Designed for a variety of applications, the UHF 10 system is ideal for live performances, presentations, and studio recordings, ensuring that users enjoy crystal-clear audio without the limitations of traditional wired microphones.

One of the standout features of the Nady UHF 10 is its use of ultra-high frequency (UHF) technology. This allows for a wide frequency spectrum, enabling users to select from up to 16 different frequencies within a 540 to 570 MHz range. This flexibility not only enhances the system's ability to minimize interference from other wireless devices but also provides a reliable signal over long distances. The UHF 10 is renowned for its impressive range, which can reach up to 250 feet, making it suitable for events of various sizes.

The Nady UHF 10 is equipped with a true diversity receiver, meaning it features two antennas that work to eliminate dropouts and ensure a consistent signal. The ability to switch between the two receivers in real-time provides users with uninterrupted audio, crucial for performances where every word matters. Additionally, the system has a rear-panel balanced XLR output and a 1/4" unbalanced output, allowing for easy integration with different audio equipment.

Another significant characteristic of the UHF 10 system is its lightweight and ergonomic design. The transmitter is comfortable to hold during extended use, and the microphone head is constructed to capture vocal nuances accurately, enhancing the overall performance quality. The system includes both handheld and bodypack transmitters, providing versatility for various microphone needs—from speeches to music performances.

Durability is also a key aspect of the UHF 10, designed to withstand the rigors of active use. The components are built to last, ensuring that the system can handle the demands of frequent transport and setup. Additionally, the rechargeable batteries provide convenience and sustainability, making it easy for users to keep their equipment powered throughout the day.

In summary, Nady Systems' UHF 10 is a comprehensive wireless microphone solution equipped with advanced UHF technology, true diversity reception, and a user-friendly design. Whether for stage performances, events, or studio recordings, the UHF 10 offers reliability and high-quality audio that professionals have come to trust.