This information was obtained from this Usenet Post:

http://groups.google.com/groups?hl=en&frame=right&th=874c5b9f385fd337&seekm=NOab888SPAM- 0705992311010001%40ip28.ts6.mn.dialup.ottawa.cyberus.ca#link1

/------------------------

2

3

.

.

4

5

6

\

1

8

9

10

11

12

13

14

<== pins on socket (header) that plugs

7

into factory radio

------------------------


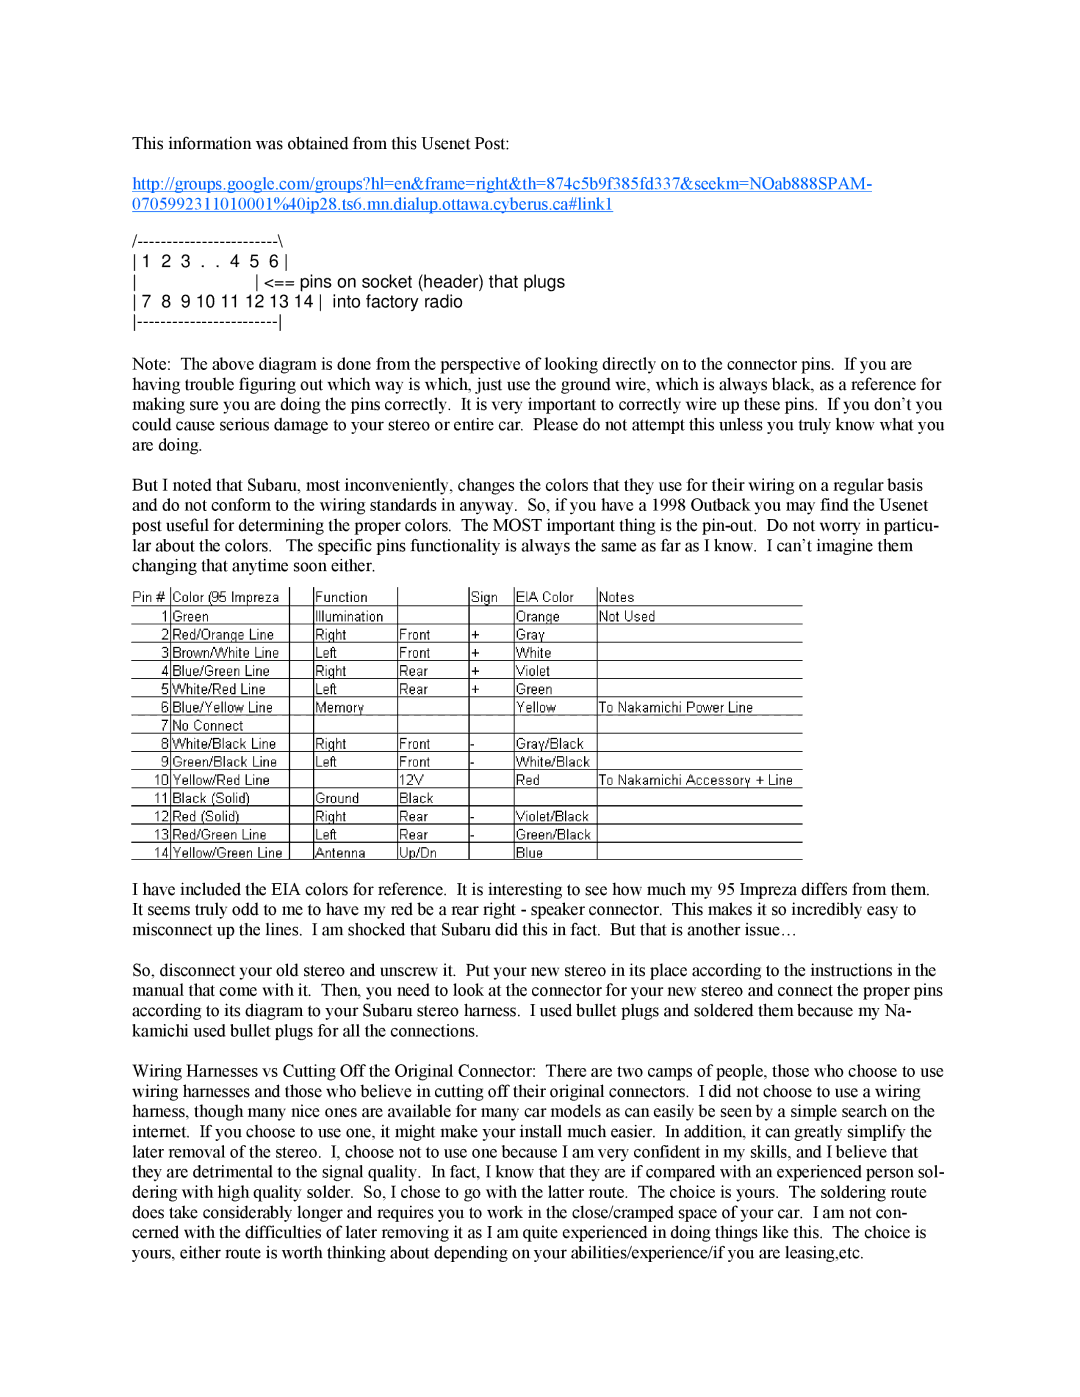
Note: The above diagram is done from the perspective of looking directly on to the connector pins. If you are having trouble figuring out which way is which, just use the ground wire, which is always black, as a reference for making sure you are doing the pins correctly. It is very important to correctly wire up these pins. If you don’t you could cause serious damage to your stereo or entire car. Please do not attempt this unless you truly know what you are doing.

But I noted that Subaru, most inconveniently, changes the colors that they use for their wiring on a regular basis and do not conform to the wiring standards in anyway. So, if you have a 1998 Outback you may find the Usenet post useful for determining the proper colors. The MOST important thing is the pin-out. Do not worry in particu- lar about the colors. The specific pins functionality is always the same as far as I know. I can’t imagine them changing that anytime soon either.

I have included the EIA colors for reference. It is interesting to see how much my 95 Impreza differs from them. It seems truly odd to me to have my red be a rear right - speaker connector. This makes it so incredibly easy to misconnect up the lines. I am shocked that Subaru did this in fact. But that is another issue…

So, disconnect your old stereo and unscrew it. Put your new stereo in its place according to the instructions in the manual that come with it. Then, you need to look at the connector for your new stereo and connect the proper pins according to its diagram to your Subaru stereo harness. I used bullet plugs and soldered them because my Na- kamichi used bullet plugs for all the connections.

Wiring Harnesses vs Cutting Off the Original Connector: There are two camps of people, those who choose to use wiring harnesses and those who believe in cutting off their original connectors. I did not choose to use a wiring harness, though many nice ones are available for many car models as can easily be seen by a simple search on the internet. If you choose to use one, it might make your install much easier. In addition, it can greatly simplify the later removal of the stereo. I, choose not to use one because I am very confident in my skills, and I believe that they are detrimental to the signal quality. In fact, I know that they are if compared with an experienced person sol- dering with high quality solder. So, I chose to go with the latter route. The choice is yours. The soldering route does take considerably longer and requires you to work in the close/cramped space of your car. I am not con- cerned with the difficulties of later removing it as I am quite experienced in doing things like this. The choice is yours, either route is worth thinking about depending on your abilities/experience/if you are leasing,etc.

Page 6
Image 6
Nakamichi CD-45Z installation manual This information was obtained from this Usenet Post

CD-45Z specifications

The Nakamichi CD-45Z is a distinguished compact disc player that showcases the brand's commitment to audio excellence and innovation. Introduced in the late 1980s, this model is celebrated for its remarkable build quality, user-friendly features, and superior sound performance.

One of the main features of the CD-45Z is its exceptional digital-to-analog converter (DAC). Nakamichi has a long-standing reputation for producing high-fidelity audio equipment, and the CD-45Z continues this legacy with a quality DAC that ensures accurate signal reproduction and minimal distortion. This allows for the faithful playback of music, maintaining the integrity of the original recording.

The design of the CD-45Z is both functional and aesthetically pleasing. It features a robust chassis that minimizes vibrations, thus enhancing audio clarity. The front panel includes a clear and intuitive layout with function buttons that are easily accessible. The LCD display provides essential information, such as track numbers and elapsed time, ensuring a user-friendly experience.

In addition to its stellar sound performance, the Nakamichi CD-45Z boasts several advanced technologies. The model incorporates a high-precision transport mechanism that ensures smooth disc reading and reduces the chances of skipping or errors in playback. This is crucial for maintaining audio quality, especially during high-tempo music passages or complex compositions.

Another noteworthy feature is the CD-45Z’s compatibility with various disc formats. It supports not only standard audio CDs but also CD-R and CD-RW formats, allowing users to enjoy a wide array of music collections without limitations. This versatility is particularly appealing for those who enjoy creating custom playlists or sampling recorded CDs.

Moreover, the CD-45Z includes several playback options, such as programmed play and repeat functions, which enhance the listening experience. The model also features line outputs that can be connected to other audio devices, giving users the flexibility to integrate it into their existing sound systems.

Overall, the Nakamichi CD-45Z stands as a testament to the brand’s dedication to quality and innovation in the audio realm. Its blend of premium components, advanced technologies, and user-centric design continues to make it a cherished piece of equipment for audio enthusiasts and collectors alike. For those seeking pristine sound reproduction and reliability, the CD-45Z remains a formidable choice in the world of compact disc players.