START UP
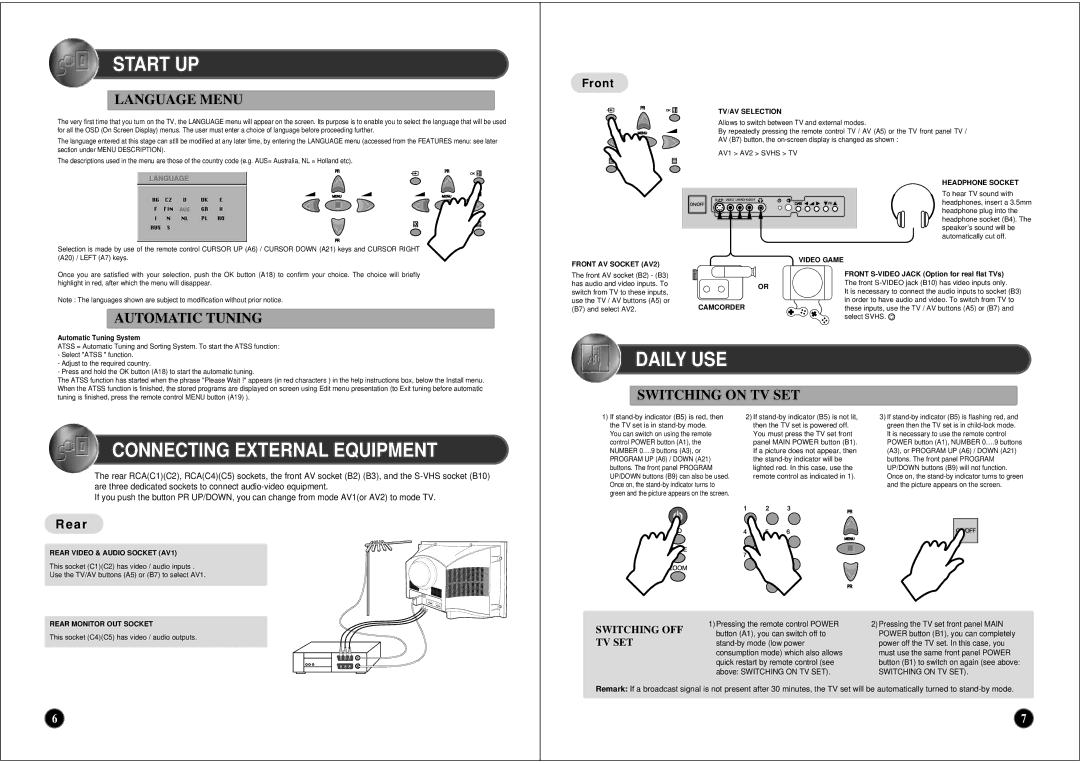
LANGUAGE MENU
The very first time that you turn on the TV, the LANGUAGE menu will appear on the screen. Its purpose is to enable you to select the language that will be used for all the OSD (On Screen Display) menus. The user must enter a choice of language before proceeding further.
The language entered at this stage can still be modified at any later time, by entering the LANGUAGE menu (accessed from the FEATURES menu: see later section under MENU DESCRIPTION).
The descriptions used in the menu are those of the country code (e.g. AUS= Australia, NL = Holland etc).
Front
TV/AV SELECTION
Allows to switch between TV and external modes.
By repeatedly pressing the remote control TV / AV (A5) or the TV front panel TV /
AV (B7) button, the
AV1 > AV2 > SVHS > TV
Selection is made by use of the remote control CURSOR UP (A6) / CURSOR DOWN (A21) keys and CURSOR RIGHT (A20) / LEFT (A7) keys.
Once you are satisfied with your selection, push the OK button (A18) to confirm your choice. The choice will briefly highlight in red, after which the menu will disappear.
Note : The languages shown are subject to modification without prior notice.
AUTOMATIC TUNING
Automatic Tuning System
FRONT AV SOCKET (AV2)
The front AV socket (B2) - (B3) has audio and video inputs. To switch from TV to these inputs, use the TV / AV buttons (A5) or (B7) and select AV2.
OR
CAMCORDER
HEADPHONE SOCKET
To hear TV sound with headphones, insert a 3.5mm headphone plug into the headphone socket (B4). The speaker’s sound will be automatically cut off.
VIDEO GAME
FRONT
It is necessary to connect the audio inputs to socket (B3) in order to have audio and video. To switch from TV to these inputs, use the TV / AV buttons (A5) or (B7) and select SVHS. ![]()
ATSS = Automatic Tuning and Sorting System. To start the ATSS function:
-Select "ATSS " function.
-Adjust to the required country.
-Press and hold the OK button (A18) to start the automatic tuning.
The ATSS function has started when the phrase "Please Wait !" appears (in red characters ) in the help instructions box, below the Install menu. When the ATSS function is finished, the stored programs are displayed on screen using Edit menu presentation (to Exit tuning before automatic tuning is finished, press the remote control MENU button (A19) ).
 DAILY USE
SWITCHING ON TV SET
 CONNECTING EXTERNAL EQUIPMENT
The rear RCA(C1)(C2), RCA(C4)(C5) sockets, the front AV socket (B2) (B3), and the
If you push the button PR UP/DOWN, you can change from mode AV1(or AV2) to mode TV.
Rear
REAR VIDEO & AUDIO SOCKET (AV1)
This socket (C1)(C2) has video / audio inputs .
Use the TV/AV buttons (A5) or (B7) to select AV1.
1)If
You can switch on using the remote control POWER button (A1), the NUMBER 0….9 buttons (A3), or PROGRAM UP (A6) / DOWN (A21) buttons. The front panel PROGRAM UP/DOWN buttons (B9) can also be used. Once on, the
2)If
3)If
REAR MONITOR OUT SOCKET
This socket (C4)(C5) has video / audio outputs.
6
SWITCHING OFF | 1)Pressing the remote control POWER | 2)Pressing the TV set front panel MAIN | |
button (A1), you can switch off to | POWER button (B1), you can completely | ||
TV SET | |||
power off the TV set. In this case, you | |||
| consumption mode) which also allows | must use the same front panel POWER | |
| quick restart by remote control (see | button (B1) to switch on again (see above: | |
| above: SWITCHING ON TV SET). | SWITCHING ON TV SET). |
Remark: If a broadcast signal is not present after 30 minutes, the TV set will be automatically turned to
7