 REMOTE CONTROL & TV CONNECTIONS
LOCAL CONTROL
Front
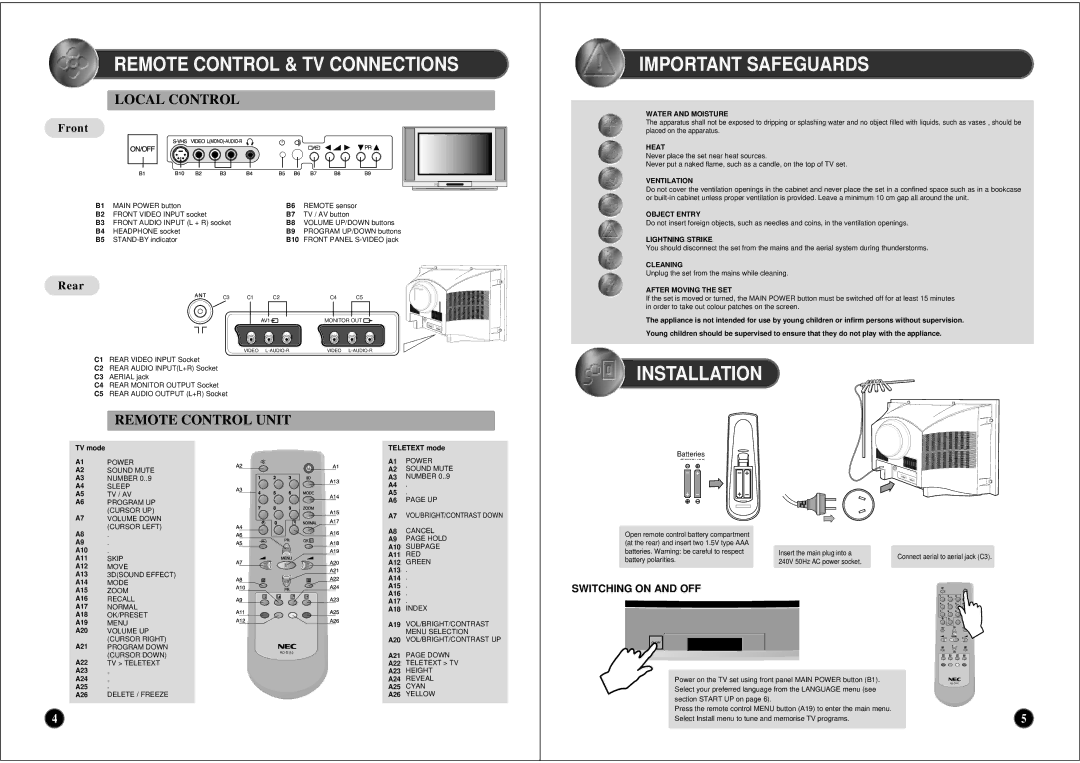
B1 | MAIN POWER button | B6 | REMOTE sensor |
B2 | FRONT VIDEO INPUT socket | B7 | TV / AV button |
B3 | FRONT AUDIO INPUT (L + R) socket | B8 | VOLUME UP/DOWN buttons |
B4 | HEADPHONE socket | B9 | PROGRAM UP/DOWN buttons |
B5 | B10 | FRONT PANEL |
 IMPORTANT SAFEGUARDS
WATER AND MOISTURE
The apparatus shall not be exposed to dripping or splashing water and no object filled with liquids, such as vases , should be placed on the apparatus.
HEAT
Never place the set near heat sources.
Never put a naked flame, such as a candle, on the top of TV set.
VENTILATION
Do not cover the ventilation openings in the cabinet and never place the set in a confined space such as in a bookcase or
OBJECT ENTRY
Do not insert foreign objects, such as needles and coins, in the ventilation openings.
LIGHTNING STRIKE
You should disconnect the set from the mains and the aerial system during thunderstorms.
CLEANING
Unplug the set from the mains while cleaning.
Rear
C3 | C1 | C2 | C4 | C5 |
|
| AV1 | MONITOR OUT | |
| VIDEO | VIDEO | ||
C1 REAR VIDEO INPUT Socket
C2 REAR AUDIO INPUT(L+R) Socket
C3 AERIAL jack
C4 REAR MONITOR OUTPUT Socket
C5 REAR AUDIO OUTPUT (L+R) Socket
REMOTE CONTROL UNIT
TV mode |
|
|
A1 | POWER |
|
A2 | SOUND MUTE |
|
A3 | NUMBER 0..9 |
|
A4 | SLEEP |
|
A5 | TV / AV |
|
A6 | PROGRAM UP |
|
A7 | (CURSOR UP) |
|
VOLUME DOWN |
| |
A8 | (CURSOR LEFT) |
|
. |
| |
A9 | . |
|
A10 | . |
|
A11 | SKIP |
|
A12 | MOVE |
|
A13 | 3D(SOUND EFFECT) |
|
A14 | MODE |
|
A15 | ZOOM |
|
A16 | RECALL |
|
A17 | NORMAL |
|
A18 | OK/PRESET |
|
A19 | MENU |
|
A20 | VOLUME UP |
|
A21 | (CURSOR RIGHT) |
|
PROGRAM DOWN | ||
| (CURSOR DOWN) | |
A22 |
| |
TV > TELETEXT |
| |
A23 | . |
|
A24 | . |
|
A25 | . |
|
A26 | DELETE / FREEZE |
|
4
TELETEXT mode
A1 | POWER |
A2 | SOUND MUTE |
A3 | NUMBER 0..9 |
A4 . | |
A5 . | |
A6 | PAGE UP |
A7 | VOL/BRIGHT/CONTRAST DOWN |
A8 | CANCEL |
A9 | PAGE HOLD |
A10 | SUBPAGE |
A11 | RED |
A12 | GREEN |
A13 . | |
A14 . | |
A15 .
A16 .
A17 .
A18 | INDEX |
A19 | VOL/BRIGHT/CONTRAST |
| MENU SELECTION |
A20 | VOL/BRIGHT/CONTRAST UP |
A21 | PAGE DOWN |
A22 | TELETEXT > TV |
A23 | HEIGHT |
A24 | REVEAL |
A25 | CYAN |
A26 | YELLOW |
AFTER MOVING THE SET
If the set is moved or turned, the MAIN POWER button must be switched off for at least 15 minutes in order to take out colour patches on the screen.
The appliance is not intended for use by young children or infirm persons without supervision.
Young children should be supervised to ensure that they do not play with the appliance.
 INSTALLATION
Batteries
Open remote control battery compartment |
|
| |
(at the rear) and insert two 1.5V type AAA |
|
| |
batteries. Warning: be careful to respect | Insert the main plug into a | Connect aerial to aerial jack (C3). | |
battery polarities. | 240V 50Hz AC power socket. | ||
|
SWITCHING ON AND OFF
Power on the TV set using front panel MAIN POWER button (B1). | |
Select your preferred language from the LANGUAGE menu (see |
|
section START UP on page 6). |
|
Press the remote control MENU button (A19) to enter the main menu. | 5 |
Select Install menu to tune and memorise TV programs. |
