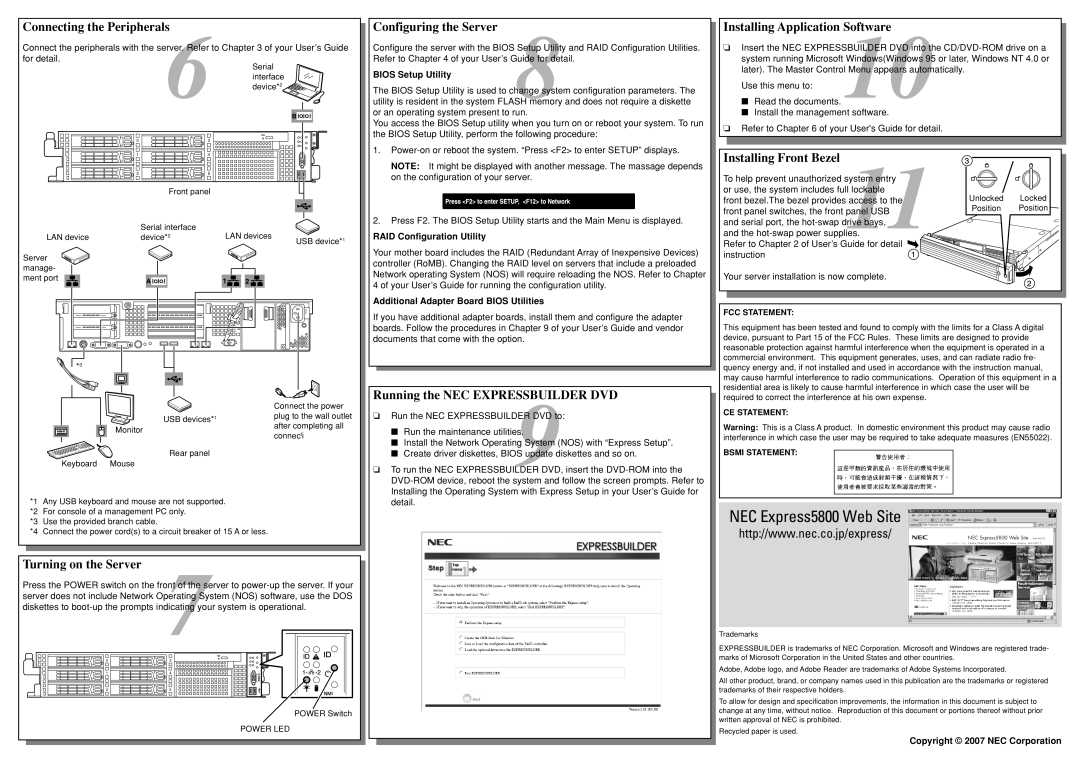
Connecting the Peripherals
Connect the peripherals with the server6. Refer to Chapter 3 of your User’s Guide for detail.
Configuring the Server
Configure the server with the BIOS 8Setup Utility and RAID Configuration Utilities. Refer to Chapter 4 of your User’s Guide for detail.
The BIOS Setup Utility is used to change system configuration parameters. The utility is resident in the system FLASH memory and does not require a diskette or an operating system present to run.
You access the BIOS Setup utility when you turn on or reboot your system. To run the BIOS Setup Utility, perform the following procedure:
Installing Application Software
❏Insert the NEC EXPRESSBUILDER10DVD into the
Use this menu to:
■Read the documents.
■Install the management software.
❏Refer to Chapter 6 of your User's Guide for detail.
| 0 |
| 3 |
| 1 |
| 4 |
| 2 |
| 5 |
|
| Front panel | |
| Serial interface | LAN devices | |
LAN device | device* | 2 | |
| USB device*1 | ||
Server manage- ment port
1.
NOTE: It might be displayed with another message. The massage depends on the configuration of your server.
2.Press F2. The BIOS Setup Utility starts and the Main Menu is displayed.
RAID Configuration Utility
Your mother board includes the RAID (Redundant Array of Inexpensive Devices) controller (RoMB). Changing the RAID level on servers that include a preloaded Network operating System (NOS) will require reloading the NOS. Refer to Chapter 4 of your User’s Guide for running the configuration utility.
Additional Adapter Board BIOS Utilities
Installing Front Bezel
To help prevent unauthorized system11entry or use, the system includes full lockable front bezel.The bezel provides access to the front panel switches, the front panel USB and serial port, the
Refer to Chapter 2 of User’s Guide for detail ![]() instruction
instruction![]()
Your server installation is now complete.
Unlocked Locked
Position Position
![]() *3
*3
| Connect the power | |
USB devices*1 | plug to the wall outlet | |
Monitor | after completing all | |
connecti | ||
|
Rear panel
Keyboard Mouse
*1 Any USB keyboard and mouse are not supported.
*2 For console of a management PC only.
*3 Use the provided branch cable.
*4 Connect the power cord(s) to a circuit breaker of 15 A or less.
Turning on the Server
Press the POWER switch on the front7of the server to
0 | 3 |
1 | 4 |
2 | 5 |
POWER Switch
POWER LED
If you have additional adapter boards, install them and configure the adapter boards. Follow the procedures in Chapter 9 of your User’s Guide and vendor documents that come with the option.
Running the NEC EXPRESSBUILDER DVD
❏Run the NEC EXPRESSBUILDER9DVD to:
■Run the maintenance utilities.
■Install the Network Operating System (NOS) with “Express Setup”.
■Create driver diskettes, BIOS update diskettes and so on.
❏To run the NEC EXPRESSBUILDER DVD, insert the
FCC STATEMENT:
This equipment has been tested and found to comply with the limits for a Class A digital device, pursuant to Part 15 of the FCC Rules. These limits are designed to provide reasonable protection against harmful interference when the equipment is operated in a commercial environment. This equipment generates, uses, and can radiate radio fre- quency energy and, if not installed and used in accordance with the instruction manual, may cause harmful interference to radio communications. Operation of this equipment in a residential area is likely to cause harmful interference in which case the user will be required to correct the interference at his own expense.
CE STATEMENT:
Warning: This is a Class A product. In domestic environment this product may cause radio interference in which case the user may be required to take adequate measures (EN55022).
BSMI STATEMENT:
NEC Express5800 Web Site
http://www.nec.co.jp/express/
Trademarks
EXPRESSBUILDER is trademarks of NEC Corporation. Microsoft and Windows are registered trade- marks of Microsoft Corporation in the United States and other countries.
Adobe, Adobe logo, and Adobe Reader are trademarks of Adobe Systems Incorporated.
All other product, brand, or company names used in this publication are the trademarks or registered trademarks of their respective holders.
To allow for design and specification improvements, the information in this document is subject to change at any time, without notice. Reproduction of this document or portions thereof without prior written approval of NEC is prohibited.
Recycled paper is used.
Copyright © 2007 NEC Corporation