WN604 IG 26July11.fm Page 1 Tuesday, July 26, 2011 6:00 PM
Installation Guide
NETGEAR® Wireless N150 Access Point WN604
Follow these instructions to set up your WN604 access point. You can also click the documentation links on the Resource CD or the NETGEAR knowledge base at
http://kbserver.netgear.com. Refer to the Resource CD or click the Documentation
link on the user interface to access the Installation Guide for instructions on advanced configuration options.
Estimated completion time: 20 minutes.
Tip: Before mounting the access point in a high location, first set up and test the unit to verify wireless network connectivity.
Package Contents
The NETGEAR® Wireless N150 Access Point WN604 contains the following:
•Wireless access point
•Ethernet cable
•Power adapter
•Vertical stand feet (2)
•Installation Guide
•Resource CD
Set Up the Access Point
1.Connect the access point to your computer:
a.Unpack the box and verify the contents.
b.Prepare a computer with Internet access and an Ethernet adapter. If this computer is already part of your network, record its TCP/IP configuration settings. Configure the computer with a static IP address of 192.168.0.210 and subnet mask of 255.255.255.0. See the Reference Manual for more detailed instructions.
c.Connect the Ethernet cable from the access point to the PC.
d.Securely insert the other end of the
cable into the access point Ethernet port.
e.Connect the power adapter from the access point to an AC power outlet.
Note: Connect your access point using only the power adapter provided with the access point.
|
|
|
|
|
|
|
|
|
|
|
|
|
|
|
|
|
|
|
|
|
|
|
|
|
|
|
|
|
|
|
|
|
|
|
|
|
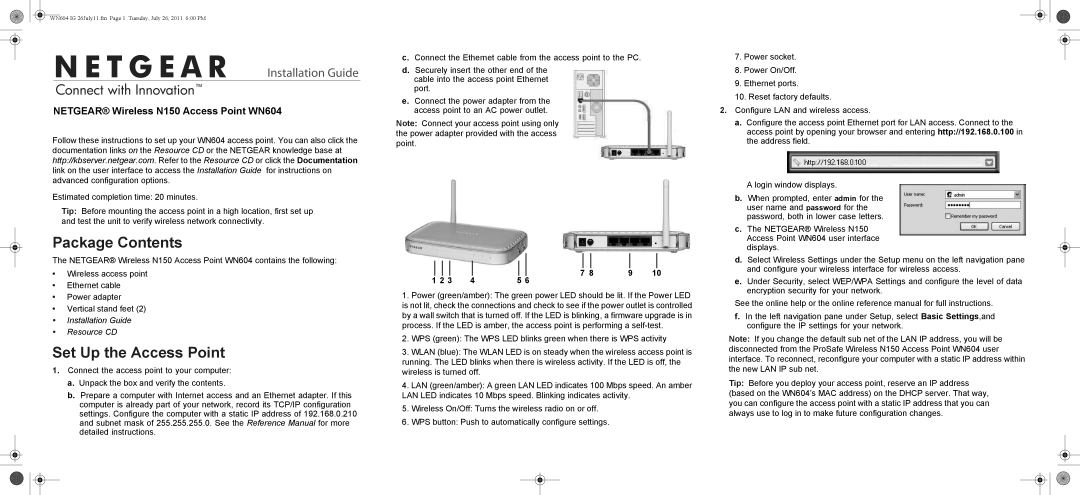
| 7 8 | 9 | 10 | ||||
1 2 3 | 4 | 5 | 6 |
|
|
|
|
|
| |||||
1.Power (green/amber): The green power LED should be lit. If the Power LED is not lit, check the connections and check to see if the power outlet is controlled by a wall switch that is turned off. If the LED is blinking, a firmware upgrade is in process. If the LED is amber, the access point is performing a
2.WPS (green): The WPS LED blinks green when there is WPS activity
3.WLAN (blue): The WLAN LED is on steady when the wireless access point is running. The LED blinks when there is wireless activity. If the LED is off, the wireless is turned off.
4.LAN (green/amber): A green LAN LED indicates 100 Mbps speed. An amber LAN LED indicates 10 Mbps speed. Blinking indicates activity.
5.Wireless On/Off: Turns the wireless radio on or off.
6.WPS button: Push to automatically configure settings.
7.Power socket.
8.Power On/Off.
9.Ethernet ports.
10.Reset factory defaults.
2.Configure LAN and wireless access.
a. Configure the access point Ethernet port for LAN access. Connect to the access point by opening your browser and entering http://192.168.0.100 in the address field.
A login window displays.
b.When prompted, enter admin for the user name and password for the password, both in lower case letters.
c.The NETGEAR® Wireless N150 Access Point WN604 user interface displays.
d.Select Wireless Settings under the Setup menu on the left navigation pane and configure your wireless interface for wireless access.
e.Under Security, select WEP/WPA Settings and configure the level of data encryption security for your network.
See the online help or the online reference manual for full instructions.
f.In the left navigation pane under Setup, select Basic Settings,and configure the IP settings for your network.
Note: If you change the default sub net of the LAN IP address, you will be disconnected from the ProSafe Wireless N150 Access Point WN604 user interface. To reconnect, reconfigure your computer with a static IP address within the new LAN IP sub net.
Tip: Before you deploy your access point, reserve an IP address (based on the WN604’s MAC address) on the DHCP server. That way, you can configure the access point with a static IP address that you can always use to log in to make future configuration changes.