Abbreviated Users Guide
Thank you for purchasing a Neuros OSD, the device that lets you digitally store and easily access your DVD’s, VHS tapes, home movies, and TV shows.
Part 1 - Overview
Purpose of this Abbreviated User’s Guide
This Abbreviated User’s Guide is provided to: (i) give you a brief overview of the OSD and its capabilities; (ii) show you how to connect your OSD; and (iii) teach you a few basics of how the
Free Firmware Upgrades
Your Neuros OSD already does everything it was advertised to do – and more – but we’re not stopping there. With the help of our rapidly growing worldwide community of users and open source developers, we will continually update the OSD with exciting new features and applications. We make these new capabilities available to you via regular “firmware” upgrades (Note: firmware is just a fancy name for the software that is loaded onto the OSD). These upgrades are free and can be done in minutes by users of any level (see Part 6
– Upgrading the OSD Firmware).
User’s Manual
The OSD, itself, should guide you through what you’ll want to do. However, a more detailed User’s Manual with FAQ’s is available at: http://www.neurostechnology.com/support
The User’s Manual is updated with each new firmware version, so be sure to use the User’s Manual corresponding to your firmware version. If for some reason you choose not to keep your firmware upgraded to the latest version, archived copies of older firmware versions are available as well.
Main Functions
Video Recorder - Record video in standard
Video Player - Play recorded, downloaded, and streamed video (including YouTube) on your TV from USB storage devices, memory cards, computer/home network, and the Internet.
Music/Audio Player - Play music, podcasts, and other audio files directly on your stereo from your from memory cards, USB devices (MP3 players, external hard drives, etc), computer/home network, and the Internet.
Photo/Image Viewer - View photos and other images on your TV from USB devices (external hard drives, digital cameras, etc), memory cards, computer/home network, and the Internet (Note: Internet photo viewing may require a firmware upgrade).
Audio Recorder - Record audio in standard MP3 and AAC formats from any audio source to any major memory card (SD, MMC, Memory Stick; CF, microdrive), virtually any USB storage device (iPod™, external hard drives, PSP™, etc), or directly to your computer/home network (Note: may require firmware upgrade).
Charging/Docking Station - The OSD will charge most USB devices that are plugged into it, so you can use it as a docking station for your iPod™ and other portables even while recording to or playing back from them.
Sharing - The OSD has features to make it easy for you to share
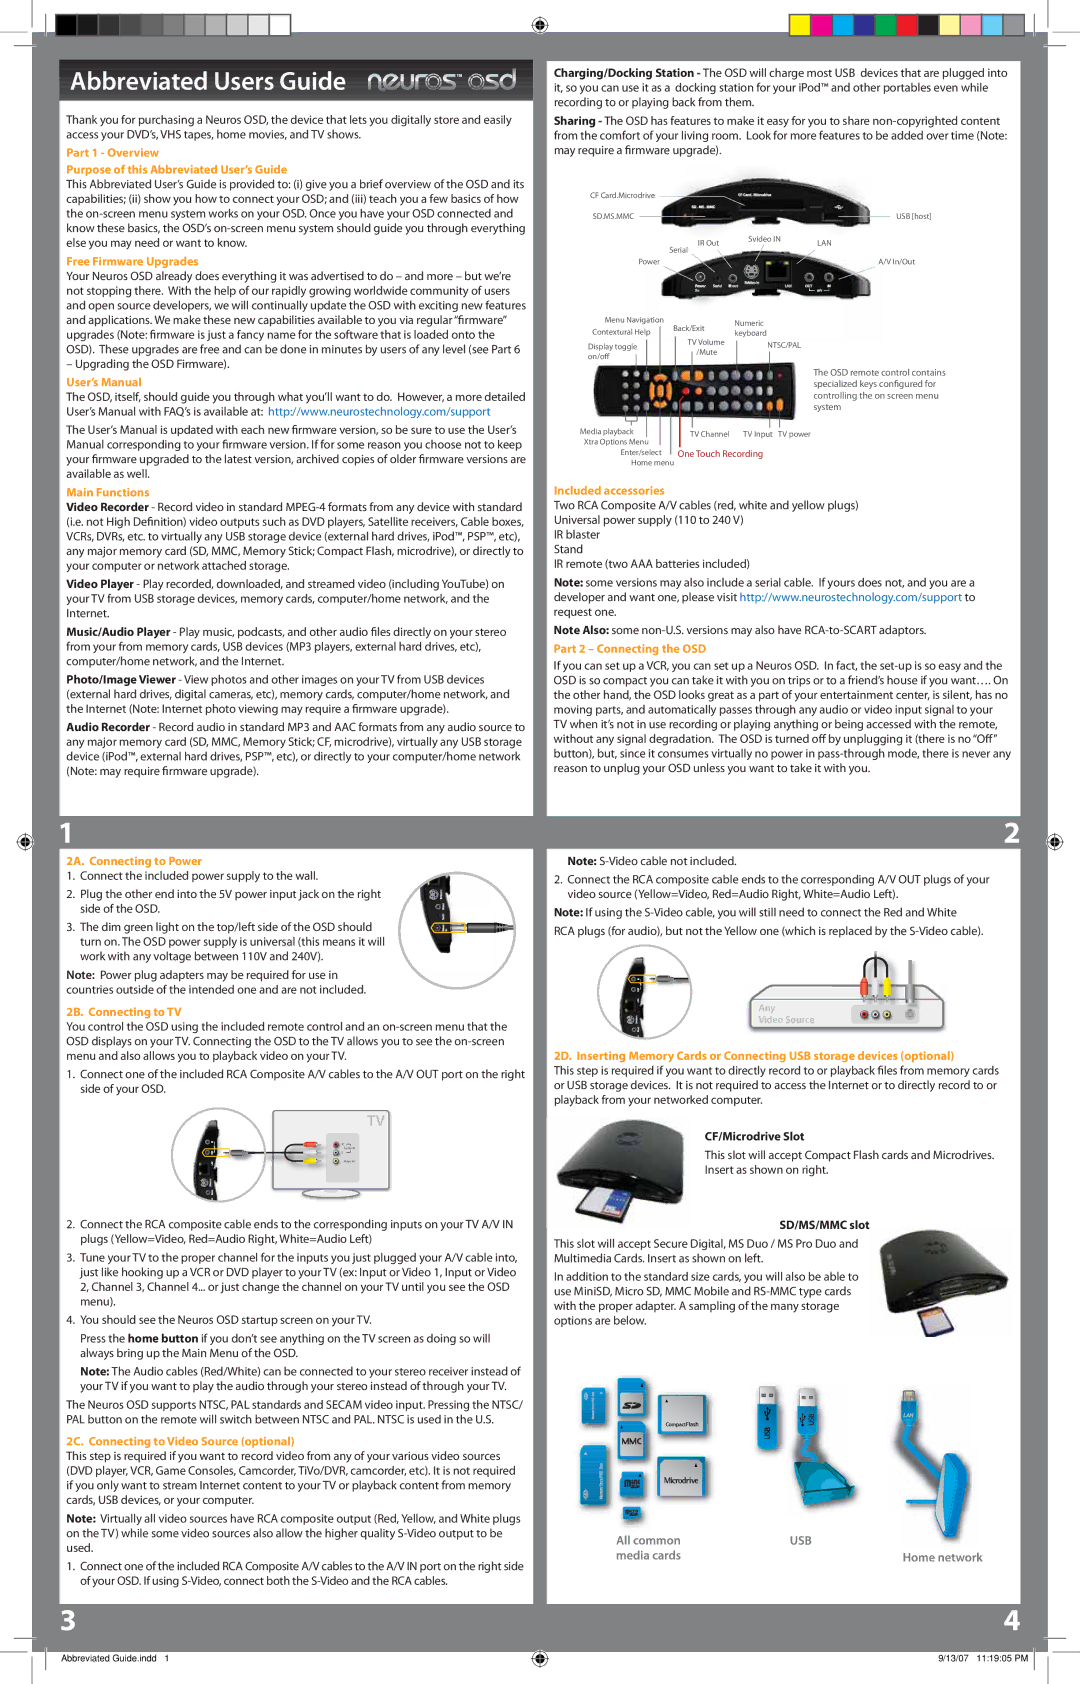
CF Card.Microdrive
SD.MS.MMC |
|
|
| USB [host] |
|
|
IR Out | Svideo IN | LAN |
Serial |
|
|
Power |
|
|
|
|
| A/V In/Out | |
Menu Navigation |
|
|
|
|
|
| |
|
|
|
|
|
| ||
|
|
| Numeric | ||||
Back/Exit | |||||||
Contextural Help | |||||||
keyboard | |||||||
TV Volume | |||||||
Display toggle |
|
| NTSC/PAL | ||||
| /Mute |
|
| ||||
on/off |
|
|
|
| |||
|
|
|
|
|
| ||
The OSD remote control contains specialized keys configured for controlling the on screen menu system
Media playback | TV Channel | TV Input TV power | |
Xtra Options Menu | |||
|
|
Enter/select | One Touch Recording |
Home menu |
|
Included accessories
Two RCA Composite A/V cables (red, white and yellow plugs)
Universal power supply (110 to 240 V)
IR blaster
Stand
IR remote (two AAA batteries included)
Note: some versions may also include a serial cable. If yours does not, and you are a developer and want one, please visit http://www.neurostechnology.com/support to request one.
Note Also: some
Part 2 – Connecting the OSD
If you can set up a VCR, you can set up a Neuros OSD. In fact, the
the other hand, the OSD looks great as a part of your entertainment center, is silent, has no moving parts, and automatically passes through any audio or video input signal to your TV when it’s not in use recording or playing anything or being accessed with the remote, without any signal degradation. The OSD is turned off by unplugging it (there is no “Off” button), but, since it consumes virtually no power in
1
2A. Connecting to Power
1. Connect the included power supply to the wall.
2. Plug the other end into the 5V power input jack on the right side of the OSD.
3. The dim green light on the top/left side of the OSD should turn on. The OSD power supply is universal (this means it will work with any voltage between 110V and 240V).
Note: Power plug adapters may be required for use in countries outside of the intended one and are not included.
2B. Connecting to TV
You control the OSD using the included remote control and an
1.Connect one of the included RCA Composite A/V cables to the A/V OUT port on the right side of your OSD.
TV
![]() R
R
Audio IN
L
Video IN
2.Connect the RCA composite cable ends to the corresponding inputs on your TV A/V IN plugs (Yellow=Video, Red=Audio Right, White=Audio Left)
3.Tune your TV to the proper channel for the inputs you just plugged your A/V cable into, just like hooking up a VCR or DVD player to your TV (ex: Input or Video 1, Input or Video 2, Channel 3, Channel 4... or just change the channel on your TV until you see the OSD menu).
4.You should see the Neuros OSD startup screen on your TV.
Press the home button if you don’t see anything on the TV screen as doing so will always bring up the Main Menu of the OSD.
Note: The Audio cables (Red/White) can be connected to your stereo receiver instead of your TV if you want to play the audio through your stereo instead of through your TV.
The Neuros OSD supports NTSC, PAL standards and SECAM video input. Pressing the NTSC/ PAL button on the remote will switch between NTSC and PAL. NTSC is used in the U.S.
2C. Connecting to Video Source (optional)
This step is required if you want to record video from any of your various video sources (DVD player, VCR, Game Consoles, Camcorder, TiVo/DVR, camcorder, etc). It is not required if you only want to stream Internet content to your TV or playback content from memory cards, USB devices, or your computer.
Note: Virtually all video sources have RCA composite output (Red, Yellow, and White plugs on the TV) while some video sources also allow the higher quality
1.Connect one of the included RCA Composite A/V cables to the A/V IN port on the right side of your OSD. If using
2
Note:
2.Connect the RCA composite cable ends to the corresponding A/V OUT plugs of your video source (Yellow=Video, Red=Audio Right, White=Audio Left).
Note: If using the
RCA plugs (for audio), but not the Yellow one (which is replaced by the
Any
Video Source
2D. Inserting Memory Cards or Connecting USB storage devices (optional)
This step is required if you want to directly record to or playback files from memory cards or USB storage devices. It is not required to access the Internet or to directly record to or playback from your networked computer.
CF/Microdrive Slot
This slot will accept Compact Flash cards and Microdrives.
Insert as shown on right.
SD/MS/MMC slot
This slot will accept Secure Digital, MS Duo / MS Pro Duo and
Multimedia Cards. Insert as shown on left.
In addition to the standard size cards, you will also be able to use MiniSD, Micro SD, MMC Mobile and
3
Abbreviated Guide.indd 1
4
9/13/07 11:19:05 PM