TIGER-4500 QUICK SET-UP GUIDE
Package Contents
|
| 4x Cameras with Stands and |
| 1x Quick | |
|
|
|
| 1x User Manual | |
1x 4 Channel MPEG4 DVR with 500GB HD | 1x Video Output Cable | Mounting Hardware | 1x |
| |
(BNC to RCA) | 1x USB to USB |
|
|
| |
|
|
|
| ||
|
| (PC Backup) |
|
|
|
1x DVR Power Adapter |
| 1x Camera Power Adapter |
|
| |
1x Remote Control |
|
|
| ||
| 1x |
|
|
| |
| (Ethernet) | (Batteries ncluded) |
| 1x Installation Card | 1x Driver CD |
|
| 4x 60 Feet of Camera Cable | |||
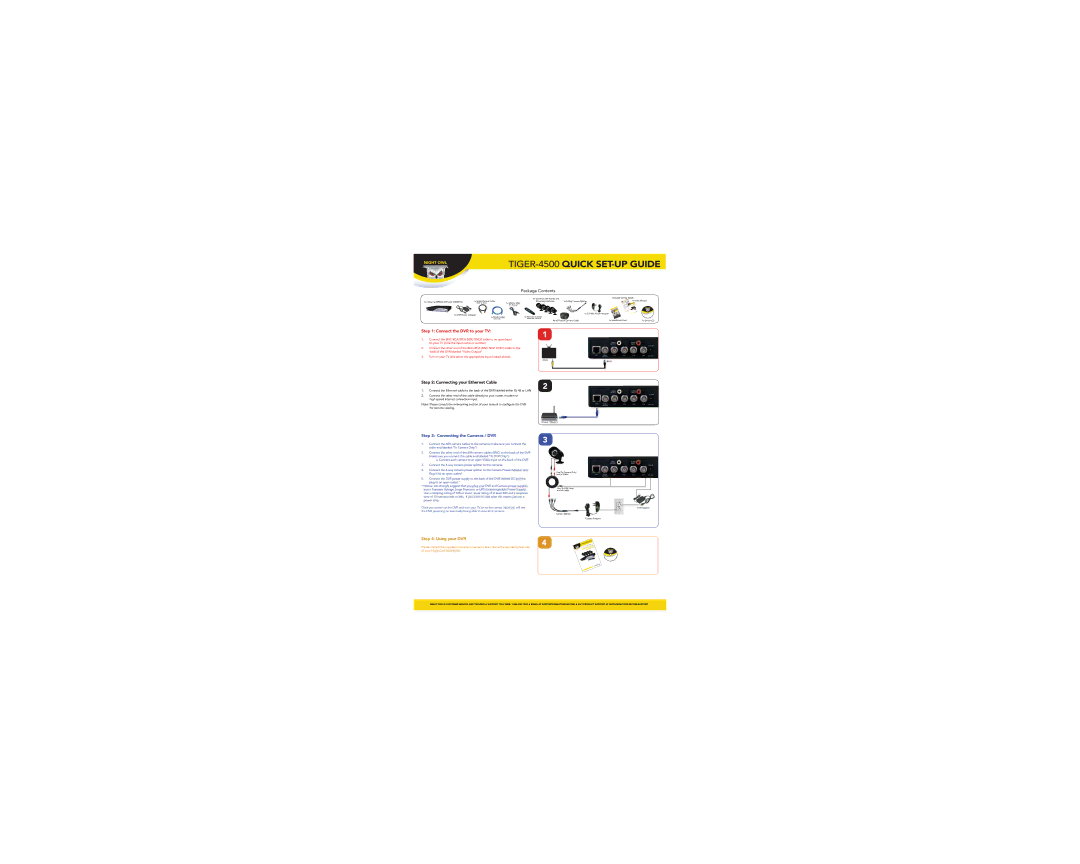
Step 1: Connect the DVR to your TV:
1.Connect the
2.Connect the other end of the
3.Turn on your TV and select the appropriate input (noted above)
1
(RCA) | (BNC) |
|
Step 2: Connecting your Ethernet Cable
1.Connect the Ethernet cable to the back of the DVR labeled either
2.Connect the other end of the cable directly to your router, modem or
high speed internet connection input.
Note: Please consult the networking section of your manual to configure the DVR for remote viewing.
2
(Router / Modem)
Step 3: Connecting the Cameras / DVR | 3 | ||
1. | Connect the 60ft camera cables to the cameras (make sure you connect the | ||
| |||
| cable end labeled “To Camera Only”) |
| |
2. | Connect the other end of the 60ft camera cables (BNC) to the back of the DVR |
| |
| (make sure you connect the cable end labeled “To DVR Only”) |
| |
| a. Connect each camera to an open Video Input on the back of the DVR |
| |
3. | Connect the |
| |
4. | Connect the |
| |
| Plug in to an open outlet* |
| |
5. | Connect the DVR power supply to the back of the DVR labeled DC and the |
| |
| plug to an open outlet.* |
| |
*Notice: We strongly suggest that you plug your DVR and Camera power supplies into a Transient Voltage Surge Protector or UPS (Uninterruptable Power Supply). Use a clamping rating of 330 or lower, Joule rating of at least 400 and a response time of 10 nanoseconds or less. If you have no idea what this means just use a power strip.
Once you power up the DVR and turn your TV on to the correct input you will see the DVR powering on eventually being able to view all 4 cameras.
Use (To Camera Only) end of Cable
Use (To DVR Only) end of Cable
DVR Adapter
Camera Splitter
Camera Adapter
Step 4: Using your DVR | 4 | |
Please consult the supplied instruction manual to learn about the wonderful features | ||
| ||
of your Night Owl Security Kit. |
|
|
|
| KIT |
|
|
| SECURITYCAMERAS |
|
| VIDEO | |
| MPEG4 | VISION | |
| 4NIGHT | ||
| 4CHANNELWITH |
| .com |
OWL |
|
| .NightOwlSP |
|
| www | |
NIGHT | INSTRUCTIONMANUAL | ||
# MODEL TIGER4500
NIGHT OWL ![]() CUSTOMER SERVICE AND TECHNICAL SUPPORT TOLL FREE: 1.866.390.1303
CUSTOMER SERVICE AND TECHNICAL SUPPORT TOLL FREE: 1.866.390.1303 ![]() EMAIL AT SUPPORT@NIGHTOWLSP.COM
EMAIL AT SUPPORT@NIGHTOWLSP.COM ![]() 24/7 PRODUCT SUPPORT AT WWW.NIGHTOWLSP.COM/SUPPORT
24/7 PRODUCT SUPPORT AT WWW.NIGHTOWLSP.COM/SUPPORT