AF-S Telekonverter TC-14E II/TC-17E II/TC-20E II
N | Jp | |
使用説明書 |
| |
En | ||
INSTRUCTION MANUAL |
| |
De | ||
GEBRAUCHSANWEISUNG |
| |
Fr | ||
MODE D'EMPLOI |
| |
Es | ||
MANUAL DE INSTURCCIONES |
| |
It | ||
MANUALE DI ISTRUZIONI |
| |
Ck | ||
| ||
|
| |
| Ch |
N
or in part (except for brief quotation in critical | NIKON CORPORATION | |||||||||||||||||||||||||||||
No reproduction in any form of this manual, in whole |
|
|
|
|
|
|
|
|
|
| ||||||||||||||||||||
articles or reviews), may be made without written | FUJI BLDG., | |||||||||||||||||||||||||||||
authorization from NIKON CORPORATION. | ||||||||||||||||||||||||||||||
|
|
|
|
|
|
|
|
|
| |||||||||||||||||||||
|
|
|
|
|
|
|
|
|
|
|
|
|
|
|
|
|
|
|
|
|
|
|
|
|
|
|
|
|
| |
|
|
|
|
|
|
|
|
|
|
|
|
|
|
|
|
|
|
|
| Printed in Japan KL5I01000501 (80) | ||||||||||
|
|
|
|
|
|
|
|
|
|
|
|
|
|
|
|
|
|
|
|
|
|
|
|
|
|
|
| |||
|
|
|
|
|
|
|
|
|
|
|
|
|
|
|
|
|
|
|
|
|
|
|
|
|
|
|
|
|
| |
|
|
|
|
|
|
|
|
|
|
|
|
|
|
|
|
|
|
|
|
|
|
|
|
|
|
|
|
|
| |
|
|
|
|
|
|
|
|
|
|
|
|
|
|
|
|
|
|
|
|
|
|
|
|
|
|
|
|
|
| |
|
|
|
|
|
|
|
|
|
|
|
|
|
|
|
|
|
|
|
|
|
|
|
|
|
|
|
|
|
| |
|
|
|
|
|
|
|
|
|
|
|
|
|
|
|
|
|
|
|
|
|
|
|
|
|
|
|
|
|
| |
|
|
|
|
|
|
|
|
| |
|
|
|
|
|
|
|
| ||
|
|
|
|
|
|
|
| ||
|
|
|
|
|
| ||||
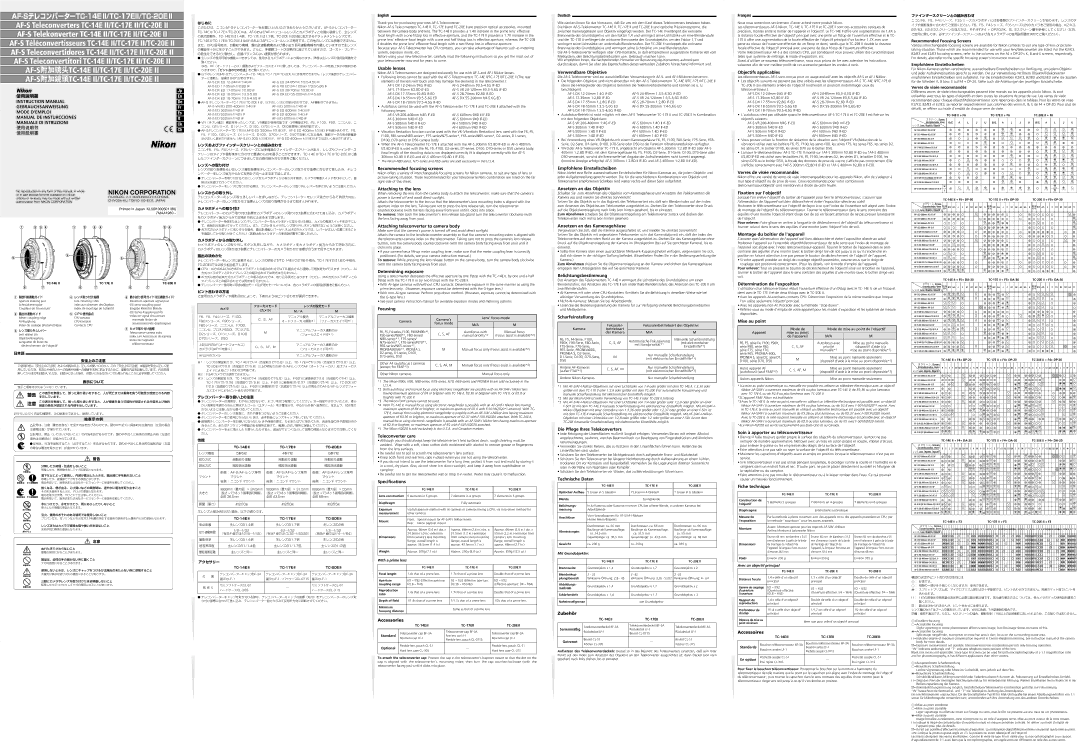
1 開放F値連動ガイド | 4 レンズ取り付け指標 | 6 最小絞り信号ガイド(EE連動ガイド) | |||||||
Aperture indexing post | Lens mounting index | Minimum aperture signal post | |||||||
Lichtstärkeneingabe | Index zum Ansetzen des Objektivs | (EE servo coupling post) | |||||||
Coupleur de l'ouverture' | Index de montage de l'objectif | Eingabe kleinster Blende | |||||||
2 露出計連動ガイド | 5 CPU信号接点 | ||||||||
Index de signal d'ouverture | |||||||||
Meter coupling ridge | CPU contacts | ||||||||
| minimale (Index de | ||||||||
| |||||||||
| servocommande diaphragme) | ||||||||
Index de coulage photométrique | Contacts CPU |
| |||||||
7 カメラ取り付け指標 | |||||||||
3 レンズ取り外しレバー |
|
|
|
| |||||
|
|
|
| ||||||
Lens release tab |
|
|
|
| |||||
|
|
|
| Index zum Ansetzen an die Kamera | |||||
Objektiventriegelung |
|
|
|
| |||||
|
|
|
| Index de l'appareil | |||||
Languette de levier de |
|
|
|
| |||||
|
|
|
|
| téléconvertisseur | ||||
déclenchement de l'objectif |
|
|
|
|
| ||||
|
|
|
|
|
|
| |||
日本語
安全上のご注意
ご使用の前に「安全上のご注意」をよくお読みの上、正しくお使いください。この「安全上のご注意」は製品を安全に正しく使 用していただき、あなたや他の人々への危害や財産への損害を未然に防止するために、重要な内容を記載しています。内容を理 解してから本文をお読みいただき、お読みになった後は、お使いになる方がいつでも見られるところに必ず保管してください。
表示について
表示と意味は次のようになっています。
この表示を無視して、誤った取り扱いをすると、人が死亡または重傷を負う可能性が想定される内容 警告 を示しています。
この表示を無視して、誤った取り扱いをすると、人が傷害を負う可能性が想定される内容および物的 注意 損害の発生が想定される内容を示しています。
お守りいただく内容の種類を、次の絵表示で区分し、説明しています。
絵表示の例
![]() 記号は、注意(警告を含む)を促す内容を告げるものです。図の中や近くに具体的な注意内容(左図の場合 は感電注意)が描かれています。
記号は、注意(警告を含む)を促す内容を告げるものです。図の中や近くに具体的な注意内容(左図の場合 は感電注意)が描かれています。
![]() 記号は、禁止(してはいけないこと)の行為を告げるものです。図の中や近くに具体的な禁止内容(左図の 場合は分解禁止)が描かれています。
記号は、禁止(してはいけないこと)の行為を告げるものです。図の中や近くに具体的な禁止内容(左図の 場合は分解禁止)が描かれています。
●記号は、行為を強制すること(必ずすること)を告げるものです。図の中や近くに具体的な強制内容(左図 の場合は電池を取り出す)が描かれています。
警告
分解したり修理・改造をしないこと
感電したり、異常動作をしてケガの原因となります。
分 解 禁 止
落下などによって破損し、内部が露出したときは、露出部に手を触れないこと
感電したり、破損部でケガをする原因となります。
接 触 禁 止 すぐに修理依頼を 電池を抜いて、販売店または当社サービスセンターに修理を依頼してください。
はじめに |
●主レンズの使用可能な機能につきましては、使用するカメラボディにより異なります。詳細は主レンズの使用説明書をご 覧ください。
なお、AF(オートフォーカス)撮影およびフォーカスエイドに関しましては、テレコンバーターの性格上多少の制約があ りますので、「ピント合わせの方法」をご覧ください。
●
|
●AF-S テレコンバーターTC-17EII/TC-20EII は、以下のレンズとの組み合わせでは、AF撮影はできません。
●VR(手ブレ補正)機能を持ったレンズは、VR機能が使用可能です(VR機能はF6、F5、F100、F80、ニコンU2、ニ コンU、D2シリーズ、D1シリーズ、D100、D70シリーズ、D50装着時に使用可能です)。
●
レンズおよびファインダースクリーンとの組み合わせ |
ニコンF6、F5、F4シリーズ、F3シリーズには多種類のファインダースクリーンがあり、レンズやファインダース
レンズへの取り付け |
レンズの絞り指標あるいはレンズ着脱指標をテレコンバーターのレンズ取り付け指標に合わせて差し込み、テレコ ンバーターをレンズ後方からみて反時計方向へ止まるまで回します。
●テレコンバーターを取り付けるためにレンズをカメラボディから取り外す際は、カメラの電源スイッチをOFFにして、直 射日光を避けて行ってください。
●テレコンバーターをレンズに取り付ける際は、テレコンバーターのレンズ取り外しレバーを押さないようご注意ください。
レンズからの取り外し |
テレコンバーターのレンズ取り外しレバーを押しながら、テレコンバーターをレンズ後方からみて時計方向に、 テレコンバーターのレンズ取り付け指標とレンズの絞り指標が合うまで回すと外れます。
カメラボディへの取り付け |
テレコンバーターのカメラ取り付け指標をカメラボディのレンズ取り付け指標に合わせて差し込み、カメラボディ をカメラボディ後方からみて反時計方向に止まるまで回します。
●テレコンバーター単体またはレンズ/テレコンバーターをカメラボディに取り付ける際は、カメラの電源スイッチをOFFにし て、直射日光を避けて行ってください。また、このときカメラのレンズ取り外しボタンを押さないようご注意ください。
●Ai方式のカメラボディに取り付ける場合、露出計連動レバーがハネ上げ式のカメラでは、レバーが正しい位置にあること を確認してから取り付けてください(詳細は各カメラボディの使用説明書をご覧ください)。
カメラボディからの取り外し
カメラボディのレンズ取り外しボタンを押しながら、カメラボディをカメラボディ後方からみて時計方向に、 カメラボディのレンズ取り付け指標とテレコンバーターのカメラ取り付け指標が合うまで回すと外れます。
露出の決めかた |
●CPU・Ai方式およびAi方式のカメラボディとの組み合わせではTTL露出方式と連動して開放測光が行えます(ただし、Ai
方式カメラボディとGタイプレンズとの組み合わせでは測光は行えません)。
● Ai方式以前の従来方式カメラボディとの組み合わせでは、絞り込み測光となります(ただし、非Ai方式カメラボディとG
タイプレンズとの組み合わせでは測光は行えません)。
● テレコンバーター使用時に可能な露出モード及び測光モードについては、各カメラボディの使用説明書をご覧ください。
ピント合わせの方法
ご使用のカメラボディや撮影目的によって、下表のようなピント合わせが選択できます。
カメラ |
| フォーカスモード | レンズの設定モード | |
| (カメラ) | M/A | M | |
|
| |||
F6、F5、F4シリーズ、F100、 |
| C、S、AF | マニュアル優先 | マニュアルフォーカス撮影 |
F90Xシリーズ、F90シリーズ、 |
| オートフォーカス撮影※1 | (フォーカスエイド可※1) | |
|
| |||
F80シリーズ、ニコンU2、F70D、 |
|
|
|
|
ニコンU、プロネア600i、プロネアS、 |
| M | マニュアルフォーカス撮影のみ | |
D2シリーズ、D1シリーズ、D100 |
| (フォーカスエイド可※1) | ||
|
| |||
D70シリーズ、D50 |
|
|
|
|
|
|
|
| |
上記以外のAF[オートフォーカス] |
| C、S、AF、M | マニュアルフォーカス撮影のみ | |
カメラ(F3AF※2を除く) |
| (フォーカスエイド可※3) | ||
|
| |||
AF以外のカメラ |
|
| マニュアルフォーカス撮影のみ | |
|
|
|
|
|
※1:
※2: F3AFカメラでは使用できません。
※3:
テレコンバーター取り扱い上の注意 |
● テレコンバーターの清掃は、むやみに拭かないで、ホコリを拭う程度にしてください。万一指紋や汗がついたとき、柔ら かい清潔な木綿のふきんに無水アルコール(エタノール)を少量湿らせ、中心から外側へ渦巻状に、拭きムラ、拭き残り のないように注意しながら軽く拭いてください。
●テレコンバーターのレンズ表面に、汚れや傷をつけないようご注意ください。
●テレコンバーターをご使用にならないときは、必ず前後にレンズキャップをしておいてください。
●長期間テレコンバーターをお使いにならないときや保管の際は、カビまたはサビを防ぐため、高温多湿の所や直射日光の 当るところ、またはナフタリンや樟脳のある場所は避けて、風通しのよい場所に保管してください。
●テレコンバーターを水に落としたり濡らしたりすると、部品がサビつくなどして故障の原因となりますので注意してくだ さい。
性能 |
| |||
レンズ構成 | 5群5枚 | 4群7枚 | 6群7枚 |
|
|
|
|
絞り方式 | 自動絞り連動 | 自動絞り連動 | 自動絞り連動 |
|
|
|
|
測光方式 | 開放測光連動 | 開放測光連動 | 開放測光連動 |
|
|
|
|
| 前側: | 前側: | 前側: |
マウント | マウント | マウント | マウント |
| 後側: ニコンFマウント | 後側: ニコンFマウント | 後側: ニコンFマウント |
English
Thank you for purchasing your new AF-S Teleconverter.
Nikon
Because your
Before using your new teleconverter, carefully read the following instructions so you get the most out of your teleconverter now and for years to come.
Usable lenses
Nikon
• Following lenses cannot be used with the
| ||
| ||
ED | ||
|
| |
•Autofocus cannot be used with the
•Vibration Reduction function can be used with the VR (Vibratioin Reduction) lens used with the F6, F5, F100,
•When the
* The Nikon
Recommended focusing screens
Nikon offers a variety of interchangeable focusing screens for Nikon cameras, to suit any type of lens or
Attaching to the lens
When removing the lens from the camera body to attach the teleconverter, make sure that the camera's power is turned off and avoid direct sunlight.
Attach the teleconverter to the lens so that the teleconverter's lens mounting index is aligned with the aperture index on the lens. Taking care not to press the lens release tab, turn the teleconverter counterclockwise (with the lens facing away from you) until it clicks into place.
To remove: Slide back the teleconverter's lens release tab gzand turn the teleconverter clockwise (with the lens facing away from you).
Attaching teleconverter to camera body
Make sure that the camera's power is turned off and avoid direct sunlight.
Attach the camera to the lens/teleconverter assembly so that the camera's mounting index is aligned with the
•If your camera has a
To remove: While pressing the lens release button on the camera body, turn the camera body clockwise (with the camera body facing away from you).
Determining exposure
Using a teleconverter decreases the effective aperture by one f/stop with the
•With
•With
•See your camera instruction manual for available exposure modes and metering systems.
Focusing
Camera | Camera’s | Lens’ focus mode | ||
|
| |||
focus mode | M/A | M | ||
| ||||
|
| |||
F6, F5, | C, S, AF | Autofocus with | Manual focus | |
manual priority*2 | (Focus assist is available*2) | |||
|
|
| ||
|
|
| ||
|
|
| ||
|
|
| ||
PRONEA600i/6i*1, PRONEA S, | M | Manual focus only (Focus assist is available*2) | ||
|
|
| ||
|
|
| ||
|
|
|
| |
Other AF (autofocus ) cameras | C, S, AF, M | Manual focus only (Focus assist is available*4) | ||
(except for F3AF*3) | ||||
|
|
| ||
Other Nikon cameras |
| Manual focus only | ||
|
|
|
| |
*1 The Nikon N90s, N90,
*2 Both autofocus and manual focus using electronic rangefinder are possible with an
*3 The Nikon F3AF camera cannot be used.
*4 With
*5 The Nikon N2020 is sold exclusively in the U.S.A. and Canadian markets.
Teleconverter care
•Although you should always keep the teleconverter's lens surfaces clean, rough cleaning must be avoided. Wipe with a soft, clean cotton cloth moistened with alcohol to remove grease or fingerprints from the lens surfaces.
•Be careful not to soil or scratch the teleconverter's lens surface.
•Keep both front and rear lens caps in place when you are not using the teleconverter.
•If you do not intend to use the teleconverter for a long time, protect it from rust and mold by storing it in a cool, dry place. Also, do not store it in direct sunlight, and keep it away from naphthalene or camphor.
•Be careful not to get the teleconverter wet or drop it in water. Water may cause it to malfunction.
Specifications
Deutsch
Wie danken Ihnen für das Vertrauen, daß Sie uns mit dem Kauf dieses Telekonverters bewiesen haben. Die Nikon
Die
Meßsystem, den Belichtungsbetriebsarten usw. Gebrauch machen kann.
Wir empfehlen Ihnen, die nachstehenden Hinweise vor Benutzung des Konverters aufmerksam durchzulesen, damit Sie über alle Eigenschaften dieses wertvollen Zubehörs hinreichend informiert sind.
Verwendbare Objektive
Die
• Die folgenden Objektive sind nicht einsetzbar mit den
beschädigen): |
|
|
•
•Bei Verwendung eines
•Wird der
Empfohlene Einstellscheiben
Nikon bietet eine Reihe auswechselbarer Einstellscheiben für
Ansetzen an das Objektiv
Schalten Sie zum Abnehmen des Objektivs vom Kameragehäuse und Ansetzen des Telekonverters die Kamera aus und meiden Sie direktes Sonnenlicht.
Setzen Sie das Objektiv so in das Bajonett des Telekonverters ein, daß sein Blendenindex auf den Index zum Ansetzen des Objektivs am Telekonveter ausgerichtet ist. Drehen Sie den Telekonverter ohne Druck auf die Objektiventriegelung nach links (von hinten gesehen), bis er einrastet.
Zum Abnehmen schieben Sie die Objektiventriegelung am Telekonverter zurück und drehen den Telekonverter nach rechts (von hinten gesehen).
Ansetzen an das Kameragehäuse
Vergewissern Sie sich, daß die Kamera ausgeschaltet ist, und meiden Sie direktes Sonnenlicht.
Setzen Sie das Objektiv mit angesetztem Telekonverter so in das Kamerabajonett ein, daß der Index des Telekonverters auf den roten Punkt an der Kamera ausgerichtet ist. Drehen Sie das Kameragehäuse ohne Druck auf die Objektiventriegelung der Kamera im Uhrzeigersinn (bei auf Sie gerichteter Kamera), bis es einrastet.
•Sollte Ihre Kamera über einen ausrückbaren
Zum Abnehmen drücken Sie die Objektiventriegelung an der Kamera und drehen das Kameragehäuse entgegen dem Uhrzeigersinn (bei auf Sie gerichteter Kamera).
Belichtungsbestimmung
Das Ansetzen des Telekonverters
•
•
•Lesen Sie die Bedienungsanleitung der Kamera für zur Verfügung stehende Belichtungsbetriebsarten und Meßsysteme.
Scharfeinstellung
| Fokussier- | Fokussierbetriebsart des Objektivs | ||
Kamera | betriebsart |
|
| |
| der Kamera | M/A | M | |
F6, F5, |
| Automatische Fokussierung | Manuelle Scharfeinstellung | |
F90X, | C, S, AF | (mit elektronischer | ||
mit Handpriorität*1 | ||||
| Einstellhilfe*1) | |||
|
|
| ||
|
|
| ||
PRONEA S, |
| Nur manuelle Scharfeinstellung | ||
M | ||||
(mit elektronischer Einstellhilfe*1) | ||||
D50 |
| |||
|
|
| ||
|
|
|
| |
Andere | C, S, AF, M | Nur manuelle Scharfeinstellung | ||
(außer F3AF*2) | (mit elektronischer Einstellhilfe*3) | |||
| ||||
Andere |
| Nur manuelle Scharfeinstellung | ||
|
|
|
| |
*1 Mit
*2 Mit der Nikon F3AF ist keine Verwendung von
*3 Mit
Die Pflege Ihres Telekonverters
•Jede Reinigung der Linsenflächen muß mit Sorgfalt erfolgen. Verwenden Sie ein mit reinem Alkohol angefeuchtetes, sauberes, weiches Baumwolltuch zur Beseitigung von Fingerabdrücken und ähnlichen Verunreinigungen.
•Vermeiden Sie starkes Reiben, das zu Kratzern in den Linsenflächen führen kann. Halten Sie die Linsenflächen stets sauber.
•Schützen Sie den Telekonverter bei Nichtgebrauch durch aufgesetzte Front- und Rückdeckel.
•Schützen Sie den Telekonverter bei längerer Nichtbenutzung durch Aufbewahrung an einem kühlen, trockenen Ort vor Korrosion und Fungusbefall. Vermeiden Sie die Lagerung im direkten Sonnenlicht oder in der Nähe von Naphtalen oder Kampfer.
•Schützen Sie den Telekonverter vor Wasser, das zu Betriebsstörungen führen kann.
Technische Daten
Français
Nous vous remercions sincérement d'avoir acheté notre produit Nikon.
Les téléconvertisseurs
Votre téléconvertisseur
Avant d'utiliser ce nouveau téléconvertisseur, nous vous prions de lire avec attention les instructions suivantes afin de tirer meilleur profit de cet accessoire pendant les années à venir.
Objectifs applicables
Les téléconvertisseurs
•Les objectifs suivants ne peuvent pas être utilisés avec les téléconvertisseurs
téléconvertisseur.): |
|
|
•L’autofocus n’est pas utilisable quand le téléconvertisseur
•Vous pouvez utiliser la fonction de réduction de la vibration avec l'objectif VR (Réduction de la vibration) utilisé avec les boîtiers F6, F5, F100, les séries F80, les séries F75, les séries F65, les séries D2, les séries D1, le boîtier D100, les séries D70 ou le boîtier D50.
•Lorsque le téléconvertisseur
Verres de visée recommandés
Nikon offre une variété de verres de visée interchangeables pour les appareils Nikon, afin de s'adapter à tout type d'objectif ou de prise de vues. Ceux recommandés pour votre combinaison téléconvertisseur/objectif sont mentionnés à droite de cette feuille.
Fixation sur l'objectif
Lorsque l'on enlève l'objectif du boîtier de l'appareil pour fixer le tél´éconvertisseur, s'assurer que l'alimentation de l'appareil soit bien débranchée et éviter l'exposition directe au soleil.
Positioner le téléconvertisseur sur l'objectif de façon à ce que l'index de l'ouverture soit aligné avec l'index de montage de l'objectif du téléconvertisseur. Tourner le téléconvertisseur dans le sens contraire des aiguilles d'une montre l'objectif étant dirigé loin de soi en faisant attention de ne pas presser la languette de l'objectif.
Pour enlever: Faire glisser en arrière la languette de déclenchement de l'objectif du téléconvertisseur et tourner
Montage du boîtier de l'appareil
S'assurer que l'alimentation de l'appareil soit bien débranchée et éviter l'exposition directe au soleil. Positioner l'appareil sur l'ensemble objectif/téléconvertisseur de telle sorte que l'index de montage de l'appareil soit aligné avec l'index
•Si votre appareil possède un doigt de couplage
Pour enlever: Tout en pressant le bouton de déclenchement de l'objectif situé sur le boîtier de l'appareil, tourner le boîtier de l'appareil dans le sens contraire des aiguilles d'une montre (avec le boîtier dirigé vers soi).
Détermination de l’exposition
L’utilisation d’un téléconvertisseur réduit l’ouverture effective d’un f/stop avec le
•Avec les appareils AI avec/sans contacts CPU: Déterminer l’exposition de la même manière que lorsque l’on utilise seulement l’objectif principal.
•Avec les appareils
•
Mise au point
| Mode de | Mode de mise au point de l’objectif | ||
Appareil | mise au point |
|
| |
| de l’appareil | M/A | M | |
F6, F5, série F4, F100, F90X, |
| Autofocus avec | Mise au point manuelle | |
série F90, série F80, | C, S, AF | priorité | (dispositif d’aide à la | |
série F75, série F70, |
| manuelle*1 | mise au point disponible*1) | |
série F65, PRONEA 600i, |
|
|
| |
|
|
| ||
PRONEA S, série D2, série D1, | M | Mise au point manuelle seulement | ||
D100, série D70, D50 | (dispositif d’aide à la mise au point disponible*1) | |||
| ||||
Autre appareil AF | C, S, AF, M | Mise au point manuelle seulement | ||
(autofocus) (sauf F3AF*2) | (dispositif d’aide à la mise au point disponible*3) | |||
| ||||
Autres appareils Nikon |
| Mise au point manuelle seulement | ||
|
|
|
| |
*1La mise au point automatique ou manuelle est possible en utilisant un télémètre électronique avec un objectif Nikkor
*2L’appareil F3AF Nikon est inutilisable.
*3Avec le
*4Le Nikon N2020 est vendu exclusivement aux
Soin à apporter au téléconvertisseur
•Bien qu'il faille toujours garder propre la surface des objectifs du téléconvertisseur, isurtout ne pas nettoyer de manière approximative. Nettoyer avec un tissu en coton propre et souple, imbibé d'alcool, pour enlever la graisse ou les empreintes des doigts de la surface de l'objectif.
•Faire attention à ne pas salir ou rayer la surface de l'objectif du téléconvertisseur.
•Maintenir les capuchons d'objectifs avant et arrière en position lorsque le téléconvertisseur n'est pas en service.
•Si le téléconvertisseur n'est pas utilisé pendant longtemps, le protéger contre la rouille et l'humidité en le rangeant dans un endroit frais et sec. D'autre part, ne pas le placer directement au soleil et l'éloigner de la naphtaline ou du camphre.
•Faire attention à ne pas mouiller le téléconvertisseur ou à le laisser tomber dans l'eau. Ce qui pourrait causer un mauvais fonctionnement.
ファインダースクリーンとの組み合わせ
ニコンF6、F5、F4シリーズ、F3シリーズカメラボディには多種類のファインダースクリーンがあります。レンズのタ イプや撮影条件に合わせてご使用ください。F6、F5、F4シリーズ、F3シリーズ以外のカメラをご使用の場合、K2/K3、 B2/B3、E2/E3スクリーンの見え方は、それぞれF4 + DP20のK、B、Eスクリーン欄を参考にしてください(なお、 ご使用に際しては、必ずファインダースクリーンおよび各カメラボディの使用説明書を併せてご覧ください)。
Recommended Focusing Screens
Various interchangeable focusing screens are available for Nikon cameras to suit any type of lens or picture- taking situation. Those which are recommended for use with your lens/teleconverter are listed. For the K2/K3, B2/B3 and E2/E3 focusing screens, refer to the columns on the F4 +
Empfohlene Einstellscheiben
Für
Verres de visée recommandés
Différents verres de visée interchangeables peuvent être montés sur les appareils photo Nikon. Ils sont utilisables avec tous les types d’objectifs et dans toutes les situations de prise de vue. Les verres de visée recommandés pour chaque objectif/téléconvertisseur sont répertoriés dans le tableau.Pour les verres de visée K2/K3, B2/B3 et E2/E3, se reporter respectivement aux colonnes des verres K, B, E de F4 +
|
|
|
|
|
|
|
|
|
| |||||
スクリーン, Screen, |
|
|
|
|
|
|
|
|
|
|
|
|
|
|
Einstellscheibe, Verre B/E | A | L | J | U | B/E | A | L | J | U | B/E | A | L | J | U |
レンズ, Lens, Objektiv, Objectif |
|
|
|
|
|
|
|
|
|
|
|
|
|
|
|
|
|
|
|
|
|
| |||||||
|
|
|
|
|
|
|
|
| ||||||
|
|
|
|
|
|
|
| |||||||
|
|
|
|
|
|
|
|
| ||||||
|
|
|
|
| ||||||||||
|
|
|
|
|
| |||||||||
|
|
|
|
|
|
|
|
|
| |||||
|
|
|
|
|
|
|
|
|
|
| ||||
|
|
|
|
|
|
|
|
|
|
|
|
|
| |
|
|
|
|
|
|
|
|
|
| |||||
|
|
|
|
|
|
|
|
|
|
| ||||
|
|
|
|
|
|
|
|
| ||||||
|
|
|
|
|
|
|
| |||||||
|
|
|
|
|
|
|
|
| ||||||
|
|
|
|
|
|
|
|
|
|
| ||||
|
|
|
|
|
|
|
|
|
|
|
| |||
|
|
|
|
|
|
|
| |||||||
|
|
|
|
|
|
|
|
| ||||||
|
|
|
|
|
|
| ||||||||
|
|
|
|
|
|
|
| |||||||
|
|
|
|
|
|
|
| |||||||
|
|
|
|
|
|
|
|
| ||||||
|
|
|
|
|
|
|
| |||||||
|
|
|
|
|
|
|
|
| ||||||
W |
|
|
|
|
|
|
|
|
|
|
|
|
| |
|
|
|
|
|
|
|
|
|
|
|
|
| ||
|
|
| ||||||||||||
T |
|
|
| |||||||||||
|
|
|
|
|
|
|
|
|
|
|
|
| ||
|
|
|
|
|
|
|
|
|
|
|
|
|
| |
|
|
|
|
| ||||||||
スクリーン, Screen, |
|
|
|
|
|
|
|
|
| |||
Einstellscheibe, Verre | B/E | A/L | J | C G1 G2 G3 G4 | U | B/E A/L J C G1 G2 G3 G4 | U | B/E A/L J C G1 G2 | G3 G4 U | |||
レンズ, Lens, Objektiv, Objectif |
|
|
|
|
|
|
|
|
| |||
|
|
|
|
|
|
|
|
|
|
|
| |
|
|
|
| (+0.5) |
|
|
|
|
|
| ||
|
|
|
|
|
|
|
|
|
|
| ||
|
|
|
|
|
|
|
|
|
|
| (+0.5) | |
|
|
|
|
|
|
|
|
|
|
|
| |
|
|
|
|
| (+0.5) |
| (+0.5) |
|
| (+0.5) | (+0.5) | |
|
|
|
|
|
|
|
|
|
| (+0.5) | ||
|
|
|
|
|
|
|
|
|
|
| ||
|
|
|
|
|
|
|
|
|
|
|
| |
|
|
|
|
|
|
|
|
|
|
|
| |
|
|
|
| (+0.5) |
|
|
|
|
|
| ||
|
|
|
|
|
|
|
|
|
|
| ||
|
| (+0.5) |
|
|
|
|
|
|
| (+0.5) |
| |
|
|
|
|
|
|
|
|
|
|
|
| |
| (+0.5) |
|
|
| (+0.5) |
|
|
|
| (+0.5) | (+0.5) | |
| (+0.5) |
|
|
| (+0.5) |
| (+0.5) |
|
| (+0.5) | (+0.5) | |
|
|
|
|
|
|
|
| |||||
|
|
|
|
|
|
|
|
|
|
|
| |
|
|
|
|
|
|
|
|
|
|
|
| |
| (+0.5) | (+0.5) | (+0.5) | (+0.5) | (+1) |
|
|
|
|
| ||
|
|
|
| |||||||||||||
スクリーン, Screen, |
|
|
|
|
|
|
|
|
|
|
|
|
| |||
Einstellscheibe, Verre | B/E | A/L | J | C G1 G2 | G3 | G4 U | B/E A/L J | C G1 G2 | G3 G4 U | B/E | A/L | J | C G1 G2 G3 G4 U | |||
レンズ, Lens, Objektiv, Objectif |
|
|
|
|
|
|
|
|
|
|
|
|
| |||
|
|
|
|
|
|
|
|
|
|
|
|
|
|
|
| |
| (+0.5) | (+0.5) | (+0.5) |
|
| (+0.5) |
|
| (+1) | (+0.5) | (+0.5) | |||||
|
|
|
|
|
| |||||||||||
| (+0.5) | (+0.5) | (+0.5) |
|
| (+0.5) |
| (+0.5) | (+1) | (+1) |
|
| ||||
|
|
|
|
|
|
| ||||||||||
(+0.5) | (+1) | (+1) |
|
|
|
|
| (+1) |
|
| (+1.5) | (+1.5) |
|
| ||
|
|
|
|
|
|
|
|
|
| |||||||
(+0.5) | (+1) | (+1) |
|
|
|
|
| (+1) |
|
| (+1.5) | (+1.5) |
|
| ||
|
|
|
|
|
|
|
|
|
|
|
|
|
|
|
| |
| (+0.5) | (+0.5) | (+0.5) |
|
|
| (+1) |
|
| (+0.5) | (+1) | (+0.5) |
| |||
|
|
|
|
|
|
|
| |||||||||
| (+0.5) | (+0.5) | (+0.5) |
|
| (+1) |
| (+0.5) | (+1) | (+1) |
|
| ||||
|
|
|
|
|
|
| ||||||||||
|
| (+0.5) |
|
|
|
|
| (+1.5) |
|
|
| (+1) |
|
| ||
|
| (+0.5) |
|
|
| (+0.5) |
|
|
| (+1) |
|
| ||||
(+0.5) | (+1) | (+1) |
|
|
| (+0.5) |
| (+1) |
|
|
| (+1.5) | (+1.5) |
|
| |
|
|
|
|
|
|
|
|
|
| |||||||
(+0.5) | (+1) | (+1) |
|
|
|
|
| (+1) |
|
| (+1) | (+1.5) |
|
| ||
|
|
|
|
|
|
|
|
|
| |||||||
|
|
|
|
|
|
| (+1) |
|
|
| (+1) |
| ||||
|
|
|
|
|
|
|
|
|
|
|
| |||||
|
|
|
|
|
| (+1) |
|
|
|
|
| |||||
| (+0.5) | (+0.5) | (+0.5) | (+0.5) |
| (+1) |
| (+1) |
|
|
|
|
|
| ||
|
|
|
|
|
|
|
|
|
| |||||||
|
|
|
|
|
|
|
| ||||||||
スクリーン, Screen, |
|
|
|
|
|
|
|
|
|
|
|
|
|
|
|
Einstellscheibe, Verre | B C | E | F G1 G2 G3 G4 J K M | P | U | B C E F G1 G2 G3 G4 J | K M | P U | B | C E | F G1 G2 | G3 G4 J | K M | P | U |
レンズ, Lens, Objektiv, Objectif |
|
|
|
|
|
|
|
|
|
|
|
|
|
|
|
|
| (– 1) |
|
|
|
|
|
|
|
|
|
|
| ||
|
| (– 1) |
|
|
|
|
|
|
|
|
| ||||
|
|
| (+1/2) | (+1/2) | (+1/2) | ||||||||||
|
|
|
| (+1/2) | (+1/2) | (+1/2) |
|
|
|
|
| ||||
|
|
|
|
|
|
|
|
|
|
|
|
|
| ||
|
| (– 1) |
|
|
|
|
|
|
|
|
|
| |||
|
|
|
|
|
|
|
|
|
|
|
| ||||
|
|
|
| (– 1) |
| (+1/2) | (+1/2) |
| |||||||
|
| (+1/2) | (+1/2) |
|
|
|
|
|
|
|
| ||||
|
| (– 1) |
| (+1/2) | (+1/2) | (+1/2) | (+1/2) |
|
|
|
|
| |||
|
|
|
| (– 1) | (+1/2) | (+1/2) | (+1/2) |
|
|
|
|
| |||
|
| (– 1) |
|
|
|
|
|
|
|
|
|
| |||
(+1/2) |
|
|
|
|
|
|
|
|
| ||||||
(+1/2) (+1) | (+1/2) | (+1/2) (+1/2) | (+1/2) |
| (+1) | (+1/2) | (+1/2) | (+1) | (+11/2) (+1) |
| (+1) | (+1) | (+1) | ||
|
|
|
|
|
|
|
| |||||||||
スクリーン, Screen, |
|
|
|
|
|
|
|
|
|
|
|
|
|
|
|
|
Einstellscheibe, Verre | B C E | F G1 G2 G3 G4 J | K M | P U | B C E | F | G1 G2 G3 G4 J | K M | P U | B | C E | F | G1 G2 G3 G4 J | K | M P | U |
レンズ, Lens, Objektiv, Objectif |
|
|
|
|
|
|
|
|
|
|
|
|
|
|
|
|
|
|
|
|
|
|
|
| |||||||||
|
|
|
|
|
|
|
|
|
|
| ||||||
|
|
|
|
|
|
|
|
|
|
|
| |||||
|
|
| (+1/2) |
| (+1/2) | (+1/2) | ||||||||||
| (+1/2) | (+1/2) | (+1/2) | (+1/2) |
|
| ||||||||||
|
|
|
|
|
|
|
|
|
|
|
| |||||
|
|
|
|
|
|
|
|
|
|
| ||||||
|
|
|
|
|
|
|
|
|
|
|
| |||||
電池を取る すぐに修理依頼を
水かけ禁止
使 用 禁 止
見ないこと
感 電 注 意
放 置 禁 止
保 管 注 意
移 動 注 意
熱くなる、煙が出る、こげ臭いなどの異常時は、速やかに電池を取り出すこと
そのまま使用すると火災、やけどの原因となります。 電池を取り出す際、やけどに十分注意してください。
電池を抜いて、販売店または当社サービスセンターに修理を依頼してください。
水につけたり、水をかけたり、雨にぬらしたりしないこと
発火したり感電の原因となります。
引火、爆発のおそれのある場所では使用しないこと
プロパンガス、ガソリンなど引火性ガスや粉塵の発生する場所で使用すると爆発や火災の原因となります。
レンズまたはカメラで直接太陽や強い光を見ないこと
失明や視力障害の原因となります。
注意
ぬれた手でさわらないこと
感電の原因になることがあります。
製品は、幼児の手の届かない所に置くこと
ケガの原因になることがあります。
使用しないときは、レンズにキャップをつけるか太陽光のあたらない所に保管すること
太陽光が焦点を結び火災の原因になることがあります。
三脚にカメラやレンズを取り付けたまま移動しないこと
転倒したりぶつけたりしてケガの原因になることがあります。
大きさ | 約66mm(最大径)× 24.5mm | 約66mm(最大径)× 31.5mm | 約66mm(最大径)× 55mm | ||
(長さ:バヨネット基準面の間隔)、 (長さ:バヨネット基準面の間隔)、 (長さ:バヨネット基準面の間隔)、 | |||||
| 全長 36.5mm | 全長 43.5mm | 全長 68mm | ||
|
|
|
|
|
|
質量(重さ) | 約200g | 約250g | 約355g | ||
|
|
|
|
|
|
主レンズと組み合わせた場合、以下の通りです。 |
|
|
| ||
|
|
|
|
|
|
|
|
| |||
|
|
|
|
|
|
焦点距離 | 主レンズの1.4倍 |
| 主レンズの1.7倍 |
| 主レンズの2倍 |
|
|
|
|
|
|
絞り連動範囲 | f/2~f/32 |
| f/2~f/32 |
| f/2~f/32 |
(有効F値ではf/2.8~f/45) | (有効F値ではf/3.36~f/53.82) |
| (有効F値ではf/4~f/64) | ||
|
| ||||
撮影倍率 | 主レンズの1.4倍 |
| 主レンズの1.7倍 |
| 主レンズの2倍 |
|
|
|
|
|
|
被写界深度 | 主レンズの1/1.4倍 |
| 主レンズの1/1.7倍 |
| 主レンズの1/2倍 |
|
|
|
|
|
|
最短撮影距離 | 主レンズと同一 |
| 主レンズと同一 |
| 主レンズと同一 |
|
|
|
|
|
|
アクセサリー
|
| ||||
|
|
|
|
| |
付 | 属 | ||||
|
| ||||
|
|
|
|
| |
別 売 り | ― | ||||
|
|
| |||
|
|
|
|
| |
● テレコンバーターキャップを取り付ける際は、テレコンバーターキャップの指標(丸印)をテレコンバーターのレンズ取 り付け指標に合わせて差し込み、テレコンバーター前方からみて反時計方向に回転させてください。
|
| |||
|
|
|
| |
Lens construction | 5 elements in 5 groups | 7 elements in 4 groups | 7 elements in 6 groups | |
|
|
|
|
|
Diaphragm |
|
| Fully automatic |
|
|
|
|
| |
Exposure | Via | |||
measurement | other cameras |
|
| |
|
|
|
|
|
Mount | Front: | Special mount for |
| |
Rear: | Nikon bayonet mount |
|
| |
|
|
| ||
|
|
|
| |
| Approx. 66mm (2.6 in.) dia. x | Approx. 66mm (2.6 in.) dia. x | Approx. 66mm (2.6 in.) dia. x | |
| 24.5mm (1.0 in.) extension | 31.5mm (1.2 in.) extension | 55mm (2.2 in.) extension from | |
Dimensions | from camera's lens mounting | from camera's lens mounting | camera's lens mounting | |
| flange; overall length is | flange; overall length is | flange; overall length is | |
| approx. 36.5mm (1.4 in.) | approx. 43.5mm (1.7 in.) | approx. 68mm (2.7 in.) | |
|
|
|
| |
Weight | Approx. 200g (7.1 oz.) | Approx. 250g (8.8 oz.) | Approx. 355g (12.5 oz.) | |
|
|
|
|
|
With a prime lens
| ||||
|
|
|
| |
Focal length | 1.4x that of a prime lens | 1.7x that of a prime lens | Double that of a prime lens | |
|
|
|
| |
Aperture | f/2 ~ f/32 (Effective aperture: | f/2 ~ f/32 (Effective aperture: | f/2 ~ f/32 | |
coupling range | f/2.8 ~ f/45) | f/3.36 ~ f/53.82) | (Effective aperture: f/4 ~ f/64) | |
|
|
|
| |
Reproduction | 1.4x that of a prime lens | 1.7x that of a prime lens | Double that of a prime lens | |
ratio | ||||
|
|
| ||
|
|
|
| |
Depth of field | 1/1.4x that of a prime lens | 1/1.7x that of a prime lens | 1/2x that of a prime lens | |
|
|
|
| |
Minimum |
| Same as that of a prime lens |
| |
focusing distance |
|
| ||
|
|
| ||
|
|
|
|
Accessories |
|
| |||
|
|
|
| |
| Teleconverter cap | Teleconverter cap | Teleconverter cap | |
Standard | Rear lens cap | |||
Rear lens cap | Rear lens cap | |||
| Flexible lens pouch | |||
|
|
| ||
|
|
|
| |
Optional | Flexible lens pouch | — | Flexible lens pouch | |
Hard lens case | Hard lens case | |||
|
| |||
|
|
|
|
To attach the teleconverter cap: Position the cap in the teleconverter's bayonet mount so that the dot on the cap is aligned with the teleconverter's mounting index; then turn the cap counterclockwise (with the teleconverter facing you) until it clicks into place.
| ||||
|
|
|
| |
Optischer Aufbau | 5 Linsen in 5 Gliedern | 7 Linsen in 4 Gliedern | 7 Linsen in 6 Gliedern | |
|
|
|
| |
Blende |
| Springblende |
| |
|
|
|
| |
Belichtungs- | In | |||
messung | Arbeitsblende |
|
| |
|
|
|
| |
Anschlüsse | Vorn Spezialbajonett für |
| ||
Hinten |
|
| ||
|
|
| ||
|
|
|
| |
| Durchmesser: ca. 66 mm | Durchmesser: ca. 66 mm | Durchmesser: ca. 66 mm | |
Abmessungen | Baulänge ab Kameraauflage: | Baulänge ab Kameraauflage: | Baulänge ab Kameraauflage: | |
ca. 24,5 mm | ca. 31,5 mm | ca. 55 mm | ||
| ||||
| Gesamtlänge: ca. 36,5 mm | Gesamtlänge: ca. 43,5 mm | Gesamtlänge: ca. 68 mm | |
|
|
|
| |
Gewicht | ca. 200 g | ca. 250 g | ca. 355 g | |
|
|
|
| |
Mit Grundobjektiv:
| ||||
|
|
|
| |
Brennweite | Grundobjektiv x 1,4 | Grundobjektiv x 1,7 | Grundobjektiv x 2 | |
|
|
|
| |
Blendenkup- | 2 - 32 | 2 | 2 | |
plungsbereich | Wirksame Öffnung: 2,8 - 45 | Wirksame Öffnung: 3,36 - 53,82 | Wirksame Öffnung: 4 - 64 | |
|
|
|
| |
Abbildungs- | Grundobjektiv x 1,4 | Grundobjektiv x 1,7 | Grundobjektiv x 2 | |
maßstab | ||||
|
|
| ||
|
|
|
| |
Schärfentiefe | Grundobjektiv ÷ 1,4 | Grundobjektiv ÷ 1,7 | Grundobjektiv ÷ 2 | |
|
|
|
| |
Naheinstellgrenze |
| wie Grundobjektiv |
| |
|
|
|
|
Zubehör |
| ||||
|
|
|
| |
| Telekonverterdeckel | Telekonverterdeckel | Telekonverterdeckel | |
Serienmäßig | Rückdeckel | |||
| Rückdeckel | Beutel | Rückdeckel | |
|
|
| ||
|
|
|
| |
Getrennt | Beutel | — | Beutel | |
Köcher | Köcher | |||
|
| |||
|
|
|
|
Aufsetzen des Telekonverterdeckels: Deckel so in das Bajonett des Telekonverters einsetzen, daß sein roter Punkt auf den Index zum Ansetzen des Objektivs an den Telekonverter ausgerichtet ist; dann Deckel (von vorn gesehen) nach links drehen, bis er einrastet.
Fiche technique
| ||||
|
|
|
| |
Construction de | 5 éléments 5 groupes | 7 éléments en 4 groupes | 7 éléments en 6 groupes | |
l'objectif | ||||
|
|
| ||
|
|
|
| |
Diaphragme |
| Entièrement automatique |
| |
|
|
|
| |
Mesure de | Par la méthode à pleine ouverture avec des appareils AI ou des appareils possédant un CPU; par | |||
l'exposition | la méthode |
| ||
|
|
|
| |
Monture | Avant: Monture spéciale pour les objectifs |
| ||
Arrière:Monture à baïonnette Nikon |
| |||
|
| |||
|
|
|
| |
| Environ 66 mm de diamètre x 24,5 | Environ 66 mm de diamètre x 31,5 | Environ 66 mm de diamètre x 55 | |
| mm d'extension à partir de la bride | mm d'extension à partir de la bride | mm d'extension à partir de la bride | |
Dimensions | de montage de l'objectif de | de montage de l'objectif de | de montage de l'objectif de | |
| l'appareil; la longueur | l'appareil; la longueur | l'appareil; la longueur | |
| d'environ 36,5 mm | d'environ 43,5 mm | d'environ 68 mm | |
|
|
|
| |
Poids | Environ 200 g | Environ 250 g | Environ 355 g | |
|
|
|
| |
Avec un objectif principal
|
|
|
|
| |
|
|
|
|
|
|
Distance focale | 1,4 x celle d'un objectif |
| 1,7 x celle d'un objectif | Double de celle d'un objectif |
|
principal |
| principal | principal |
| |
|
|
| |||
|
|
|
|
|
|
Gamme de couplage | f/2 ~ f/32 |
| f/2 ~ f/32 | f/2 ~ f/32 |
|
d'ouverture | (Ouverture effective: |
|
| ||
| (Ouverture effective: f/4 ~ f/64) | (Ouverture effective: f/4 ~ f/64) |
| ||
l'ouverture | f/2,8 ~ f/45) |
|
| ||
|
|
|
| ||
|
|
|
|
|
|
Rapport de | 1,4 x celle d'un objectif |
| Double de celle d'un objectif | Double de celle d'un objectif |
|
reproduction | principal |
| principal | principal |
|
|
|
|
|
|
|
Profondeur de | 1/1,4 x celle d'un objectif |
| 1/1,7 de celle d'un objectif | 1/2 de celle d'un objectif |
|
champ | principal |
| principal | principal |
|
|
|
|
|
|
|
Distance de mise au |
| Idem que pour celle d'un objectif principal |
| ||
point minimum |
|
| |||
|
|
|
|
| |
Accessoires |
| ||||
|
|
|
| |
| Bouchon téléconvertisseur | Bouchon téléconvertisseur | Bouchon téléconvertisseur | |
Standards | Bouchon arrière | |||
Bouchon arrière | Bouchon arrière | |||
| Pochette souple | |||
|
|
| ||
|
|
|
| |
En option | Pochette souple | — | Pochette souple | |
Etui rigide | Etui rigide | |||
|
| |||
|
|
|
|
Pour fixer le bouchon téléconvertisseur: Positionner le bouchon sur la monture à baïonnette du téléconvertisseur de telle manière que le point sur le capuchon soit aligné avec l'index de montage de l'objectif du téléconvertisseur ; puis tourner le capuchon dans le sens contraire des aiguilles d'une montre (avec le téléconvertisseur dirigé vers soi) jusqu'à ce qu'il s'enclenche en position.
|
| (+1/2) | (+1/2) | (+1/2) | (+1/2) | |||||||||
|
|
|
|
|
|
|
| |||||||
(+1/2) | (+1/2) | (+1/2) |
| (+1) | (+1) | (+1/2) | (+1/2) | |||||||
|
|
| (+1/2) |
| (+1/2) | (+1/2) |
|
|
| |||||
|
|
|
|
|
|
|
|
| ||||||
|
|
|
|
|
|
|
|
|
| |||||
|
|
|
|
|
|
|
| |||||||
(+1/2) (+1) | (+1/2) | (+1/2) (+1/2) | (+1/2) | (+1/2) | (+1/2) | (+1/2) | (+1/2) | (+1) (+11/2) (+1) | (+1) | (+1) | (+1) | |||
TC-14E II + F3TC-17E II + F3TC-20E II + F3
スクリーン, Screen,
Einstellscheibe, Verre A/L B C D E G1G2G3G4 H1H2H3H4 J K/P M R S T U A/L B C D E G1G2G3G4 H1H2H3H4 J K/P M R S T U A/L B C D E G1G2G3G4 H1H2H3H4 J K/P M R S T U レンズ, Lens, Objektiv, Objectif
構図の決定やピント合わせの目的には T: 好適です。
R: 視野の一部が多少見にくくなりますが、使用できます。
Y: スプリットプリズム部、マイクロプリズム部および十字線部では、ピント合わせができません。周囲のマット面でピントを
合わせます。
[: [内の数値は中央部重点測光時に必要な露出補正値です。測光値の補正方法に ついては、各カメラボディの使用説明書をご
覧ください。
fF: 露出は決められませんが、ピント合わせには使えます。
レンズ欄のWとTはズーム位置を示しています。Wが広角側、Tが望遠側の場合です。
空欄:使用不適当です。ただし、Mスクリーンの場合、撮影倍率1/1倍以上の近接撮影に用いられるため、この限りではありません。
T=Excellent focusing R=Acceptable focusing
Slight vignetting or moire phenomenon affects screen image, but film image shows no traces of this. Y=Acceptable focusing
[= Indicates degree of exposure compensation required in
fF= Exposure measurement not possible; teleconverter/screen combination permits only focusing operation. “W” indicates wideangle and “T” indicates telephoto zoom position of the lens.
Blank box means not applicable. Since type M screen can be used for both macrophotography at a 1:1 magnification ratio and for photomicrography, it has different applications than other screens.
T=Ausgezeichnete Scharfeinstellung R=Brauchbare Scharfeinstellung
Leichte Vignettierung oder Moiré im Sucherbild, nicht jedoch auf dem Film. Y=Brauchbare Scharfeinstellung
Schnittbildindikator, Mikroprismenfeld oder Fadenkreuzbereich dunkeln ab. Fokussierung auf
Bedienungsanleitung der Kamera.
fF= Keine Belichtungsmessung möglich;
Ein Leerfeld bedeutet unbrauchbar. Da die Einstellscheibe Typ M für Makrofotografie bei einem Abbildungsverhältnis von 1:1 sowie für Mikrofotografie verwendet wird, unterscheidet sich ihre Anwendung von den anderen Einstellscheiben.
T=Mise au point excellente R=Mise au point passable
Léger vignettage ou effets de moire sur l’image du verre, mais le film ne présente aucune trace de ces phénomènes. Y=Mise au point passable
Image brouillée au télémètre, zone microprisme ou en toile d'araignée terne. Mise au point autour de la zone tressée. [= Indique le degré de compensation d’exposition requis en mesure pondérée centrale. Se référer au mode d’emploi de
l’appareil pour plus de détails.
fF= Il n’est pas possible d’effectuer les mesures d’exposition. La combinaison objectif/téléconvertisseur ne permet que la mise au point. «W» indique la position
Les blancs désignent des verres inutilisables. Comme le verre de type M est utilisé pour la macrophotographie à un rapport d’agrandissement de 1:1 aussi bien que la microphotographie, son application est différente de celle des autres verres.