|
|
|
|
|
|
|
|
|
|
|
|
|
|
|
| |||||||||||||||||||||||||||||
|
| |||||||||||||||||||||||||||||||||||||||||||
|
| 使用説明書 |
|
|
|
|
|
|
|
|
|
|
|
|
|
|
|
|
|
|
|
|
|
|
|
|
|
|
|
|
| |||||||||||||
|
| Instruction Manual |
|
|
|
|
|
|
|
|
|
|
|
|
|
|
|
|
|
|
|
|
|
|
|
|
|
|
|
|
| |||||||||||||
Jp |
| Bedienungsanleitung |
|
|
|
|
|
|
|
|
|
|
|
|
|
|
|
|
|
|
|
|
|
|
|
|
|
|
|
|
| |||||||||||||
En |
| Manuel d’utilisation |
|
|
|
|
|
|
|
|
|
|
|
|
|
|
|
|
|
|
|
|
|
|
|
|
|
|
|
|
| |||||||||||||
| Manual de instrucciones |
|
|
|
|
|
|
|
|
|
|
|
|
|
|
|
|
|
|
|
|
|
|
|
|
|
|
|
|
| ||||||||||||||
|
| Manuale di istruzioni |
|
|
|
|
|
|
|
|
|
|
|
|
|
|
|
|
|
|
|
|
|
|
|
|
|
|
|
|
| |||||||||||||
De |
|
|
|
|
|
|
|
|
|
|
|
|
|
|
|
|
|
|
|
|
|
|
|
|
|
|
|
|
|
| ||||||||||||||
Fr |
|
|
|
|
|
|
|
|
|
|
|
|
|
|
|
|
|
|
|
|
|
|
|
|
|
|
|
|
|
|
|
|
|
|
|
|
|
|
|
|
|
|
|
|
Es |
|
|
|
|
|
|
|
|
|
|
|
|
|
|
|
|
|
|
|
|
|
|
|
|
|
|
|
|
|
|
|
|
|
|
|
|
|
|
|
|
|
|
|
|
It |
|
|
|
|
|
|
|
|
|
|
|
|
|
|
|
|
|
|
|
|
|
|
|
|
|
|
|
|
|
|
|
|
|
|
|
|
|
|
|
|
|
|
|
|
|
|
|
|
|
|
|
|
|
|
|
|
|
|
|
|
|
|
|
|
|
|
|
|
|
|
|
|
|
|
|
|
|
|
|
|
|
|
|
|
|
|
|
| |
Ck |
| 使用説明書の内容が破損などによって判読できなくなったときは、ニコンサービスセンターにて新しい使用説明書をお求めください(有料)。 | ||||||||||||||||||||||||||||||||||||||||||
Ch |
| No reproduction in any form of this manual, in whole or in part (except for brief quotation in critical articles | ||||||||||||||||||||||||||||||||||||||||||
| or reviews), may be made without written authorization from NIKON CORPORATION. | |||||||||||||||||||||||||||||||||||||||||||
|
| NIKON CORPORATION |
|
|
|
|
|
|
|
|
|
|
|
|
|
|
|
|
|
|
|
|
|
|
|
|
|
|
|
|
| |||||||||||||
|
| FUJI BLDG., |
|
|
|
|
|
|
|
|
|
|
|
|
|
|
|
|
|
|
|
|
|
|
|
|
|
|
|
|
| |||||||||||||
|
| TOKYO | Printed in Japan TT7C04000103 (80) |
| ||||||||||||||||||||||||||||||||||||||||
|
|
|
|
|
|
|
|
|
|
|
|
|
|
|
|
|
|
|
|
|
|
|
|
|
|
|
|
|
|
|
|
|
|
|
|
|
|
|
|
|
|
|
|
|
|
|
|
|
|
|
|
|
|
|
|
|
|
|
|
|
|
|
|
|
|
|
|
|
|
|
|
|
|
|
|
|
|
|
|
|
|
|
|
|
|
|
|
|
|
|
|
|
|
|
|
|
|
|
|
|
|
|
|
|
|
|
|
|
|
|
|
|
|
|
|
|
|
|
|
|
|
|
|
|
|
|
|
|
|
|
|
|
|
|
|
|
|
|
|
|
|
|
|
|
|
|
|
|
|
|
|
|
|
|
|
|
|
|
|
|
|
|
|
|
|
|
|
|
|
|
|
|
|
|
|
|
|
|
|
|
|
|
|
|
|
|
|
|
|
|
|
|
|
|
|
|
|
|
|
|
|
|
|
|
|
|
|
|
|
|
|
|
|
|
|
|
|
|
|
|
|
|
|
|
|
|
|
|
|
|
|
|
|
|
|
|
|
|
|
|
|
|
|
|
|
|
|
|
|
|
|
|
|
|
|
|
|
|
|
|
|
|
|
|
|
|
|
|
|
|
|
|
|
|
|
|
|
|
|
|
|
|
|
|
|
|
|
|
|
|
|
|
|
|
|
|
|
|
|
|
|
|
|
|
|
|
|
|
|
|
|
|
|
|
|
|
|
|
|
|
|
|
|
|
|
|
|
|
|
|
|
|
|
|
|
|
|
|
|
|
|
|
|
|
|
|
|
|
|
|
|
|
|
|
|
|
|
|
|
|
|
|
|
|
|
|
|
|
|
|
|
|
|
|
|
|
|
|
|
|
|
|
|
|
|
|
|
|
|
|
|
|
|
|
|
|
|
|
|
|
|
|
|
|
|
|
|
|
|
|
|
|
|
|
|
|
|
|
|
|
|
|
|
|
|
|
|
|
|
|
|
|
|
|
|
|
|
|
|
|
|
|
|
|
|
|
|
|
|
|
|
|
|
|
|
|
|
|
|
|
|
|
|
|
|
|
|
|
|
|
|
|
|
|
|
|
|
|
|
|
|
|
|
|
|
|
|
|
|
|
|
|
|
|
|
|
|
|
|
|
|
|
|
|
|
|
|
|
|
|
|
|
|
|
|
|
|
|
|
|
|
|
|
|
|
|
|
|
|
|
|
|
|
|
|
|
|
|
|
|
|
|
|
|
|
|
|
|
|
|
|
|
|
|
|
|
|
|
|
|
|
|
|
|
|
|
|
|
|
|
|
|
|
|
|
|
|
|
|
|
|
|
|
|
|
|
|
|
|
|
|
|
|
|
|
|
|
|
|
|
|
|
|
|
|
|
|
|
|
|
|
|
|
|
|
|
|
|
|
|
|
|
|
|
|
|
|
|
|
|
|
|
|
|
|
|
|
|
|
|
|
|
|
|
|
|
|
|
|
|
|
|
|
|
|
|
|
|
|
|
|
|
|
|
|
|
|
|
|
|
|
|
|
|
|
|
|
|
|
|
|
|
|
|
|
|
|
|
|
|
|
|
|
|
|
|
|
|
|
|
|
|
|
|
|
|
|
|
|
|
|
|
|
|
|
|
|
|
|
|
|
|
|
|
|
|
|
|
|
|
|
|
|
|
|
|
|
|
|
|
|
|
|
|
|
|
|
|
|
|
|
|
|
|
|
|
|
|
|
|
|
|
|
|
|
|
|
|
|
|
|
|
|
|
|
|
|
|
|
|
|
|
|
|
|
|
|
|
|
|
|
|
|
|
|
|
|
|
|
|
|
|
|
|
|
|
|
|
|
|
|
|
|
|
|
|
|
|
|
|
|
|
|
|
|
|
|
|
|
|
|
|
|
|
|
|
|
|
|
|
|
|
|
|
|
|
|
|
|
|
|
|
|
|
|
|
|
|
|
|
|
|
|
|
|
|
|
|
|
|
|
|
|
|
|
|
|
|
|
|
|
|
|
|
|
|
|
|
|
|
|
|
|
|
|
|
|
|
|
|
|
|
|
|
|
|
|
|
|
|
|
|
|
|
|
|
|
|
|
|
|
|
|
|
|
|
|
|
|
|
|
|
|
|
|
|
|
|
|
|
|
|
|
|
|
|
|
|
|
|
|
|
|
|
|
|
|
|
|
|
|
|
|
|
|
|
|
|
|
|
|
|
|
|
|
|
|
|
|
|
|
|
|
|
|
|
|
|
|
|
|
|
|
|
|
|
|
|
|
|
|
|
|
|
|
|
|
|
|
|
|
|
|
|
|
|
|
|
|
|
|
|
|
|
|
|
|
|
|
|
|
|
|
|
|
|
|
|
|
|
|
|
|
|
|
|
|
|
|
|
|
|
|
|
|
|
|
|
|
|
|
|
|
|
|
|
|
|
|
|
|
|
|
|
|
|
|
|
|
日本語
このたびはDXニッコールレンズをお買い上げいただきありがとうございます。このレンズは、ニコ ンDXフォーマットのニコンデジタル一眼レフカメラ(D2シリーズ、D40など)専用です。ニコン DXフォーマットでの撮影画角は、35mm判換算で焦点距離の約1.5倍の焦点距離に相当する画角に なります。ご使用の前に、この「使用説明書」をよくお読みの上、正しくお使いください。また、 「安全上のご注意」を必ずお読みください。
主な特長
●手ブレ補正機能(VR)を使用すると、使わないときと比べ約3段分*シャッタースピードを遅くし て撮影できるため、シャッタースピードの選択範囲が広がり、幅広い領域で手持ち撮影が可能です。
(*当社測定条件によります。また、手ブレ補正効果は、撮影者や撮影条件によって異なります。)
●レンズ内超音波モーター(サイレント・ウエーブ・モーター)を採用し静かなAF(オートフォー
びMF(マニュアルフォーカス)撮影ができます。
●被写体までの距離情報をカメラボディー側に伝達する機能を備え、より的確な露出制御を実現します。
●ニコン独自のED(特殊低分散)ガラスによる色収差の補正とともに、良好なボケ味を再現する円 形絞りの採用により優れた光学性能、描写性能を発揮します。
カメラへの取り付け方(カメラの使用説明書もご覧ください)
1カメラの電源スイッチをOFFにします。
2レンズの裏ぶたを取り外します(図D)
3レンズとカメラのレンズ着脱指標9を合わせ、反時計回りにカチッと音がするまでレンズを回し ます。このとき、レンズの着脱指標9が真上にきます。
4レンズキャップを取り外します。(図C)
カメラからレンズの取り外し方(カメラの使用説明書もご覧ください)
レンズを取り外すには、カメラの電源スイッチをOFFにし、レンズ取り外しボタンを押しながら時計 回りにレンズを回します。
バヨネットフードHB-371の取り付け、取り外し(図B)
■取り付け方:レンズ先端のフード着脱指標4とフード取り付け指標( ![]() 、2ヶ所のいずれか) 2を合わせて、時計回りにカチッと音がするまでフード1を回転させ、確実に取り付けます。
、2ヶ所のいずれか) 2を合わせて、時計回りにカチッと音がするまでフード1を回転させ、確実に取り付けます。
●フード着脱指標4とフードセット指標( ![]() )3が合っていることを確認してください。
)3が合っていることを確認してください。
●フード1が正しく取り付けられないと撮影画面にケラレを生じますのでご注意ください。
●フード1先端を強くつかむと着脱が困難になります。着脱の際は、フード1の根元(フード取り付 け指標2部分)付近を持って回転させてください。
●収納時はフード1を逆向きにしてレンズに取り付けることができます。
■取り外し方:フード1の根元(フード取り付け指標2部分)付近を持ち、反時計回りにフード1
を回転させて取り外します。
ズーミングと被写界深度
English
Thank you for purchasing the
Notes on Safety Operations
![]() CAUTION
CAUTION
Do not disassemble
Touching the internal parts of the camera or lens could result in injury. Repairs should be performed only by qualified technicians. Should the camera or lens break open as the result of a fall or other accident, take the product to a
Turn off immediately in the event of malfunction
Should you notice smoke or an unusual smell coming from the camera or lens, remove the battery immediately, taking care to avoid burns. Continued operation could result in injury. After removing or disconnecting the power source, take the equipment to a
Do not use the camera or lens in the presence of flammable gas
If the electronic equipment is operated in the presence of flammable gas, it could result in an explosion or a fire.
Do not look at the sun through the lens or viewfinder
Viewing the sun or other strong light sources through the lens or viewfinder could cause permanent visual impairment.
Keep out of reach of children
Particular care should be taken to prevent infants from putting the batteries or other small parts into their mouths.
Observe the following precautions when handling the camera and lens
•Keep the camera or lens unit dry. Failure to do so could result in a fire or electric shock.
•Do not handle or touch the unit with wet hands. Failure to do so could result in electric shock.
•When the lens will not be used for a long time, attach both front and rear lens caps and store the lens away from direct sunlight. Failure to do so could result in a fire, as the lens might focus sunlight onto an object.
Major features
•Pictures can be taken at shutter speeds approx. 3 stops* slower than is possible without using a VR lens, thus expanding the range of usable shutter speed options and making shooting without a tripod at various zoom settings much easier. (*Under Nikon measurement conditions. The effects of vibration reduction vary depending on individual and shooting conditions.)
•This lens employs a Silent Wave Motor to drive the focusing mechanism, making autofocusing smooth, silent and almost instantaneous. The
•More accurate exposure control is possibe because subject distance information is transferred from the lens to the camera body.
•The use of one ED
Mounting the lens (Refer to your camera instruction manual.)
1
Deutsch
Wir danken Ihnen für das Vertrauen, das Sie Nikon mit dem Kauf des
Hinweise für sicheren Betrieb
 ACHTUNG
Keinesfalls zerlegen.
Beim Berühren der Innenteile von Kamera oder Objektiv droht Verletzungsgefahr. Überlassen Sie Reparaturen unbedingt ausschließlich qualifizierten Technikern. Kommt es durch einen heftigen Stoß (z. B. Fall auf den Boden) zu einem Bruch von Kamera oder Objektiv, so trennen Sie zunächst das Produkt vom Stromnetz bzw. entnehmen die Batterie(n) und geben es dann an eine autorisierte
Bei einer Störung sofort die Stromversorgung ausschalten.
Bei Entwicklung von Rauch oder ungewöhnlichem Geruch durch Kamera oder Objektiv entnehmen Sie sofort die Batterie(n); dabei vorsichtig vorgehen, denn es besteht Verbrennungsgefahr. Bei einem Weiterbetrieb unter diesen Umständen droht Verletzungsgefahr. Nach dem Abtrennen von der Stromversorgung geben Sie das Gerät an eine autorisierte
Kamera oder Objektiv keinesfalls bei Vorhandensein von brennbarem Gas einsetzen.
Wird elektronisches Gerät bei brennbarem Gas betrieben, so droht u. U. Explosions- oder Brandgefahr.
Keinesfalls durch Objektiv oder Sucher in die Sonne blicken.
Beim Betrachten der Sonne oder anderer starker Lichtquellen durch Objektiv oder Sucher droht eine permanente Schädigung des Sehvermögens.
Dem Zugriff von Kindern entziehen.
Es ist unbedingt dafür zu sorgen, dass Kleinkinder keine Batterien oder andere kleine Teile in den Mund nehmen können.
Beim Umgang mit Kamera und Objektiv unbedingt die folgenden Vorsichtmaßnahmen beachten:
•Halten Sie Kamera oder Objektiv stets trocken. Andernfalls droht Brand- oder Stromschlaggefahr.
•Handhaben oder berühren Sie die Komponente keinesfalls mit nassen Händen. Andernfalls droht Stromschlaggefahr.
•Vor einem längeren Nichtgebrauch des Objektivs bringen Sie den vorderen und hinteren Deckel an und bewahren das Objektiv geschützt vor direkter Sonnenlichteinwirkung auf. Andernfalls droht Brandgefahr wegen möglicher Fokussierung von Sonnenlicht durch die Linse auf Gegenstände.
Hauptmerkmale
• Aufnahmen bei Verschlusszeiten ermöglicht der Bildstabilisator (VR) verwacklungsfreie Aufnahmen |
mit um bis zu drei Lichtwertstufen* längeren Verschlusszeiten als beim Fotografieren ohne VR- |
Technik, auf diese Weise werden der Bereich der verfügbaren Verschlusszeitoptionen erweitert und |
Teleaufnahmen ohne Stativ erheblich vereinfacht. (*unter |
Effekts des Bildstabilisators ist abhängig vom Fotografen und den Aufnahmebedingungen.) |
• Der Silent Wave Motor im Objektiv steuert den Fokussiermechanismus und sorgt so für stufenlosen, |
leisen und praktisch verzögerungsfreien |
dient zur einfachen Wahl von Autofokus (A) oder manueller Scharfeinstellung (M). |
• Eine präzisere Belichtungssteuerung ist möglich, denn die Objektdistanzdaten werden vom |
Objektiv zum Kameragehäuse übertragen. |
• Ein |
Français
Merci d’avoir porté votre choix sur l’objectif
Lorsqu’il est monté sur des appareils au format DX Nikon, l’angle d’image de l’objectif est environ équivalent à 1,5x la focale au format 35mm. Avant d’utiliser cet objectif, veuillez lire ces instructions et les remarques sur les utilisations en toute sécurité.
Remarques concernant une utilisation en toute sécurité
![]() ATTENTION
ATTENTION
Ne pas démonter
Le fait de toucher aux pièces internes de l’appareil ou aux lentilles pourrait entraîner des blessures. Les réparations doivent être effectuées par des techniciens qualifiés. Si l’appareil ou l’objectif est cassé suite à une chute ou un autre accident, apportez le produit dans un centre de service agréé Nikon pour le faire vérifier après avoir débranché le produit et retiré les piles.
En cas de dysfonctionnement, éteignez immédiatement
Si vous remarquez de la fumée ou une odeur inhabituelle se dégageant de l’appareil photo ou de l’objectif, retirez immédiatement les piles, en prenant soin de ne pas vous brûler. Continuer d’utiliser son matériel peut entraîner des blessures. Après avoir retiré ou débranché la source d’alimentation, confiez votre matériel à un centre de service agréé Nikon pour le faire vérifier.
N’utilisez pas l’appareil photo ou l’objectif en présence de gaz inflammable
N’utilisez pas de matériel électronique en présence de gaz inflammable car cela risque de provoquer une explosion ou un incendie.
Ne regardez pas le soleil dans l’objectif ou le viseur
Regarder le soleil ou tout autre source lumineuse violente dans l’objectif ou le viseur peut provoquer de graves lésions oculaires irréversibles.
Tenir hors de portée des enfants
Faites extrêmement attention à ce que les enfants ne mettent pas à la bouche les piles ou d’autres petites pièces.
Observez les précautions suivantes lorsque vous manipulez l’appareil et l’objectif
•Maintenez l’appareil et l’objectif au sec. Le
•Ne manipulez pas et ne touchez pas l’appareil avec les mains humides. Le
•Lorsque vous n’utilisez pas l’objectif pendant une longue période, fixez les capuchons avant et arrière et rangez l’objectif à l’abris de la lumière directe du soleil. Le
Principales caractéristiques
•Vous pouvez prendre des photos à des vitesses d’obturation d’environ 3 valeurs* inférieures à celles normalement utilisées, ce qui permet d’augmenter la gamme des options de vitesses d’obturation et de prendre des photos avec téléobjectif beaucoup plus facilement sans trépied. (*Dans les conditions de mesures de Nikon. Les effets de la réduction de vibration varient en fonction des personnes et des conditions de prise de vue.)
•Cet objectif utilise un moteur à ondes silencieux pour entraîner le mécanisme de mise au point,
permettant un autofocus régulier, silencieux et presque instantané. Le commutateur de mode
•Un contrôle d’exposition plus précis est possible, parce que l’information de distance au sujet est transférée de l’objectif au boîtier.
•L’utilisation d’un élément ED (dispersion extra basse) assure des images nettes virtuellement exemptes de frangeage couleur. Et l’emploi d’un diaphragme à 7 lames produisant une ouverture quasi circulaire estompe agréablement les images floues à l’avant ou à l’arrière du sujet.
Montage de l’objectif
1 Eteignez l’appareil photo.
B |
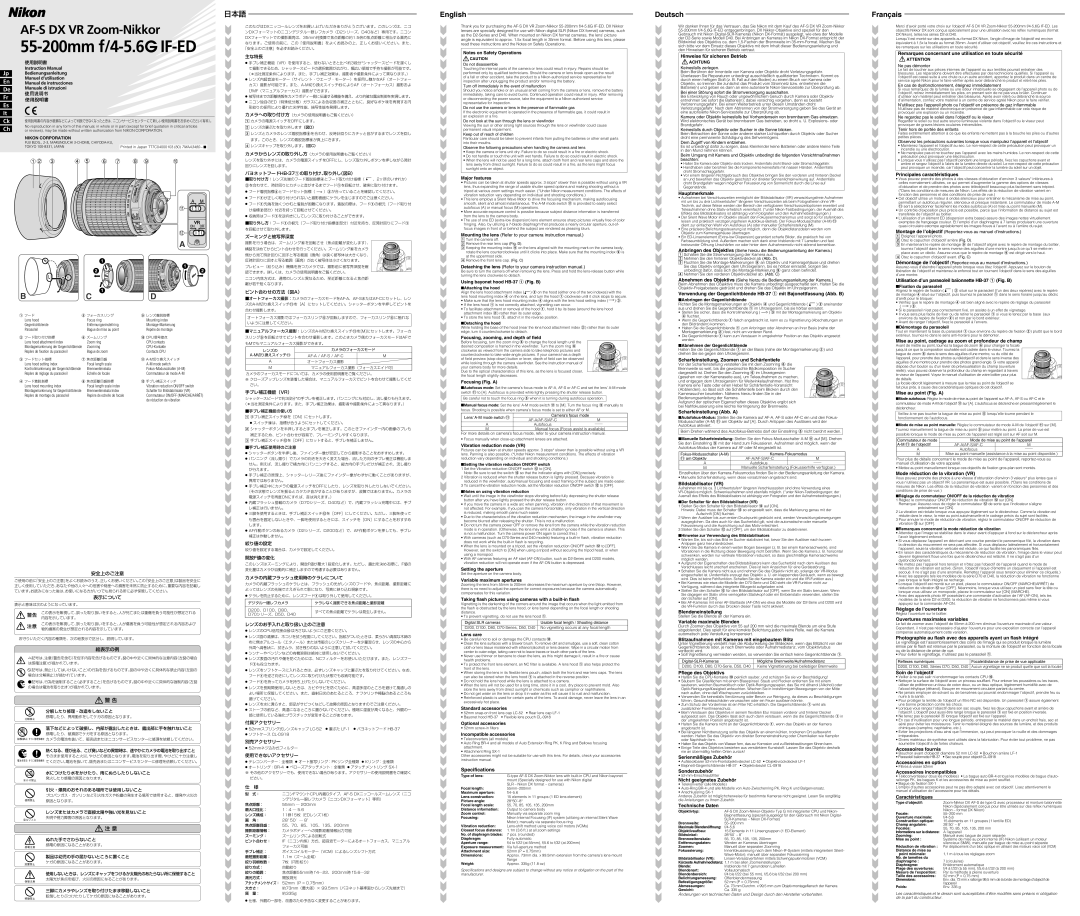
| C | |
1 | フード | 5 | フォーカスリング |
| Lens hood |
| Focus ring |
| Gegenlichtblende |
| Entfernungseinstellring |
| Parasoleil |
| Bague de mise au point |
2 | フード取り付け指標 | 6 | ズームリング |
| Lens hood attachment index |
| Zoom ring |
| Montagemarkierung der Gegenlichtblende | Zoomring | |
| Repère de fixation du parasoleil |
| Bague de zoom |
3 | フードセット指標 | 7 | 焦点距離目盛 |
| Lens hood setting index |
| Focal length scale |
| Kontrollmarkierung der Gegenlichtblende |
| Brennweitenskala |
| Repère de réglage du parasoleil |
| Echelle de focale |
4 | フード着脱指標 | 8 | 焦点距離目盛指標 |
| Lens hood mounting index |
| Focal length scale index |
| Montagemarkierung für Gegenlichtblende |
| Brennweitenskala Index |
| Repère de montage du parasoleil |
| Repère de echelle de focale |
A
D
9レンズ着脱指標
Mounting index
!CPU信号接点
CPU contacts
"
#手ブレ補正スイッチ
Vibration reduction ON/OFF switch Schalter für Bildstabilisator (VR) Commutateur ON/OFF (MARCHE/ARRÊT) de réduction de vibration
撮影を行う場合は、ズームリング6を回転させ(焦点距離が変化します)、 ![]() 構図を決めてからピント合わせを行ってください。ズームリング6をカメラ
構図を決めてからピント合わせを行ってください。ズームリング6をカメラ ![]() 側から見て時計回りに回すと写る範囲(画角)は狭く被写体は大きくなり、
側から見て時計回りに回すと写る範囲(画角)は狭く被写体は大きくなり、 ![]()
![]() 反時計回りに回すと写る範囲(画角)が広く被写体は小さくなります。
反時計回りに回すと写る範囲(画角)が広く被写体は小さくなります。 ![]() プレビュー(絞り込み)機構を持つカメラでは、撮影前に被写界深度を確
プレビュー(絞り込み)機構を持つカメラでは、撮影前に被写界深度を確 ![]()
![]()
![]()
![]()
![]() 認できます。詳しくは、カメラの使用説明書をご覧ください。
認できます。詳しくは、カメラの使用説明書をご覧ください。 ![]() ニコン内焦方式は、通常のレンズと異なるため、至近距離になると焦点距
ニコン内焦方式は、通常のレンズと異なるため、至近距離になると焦点距
離が若干短くなります。
ピント合わせの方法(図A)
合わせ撮影します。
オートフォーカス撮影ではフォーカスリング5が回転しますので、フォーカスリング5に触れな いように注意してください。
レンズの | カメラのフォーカスモード |
| |
| M | ||
A | オートフォーカス撮影 |
|
|
Mマニュアルフォーカス撮影(フォーカスエイド可)
カメラのフォーカスモードについては、カメラの使用説明書をご覧ください。
※クローズアップレンズを装着した場合は、マニュアルフォーカスでピントを合わせて撮影してくだ さい。
手ブレ補正機能(VR)
シャッタースピードで約3段分*の手ブレを補正します。パンニングにも対応し、流し撮りも行えます。 (*当社測定条件によります。また、手ブレ補正効果は、撮影者や撮影条件によって異なります。)
■手ブレ補正機能の使い方
1手ブレ補正スイッチ#を[ON]にセットします。
●スイッチ#は、指標が合うようにセットしてください。
2シャッターボタンを半押しすると手ブレを補正します。このときファインダー内の画像のブレも 補正するため、ピント合わせが容易で、フレーミングしやすくなります。
3手ブレ補正スイッチ#を[OFF]にセットすると、手ブレを補正しません。
■手ブレ補正使用時のご注意
●シャッターボタンを半押し後、ファインダー像が安定してから撮影することをおすすめします。
●パンニング(流し撮り)でカメラの向きを大きく変えた場合、流した方向の手ブレ補正は機能しま せん。例えば、流し撮りで横方向にパンニングすると、縦方向の手ブレだけが補正され、流し撮り が行えます。
●手ブレ補正の原理上、シャッターレリーズ後にファインダー像がわずかに動くことがありますが、 異常ではありません。
●手ブレ補正中にカメラの電源スイッチをOFFにしたり、レンズを取り外したりしないでください。 (その状態でレンズを振るとカタカタ音がすることがありますが、故障ではありません。カメラの 電源スイッチを再度ONにすれば、音は消えます。)
●内蔵フラッシュ搭載のカメラ(D70シリーズ、D40など)で、内蔵フラッシュ充電中には、手ブ レ補正は行いません。
●三脚を使用するときは、手ブレ補正スイッチ#を[OFF]にしてください。ただし、三脚を使って も雲台を固定しないときや、一脚を使用するときには、スイッチを[ON]にすることをおすすめ します。
●AF作動ボタンのあるカメラ(D2シリーズ、D200など)で、AF作動ボタンを押しても、手ブレ 補正は作動しません。
絞り値の設定
絞り値を設定する場合は、カメラで設定してください。
開放F値の変化
このレンズはズーミングにより、開放F値が最大1段変化します。ただし、露出を決める際に、F値の 変化量はカメラが自動的に補正しますので考慮する必要はありません。
Turn the camera off.
2 Remove the rear lens cap (Fig. D).
3 Keeping the mounting index 9 on the lens aligned with the mounting mark on the camera body, rotate the lens counterclockwise until it clicks into place. Make sure that the mounting index 9 is at the uppermost side.
4 Remove the front lens cap. (Fig. C)
Detaching the lens (Refer to your camera instruction manual.)
Be sure to turn the camera off when removing the lens. Press and hold the
Using bayonet hood HB-37 1 (Fig. B)
■Attaching the hood
Align the lens hood attachment index ( ![]() ) 2 on the hood (either one of the two indexes) with the lens hood mounting index 4 on the lens, and turn the hood 1 clockwise until it click stops to secure.
) 2 on the hood (either one of the two indexes) with the lens hood mounting index 4 on the lens, and turn the hood 1 clockwise until it click stops to secure.
•Make sure that the lens hood mounting index 4 aligns with the lens hood setting index ( ![]() ) 3.
) 3.
•If the lens hood 1 is not correctly attached, vignetting can occur.
•To facilitate attachment or removal of the hood 1, hold it by its base (around the lens hood attachment index 2) rather than its outer edge.
•To store the lens hood 1, attach it in the reverse position.
■Detaching the hood
While holding the base of the hood (near the lens hood attachment index 2) rather than its outer edge, turn it counterclockwise to detach.
Focusing, zooming, and depth of field
Before focusing, turn the zoom ring 6 to change the focal length until the desired composition is framed in the viewfinder. Turn the zoom ring 6 clockwise as viewed from the camera side to take telephoto pictures and counterclockwise to take
Due to the optical characteristics of this lens, as the lens is focused closer, the focal length slightly decreases.
Focusing (Fig. A)
■Autofocus mode: Set the camera’s focus mode to
Be careful not to touch the focus ring 5 when it is turning during autofocus operation.
■Manual focus mode: Set the lens’
Lens’ | Camera’s focus mode |
| |
|
| M | |
|
| ||
A | Autofocus |
| — |
M | Manual focus (Focus assist is available) | ||
For more details on camera’s focus mode, refer to your camera instruction manual.
• Focus manually when
Vibration reduction mode (VR)
Pictures can be taken at shutter speeds approx. 3 stops* slower than is possible without using a VR lens. Panning is also possible. (*Under Nikon measurement conditions. The effects of vibration reduction vary depending on individual and shooting conditions.)
■Setting the vibration reduction ON/OFF switch
1 Set the Vibration reduction ON/OFF switch # to [ON].
Note: Be sure to set the switch # so that the indicator aligns with [ON] precisely.
2 Vibration is reduced when the shutter release button is lightly pressed. Because vibration is reduced in the viewfinder, auto/manual focusing and exact framing of the subject are made easier.
3 To cancel the vibration reduction mode, set the Vibration reduction ON/OFF switch # to [OFF].
■Notes on using vibration reduction
•Wait until the image in the viewfinder stops vibrating before fully depressing the shutter release button after you have lightly pressed the shutter release button.
•If you move the camera in a wide arc when panning, vibration in the direction of that movement is not affected. For example, if you pan the camera horizontally, only vibration in the vertical direction is reduced, making smooth pans much easier.
•Due to the characteristics of the vibration reduction mechanism, the image in the viewfinder may become blurred after releasing the shutter. This is not a malfunction.
•Do not turn the camera power OFF or remove the lens from the camera while the vibration reduction mode is in operation. (Otherwise, the lens may emit a chattering noise if the camera is shaken. This is not a malfunction. Turn the camera power ON again to correct this.)
•With cameras (such as
•When the lens is mounted on a tripod, set the vibration reduction ON/OFF switch # to [OFF]. However, set the switch to [ON] when using a tripod without securing the tripod head, or when using a monopod.
•With AF cameras featuring an AF start
Setting the aperture
Farbsaumbildung sind. Außerdem machen sich dank einer Irisblende mit 7 Lamellen und fast |
kreisrunder Öffnung Unschärfen vor oder hinter dem Aufnahmemotiv nicht störend bemerkbar. |
Anbringen des Objektivs (Siehe hierzu die Bedienungsanleitung der Kamera.)
1 Schalten Sie die Stromversorgung der Kamera aus.
2 Nehmen Sie den hinteren Objektivdeckel ab (Abb. D).
3 Fluchten Sie die
4 Nehmen Sie den vorderen Objektivdeckel ab. (Abb. C)
Abnehmen des Objektivs (Siehe hierzu die Bedienungsanleitung der Kamera.)
Beim Abnehmen des Objektivs muss die Kamera unbedingt ausgeschaltet sein. Halten Sie die
Verwendung der Gegenlichtblende
■Anbringen der Gegenlichtblende
Richten Sie die Montagemarkierungen an Objektiv 4 und Gegenlichtblende ( ![]() ) 2 aneinander aus und drehen Sie die Gegenlichtblende 1 im Uhrzeigersinn, bis sie hörbar einrastet.
) 2 aneinander aus und drehen Sie die Gegenlichtblende 1 im Uhrzeigersinn, bis sie hörbar einrastet.
•Stellen Sie sicher, dass die Kontrollmarkierung ( ![]() ) 3 mit der Montagemarkierung am Objektiv 4 fluchtet.
) 3 mit der Montagemarkierung am Objektiv 4 fluchtet.
•Wenn die Gegenlichtblende 1 falsch angebracht ist, kann es zu Vignettierung (Abschattungen an den Bildrändern) kommen.
•Halten Sie die Gegenlichtblende 1 zum Anbringen oder Abnehmen an ihrer Basis (nahe der Montagemarkierung 2) fest, nicht am vorderen Rand.
•Die Gegenlichtblende 1 kann zum Verstauen in umgekehrter Position an das Objektiv angesetzt werden.
■Abnehmen der Gegenlichtblende
Halten Sie die Gegenlichtblende 1 an der Basis (nahe der Montagemarkierung 2) und drehen Sie sie gegen den Uhrzeigersinn.
Scharfeinstellung, Zoomen und Schärfentiefe
Vor der Scharfeinstellung verstellen Sie mit dem Zoomring 6 die Brennweite so weit, bis die gewünschte Bildkomposition im Sucher dargestellt ist. Drehen Sie den Zoomring 6 im Uhrzeigersinn (gesehen von der Kameraseite aus), um Teleaufnahmen zu machen, und entgegen dem Uhrzeigersinn für Weitwinkelaufnahmen. Hat Ihre Kamera eine Taste oder einen Hebel für
Aufgrund der optischen Eigenschaften dieses Objektivs ergibt sich bei Nahfokussierung eine leichte Verringerung der Brennweite.
Scharfeinstellung (Abb. A)
Beim Drehen während des
■Manuelle Scharfeinstellung: Stellen Sie den
| |||
" am Objektiv |
|
| M |
A | Autofokus |
| — |
M | Manuelle Scharfeinstellung (Fokussierhilfe verfügbar.) | ||
Einzelheiten über den
• Manuelle Scharfeinstellung, wenn diese vorsatzlinsen angebracht sind.
Bildstabilisator (VR)
Aufnahmen mit bis ca. 3 Lichtwertstufen* längeren Verschlusszeiten sind ohne Verwendung eines
■Der Schalter für den Bildstabilisator (VR)
1 Stellen Sie den Schalter für den Bildstabilisator # auf [ON].
Hinweis: Dabei muss der Schalter # so eingestellt sein, dass die Markierung genau mit der Aufschrift [ON] fluchtet.
2 Wenn der Auslöser bis zum ersten Druckpunkt gedrückt wird, werden Verwacklungsbewegungen ausgeglichen. Da dies auch für das Sucherbild gilt, wird die automatische oder manuelle Fokussierung und die Ausrichtung auf das Motiv erleichtert.
3 Stellen Sie den Schalter # auf [OFF], um den Bildstabilisator zu deaktivieren.
■Hinweise zur Verwendung des Bildstabilisators
• Warten Sie, bis sich das Bild im Sucher stabilisiert hat, bevor Sie den Auslöser nach kurzem |
Antippen ganz herunterdrücken. |
• Wenn Sie die Kamera in einem weiten Bogen bewegen (z. B. bei einem Kameraschwenk), sind |
Vibrationen in die Richtung dieser Bewegung nicht betroffen. Wenn Sie die Kamera z. B. horizontal |
schwenken, werden nur vertikale Vibrationen reduziert, so dass gleichmäßige Kameraschwenks |
möglich werden. |
• Aufgrund der Eigenschaften des Bildstabilisators kann das Sucherbild nach dem Auslösen des |
Verschlusses leicht unscharf erscheinen. Dies ist kein Anzeichen für eine Gerätestörung. |
• Schalten Sie die Kamera nicht aus und nehmen Sie das Objektiv nicht ab, solange der |
2 Otez le capuchon d’objectif arrière (Fig. D).
3 En maintenant le repère de montage 9 de l’objectif aligné avec le repère de montage du boîtier, tournez l’objectif dans le sens inverse des aiguilles d’une montre jusqu’à ce qu’il se mette en place avec un déclic.
4 Otez le capuchon d’objectif avant. (Fig. C)
Démontage de l’objectif
Utilisation d’un parasoleil baïonnette
Alignez le repère de fixation ( |
| ) 2 situé sur le parasoleil (l’un des deux repères) avec le repère |
|
de montage 4 situé sur l’objectif, puis tournez le parasoleil 1 dans le sens horaire jusqu’au déclic d’arrêt pour le bloquer.
•Vérifiez que le repère de montage 4 est bien aligné avec le repère de réglage du parasoleil
( ![]() ) 3.
) 3.
•Si le parasoleil n’est pas correctement fixé, on assiste à un effet de vignetage.
•Il vous sera plus facile de fixer ou de retirer le parasoleil 1 si vous le tenez par la base (aux environs du repère de fixation 2) et non par le bord extérieur.
•Avant de ranger l’objectif, fixez le parasoleil à l’envers.
■Démontage du parasoleil
Tout en maintenant la base du parasoleil 1 (aux environs du repère de fixation 2) plutôt que le bord extérieur,
Mise au point, cadrage au zoom et profondeur de champ
Avant de mettre au point, tournez la bague de zoom 6 pour changer la focale jusqu’à ce que la composition souhaitée soit cadrée dans le viseur. Tournez la bague de zoom 6 dans le sens des aiguilles d’une montre, vu du côté de l’appareil, pour prendre des photos au téléobjectif et dans le sens inverse des aiguilles d’une montre pour prendre des photos
La focale décroît légèrement à mesure que la mise au point de l’objectif se fait plus près, à cause des caractéristiques optiques de cet objectif.
Mise au point (Fig. A)
■Mode autofocus: Réglez le mode de mise au point de l’appareil sur
Veillez à ne pas toucher la bague de mise au point 5 lorsqu’elle tourne pendant le fonctionnement de l’autofocus.
■Mode de mise au point manuelle: Réglez le commutateur de mode
Commutateur de mode | Mode de mise au point de l’appareil | |
M | ||
A | Autofocus | — |
M | Mise au point manuelle (assistance à la mise au point disponible.) | |
Pour plus de détails concernant le mode de mise au point de l’appareil,
• Mettez au point manuellement lorsque ces objectifs de fixation
Mode réduction de la vibration (VR)
Vous pouvez prendre des photos à une vitesse d’obturation d’environ 3 valeurs* plus lentes que si vous n’utilisez pas un objectif VR. Le panoramique est aussi possible. (*Dans les conditions de mesures de Nikon. Les effets de la réduction de vibration varient en fonction des personnes et des conditions de prise de vue.)
■Réglage du commutateur ON/OFF de la réduction de vibration
1 Réglez le commutateur ON/OFF de réduction de vibration # sur [ON].
Remarque:
2 La vibration est réduite lorsque vous appuyez légèrement sur le déclencheur. Comme la vibration est réduite dans le viseur, la mise au point auto/manuelle et le cadrage précis du sujet sont facilités.
3 Pour annuler le mode de réduction de vibration, réglez le commutateur ON/OFF de réduction de vibration # sur [OFF].
■Remarques concernant la mode réduction de vibration
• Attendez que l’image se stabilise dans le viseur avant d’appuyer à fond sur le déclencheur après |
l’avoir légèrement enfoncé. |
• Si vous déplacez l’appareil en décrivant une courbe pendant le panoramique filé, la vibration dans |
la direction du mouvement ne sera pas affectée. Si vous déplacez latéralement et horizontalement |
l’appareil, seule la vibration verticale est réduite, ce qui facilite les panoramiques filés. |
• En raison des caractéristiques du mécanisme de réduction de vibration, l’image dans le viseur peut |
devenir légèrement floue une fois que le déclencheur est relâché. Il ne s’agit pas d’un |
dysfonctionnement. |
• Ne mettez pas l’appareil hors tension et n’ôtez pas l’objectif de l’appareil quand le mode de |
réduction de vibration est activé. (Sinon, l’objectif risque d’émettre un claquement si l’appareil est |
安全上のご注意
ご使用の前に「安全上のご注意」をよくお読みのうえ、正しくお使いください。この「安全上のご注意」は製品を安全に 正しく使用していただき、あなたや他の人々への危害や財産への損害を未然に防止するために、重要な内容を記載し ています。お読みになった後は、お使いになる方がいつでも見られる所に必ず保管してください。
表示について
表示と意味は次のようになっています。
カメラの内蔵フラッシュ使用時のケラレについて
カメラの内蔵フラッシュのケラレとは、フラッシュの光がレンズのフードや、焦点距離、撮影距離に よってはレンズの先端でさえぎられて影になり、写真に映り込む現象です。
●ケラレを防止するために、レンズフード1は取り外して使用してください。
デジタル一眼レフカメラ | ケラレなく撮影できる焦点距離と撮影距離 |
Set the aperture on the camera body.
Variable maximum apertures
Zooming the lens from 55mm to 200mm decreases the maximum aperture by one f/stop. However, there is no need to adjust the aperture for correct exposures because the camera automatically compensates for this variation.
Taking flash pictures using cameras with a built-in flash
Vignetting is the darkening of the corners around the image that occurs when the light emitted from
eingeschaltet ist. (Andernfalls erzeugt das Objektiv u. U. ein klapperndes Geräusch, wenn es bewegt |
wird. Dies ist keine Fehlfunktion. Schalten Sie die Kamera wieder ein und die |
• Bei Kameras wie etwa die Modelle der |
Verfügung, während das integrierte Blitzgerät aufgeladen wird. |
• Stellen Sie den Schalter # für den Bildstabilisator auf [OFF], wenn Sie ein Stativ benutzen. Wenn |
Sie dagegen ein Stativ ohne verriegelten Stativkopf oder ein Einbeinstativ verwenden, stellen Sie |
den Schalter auf [ON]. |
• Bei |
die |
secoué. Il ne s’agit pas d’une anomalie. Remettez l’appareil sous tension pour éliminer ce cliquetis.) |
• Avec les appareils tels les modèles de la série D70 et D40, la réduction de vibration ne fonctionne |
pas lorsque le flash intégré se recharge. |
• Lorsque l’objectif est monté sur un pied, placez le commutateur ON/OFF (MARCHE/ARRÊT) de |
réduction de vibration # sur [OFF]. Néanmoins, lorsque vous utilisez un pied sans fixer la tête ou |
lorsque vous utilisez un monopode, placez le commutateur sur [ON] (MARCHE). |
• Avec des appareils photo AF possédant une commande d’activation de l’AF |
modèles de la série D2 et D200, la réduction de vibration ne fonctionnera pas même si vous |
appuyez sur la commande |
警告
この表示を無視して、誤った取り扱いをすると、人が死亡または重傷を負う可能性が想定される 内容を示しています。
D200、D100、D80、 | すべての焦点距離でケラレは発生しません。 | |
D70シリーズ、D50、D40 | ||
|
the flash is obstructed by the lens hood, or lens barrel depending on the focal length or shooting distance.
• To prevent vignetting, do not use the lens hood 1.
Blendeneinstellung
Stellen Sie die Blende an der Kamera ein.
Réglage de l’ouverture
Réglez l’ouverture sur le boîtier.
Ouvertures maximales variables
注意
この表示を無視して、誤った取り扱いをすると、人が傷害を負う可能性が想定される内容および 物的損害の発生が想定される内容を示しています。
レンズのお手入れと取り扱い上のご注意
● レンズのCPU信号接点!は汚さないようにご注意ください。 |
● レンズ面の清掃は、ホコリを拭う程度にしてください。指紋がついたときは、柔らかい清潔な木綿の |
Digital SLR cameras | Usable focal length / Shooting distance |
D200, D100, D80, | No vignetting occurs at any focal length |
Lens care
Variable maximale Blenden
Durch Zoomen des Objektivs von 55 auf 200 mm wird die maximale Blende um eine Stufe abgeblendet. Dies spielt für eine korrekte Belichtung jedoch keine Rolle, weil die Kamera automatisch jede Verstellung kompensiert.
Le fait de zoomer avec l’objectif de 55mm à 200 mm diminue l’ouverture maximale d’une valeur. Cependant, il n’est pas nécessaire d’ajuster l’ouverture pour une exposition correcte car l’appareil compense automatiquement cette variation.
お守りいただく内容の種類を、次の絵表示で区分し、説明しています。
絵表示の例
△記号は、注意(警告を含む)を促す内容を告げるものです。図の中や近くに具体的な注意内容(左図の場合 は感電注意)が描かれています。
![]() 記号は、禁止(してはいけないこと)の行為を告げるものです。図の中や近くに具体的な禁止内容(左図の 場合は分解禁止)が描かれています。
記号は、禁止(してはいけないこと)の行為を告げるものです。図の中や近くに具体的な禁止内容(左図の 場合は分解禁止)が描かれています。
●記号は、行為を強制すること(必ずすること)を告げるものです。図の中や近くに具体的な強制内容(左図 の場合は電池を取り出す)が描かれています。
布に無水アルコール(エタノール)または市販のレンズクリーナーを少量湿らせ、レンズの中心から |
外周へ渦巻状に、拭きムラ、拭き残りのないように注意して拭いてください。 |
● シンナーやベンジンなどの有機溶剤は絶対に使用しないでください。 |
● レンズ表面の汚れや傷を防ぐためには、NCフィルターをお使いいただけます。また、レンズフー |
ド1も役立ちます。 |
● レンズをソフトケースに入れるときは、必ずレンズキャップと裏ぶたを取り付けてください。なお、 |
フード1を逆さ向きにしてレンズに取り付けた状態でも収納可能です。 |
● フード1を持ってカメラを持ち上げたりしないでください。 |
● レンズを長期間使用しないときは、カビやサビを防ぐために、高温多湿のところを避けて風通しの |
よい場所に保管してください。また、直射日光のあたるところ、ナフタリンや樟脳のあるところも |
• Be careful not to soil or damage the CPU contacts !. |
• Clean the lens surfaces with a blower brush. To remove dirt and smudges, use a soft, clean cotton |
cloth or lens tissue moistened with ethanol (alcohol) or lens cleaner. Wipe in a circular motion from |
center to outer edge, taking care not to leave traces or touch other parts of the lens. |
• Never use thinner or benzene to clean the lens, as this might damage it, result in a fire or cause |
health problems. |
• To protect the front lens element, an NC filter is available. A lens hood 1 also helps protect the |
front of the lens. |
• When storing the lens in its flexible lens pouch, attach both the front and rear lens caps. The lens |
can also be stored when the lens hood 1 is attached in the reverse position. |
• Do not hold the lens hood while the lens is attached to a camera. |
• When the lens will not be used for a long time, store it in a cool, dry place to prevent mold. Also |
store the lens away from direct sunlight or chemicals such as camphor or naphthalene. |
• Do not get water on the lens or drop it in water as this will cause it to rust and malfunction. |
Blitzaufnahmen mit Kameras mit eingebautem Blitz
Unter Vignettierung versteht man die Abdunkelung der Bildecken, wenn das Blitzlicht von der Gegenlichtblende oder, je nach Brennweite oder Aufnahmedistanz, vom Objektivtubus verdeckt wird.
•Soll Vignettierung vermieden werden, so verwenden Sie einfach keine Gegenlichtblende 1.
Mögliche Brennweite/Aufnahmedistanz | |
D200, D100, D80, | Keine Vignettierung bei beliebiger Brennweite |
Pflege des Objektivs
• Halten Sie die |
• Säubern Sie Glasflächen mit einem Blasepinsel. Staub und Flecken entfernen Sie mit einem |
sauberen, weichen Baumwolltuch oder |
nach außen, ohne daß Wischspuren zurückbleiben. |
Photographie au flash avec des appareils ayant un flash intégré
Le vignettage est l’assombrissement des coins de l’image qui se produit lorsque la lumière émise par le flash est retenue par le parasoleil, ou la monture de l’objectif en fonction de la focale ou de la distance de prise de vue.
•Pour éviter le vignettage, n’utilisez pas le parasoleil 1.
Reflexes numériques | Focale/distance de prise de vue applicable |
D200, D100, D80, Séries D70, D50, D40 | Aucun vignettage ne se produit quelle que soit la focale |
Soin de l’objectif
• Veiller à ne pas salir ni endommager les contacts CPU !. |
• Nettoyer la surface de l’objectif avec un pinceau soufflant. Pour enlever les poussières ou les traces, |
utiliser de préférence un tissu de coton doux, ou un tissu optique, légèrement humidifié avec de |
l’alcool éthylique (éthanol). Essuyer en mouvement circulaire partant du centre. |
• Ne jamais employer de solvant ou de benzènes qui pourrait endommager l’objectif, prendre feu ou |
nuire à la santé. |
分解禁止
![]() 警 告
警 告
分解したり修理・改造をしないこと
感電したり、異常動作をしてケガの原因となります。
落下などによって破損し、内部が露出したときは、露出部に手を触れないこと
感電したり、破損部でケガをする原因となります。
避けてください。 |
● レンズを水に濡らすと、部品がサビつくなどして故障の原因となりますのでご注意ください。 |
● ストーブの前など、高温になるところに置かないでください。極端に温度が高くなると、外観の一 |
部に使用している強化プラスチックが変形することがあります。 |
付属アクセサリー
●52mmスプリング式レンズキャップ
●ソフトケース
• Reinforced plastic is used for certain parts of the lens. To avoid damage, never leave the lens in an |
excessively hot place. |
Standard accessories
• 52mm
• Bayonet hood
Optional accessories
• 52mm
Incompatible accessories
• Verwenden Sie keinesfalls Verdünnung oder Benzin zur Reinigung, da dieses zu Beschädigungen |
führen, Gesundheitsschäden verursachen oder ein Feuer auslösen könnte. |
• Zum Schutz der Vorderlinse ist ein Filter NC erhältlich. Die Gegenlichtblende 1 wirkt als |
zusätzlicher Frontlinsenschutz. |
• Beim Verstauen des Objektivs in seinem flexiblen Etui müssen vorderer und hinterer Deckel |
aufgesetzt sein. Das Objektiv lässt sich auch dann verstauen, wenn die die Gegenlichtblende 1 in |
der umgekehrten Position angebracht ist. |
• Halten Sie die Kamera nicht an der Gegenlichtblende 1, wenn das Objektiv an der Kamera |
angebracht ist. |
• Bei längerer Nichtbenutzung sollte das Objektiv an einem kühlen, trockenen Ort aufbewahrt |
werden. Halten Sie das Objektiv von direkter Sonneneinstrahlung oder Chemikalien wie Kampfer |
• Pour protéger la lentille de l’objectif un filtre NC est disponible. Un paresoleil 1 assure également |
une bonne protection contre les chocs. |
• Lorsque vous rangez l’objectif dans son sac souple, fixez les deux capuchons avant et arrière de |
l’objectif. L’objectif peut aussi être rangé lorsque le paresoleil 1est fixé en position inversée. |
• Ne tenez pas le paresoleil 1lorsque l’objectif est fixé sur l’appareil. |
• En cas d’inutilisation pour une longue période, entreposer le matériel dans un endroit frais, sec et |
aéré pour éviter les moisissures. Tenir le matériel éloigné des sources de lumière, et des produits |
chimiques (camphre, naphtaline, etc.). |
• Eviter les projections d’eau ainsi que l’immersion, qui peut provoquer la rouille et des dommages |
irréparables. |
接触禁止 すぐに修理依頼を カメラの電池を抜いて、販売店またはニコンサービスセンターに修理を依頼してください。
熱くなる、煙が出る、こげ臭いなどの異常時は、速やかにカメラの電池を取り出すこと
![]()
![]() そのまま使用すると火災、やけどの原因となります。電池を取り出す際、やけどに十分注意し 電池を取る すぐに修理依頼を てください。電池を抜いて、販売店またはニコンサービスセンターに修理を依頼してください。
そのまま使用すると火災、やけどの原因となります。電池を取り出す際、やけどに十分注意し 電池を取る すぐに修理依頼を てください。電池を抜いて、販売店またはニコンサービスセンターに修理を依頼してください。
別売アクセサリー
●52mmネジ込み式フィルター
使用できないアクセサリー
● テレコンバーター:全種類 ● オート接写リング:PKリング全種類 ● Kリング:全種類 |
● |
•Teleconverters (all models)
•Auto Ring
•Attachment Ring
Other accessories might not be suitable for use with this lens. For details, check your accessories instruction manual.
oder Naphthalin fern. |
• Halten Sie das Objektiv von Wasser fern, das zur Korrosion und zu Betriebsstörungen führen kann. |
• Einige Teile des Objektivs bestehen aus verstärktem Kunststoff. Lassen Sie das Objektiv deshalb |
nie an übermäßig heißen Orten zurück! |
Serienmäßiges Zubehör
•Aufsteckbarer
•
• Divers matériaux de synthèse sont utilisés dans la fabrication. Pour éviter tout problème, ne pas |
soumettre l’objectif à de fortes chaleurs. |
Accessoires fournis
•Bouchon avant d’objectif diamètre 52 mm
•Parasoleil baïonnette
Accessoires en option
• Filtres à visser 52mm
水かけ禁止
水につけたり水をかけたり、雨にぬらしたりしないこと
発火したり感電の原因となります。
引火・爆発のおそれのある場所では使用しないこと
プロパンガス・ガソリンなど引火性ガスや粉塵の発生する場所で使用すると、爆発や火災の
※ その他のアクセサリーでも、使用できない場合があります。アクセサリーの使用説明書をご確認く ださい。
仕 | 様 |
|
型 | 式: | |
|
| ンデジタル一眼レフカメラ[ニコンDXフォーマット]専用) |
Specifications
Type of lens: | |
| mount (Specially designed for use with Nikon digital |
| SLR – Nikon DX format – cameras) |
Focal length: | |
Maximum aperture: | |
Lens construction: | 15 elements in 11 groups (1 ED lens element) |
Sonderzubehör
•
Nicht geeignetes Zubehör
•Telekonverter (alle Modelle)
•
•Anschlussring
Anderes Zubehör ist möglichcherweise für bestimmte Kameras nicht geeignet. Lesen Sie sorgfältig
Accessoires incompatibles
•Téléconvertisseur (tous les modèles) • La bague auto
•Bague de fixation
L’emploi d’autres accessoires peut ne pas être adapté avec cet objectif. Lisez attentivement le manuel d’utilisation de l’accessoire pour les détails.
Caractéristiques
使用禁止 原因となります。
焦点距離: | 55mm ― 200mm |
最大口径比: | 1:4 ― 5.6 |
Picture angle: | |
Focal length scale: | 55, 70, 85, 105, 135, 200mm |
Distance information: | Output to camera body |
die Anleitungen zu Ihrem Zubehör.
Technische Daten
Type d’objectif: | |
| Nikon (Spécialement conçus pour être utilisés sur des reflex numériques |
| Nikon – format DX Nikon) |
見ないこと
レンズまたはカメラで直接太陽や強い光を見ないこと
失明や視力障害の原因となります。
レンズ構成: | 11群15枚(EDレンズ1枚) |
画 角: | 28°50′― 8° |
焦点距離目盛: | 55、70、85、105、135、200mm |
Zoom control: | Manually via separate zoom ring |
Focusing: | Nikon Internal Focusing (IF) system (utilizing an internal Silent Wave |
| Motor); manually via separate focus ring |
Vibration reduction: |
Objektivtyp: | |
| Bajonettfassung (speziell ausgelegt für den Gebrauch mit Nikon Digital- |
| |
Brennweite: |
Focale: | |
Ouverture maximale: | |
Construction optique: | 15 éléments en 11 groupes (1 lentille ED) |
Champ angulaire: | 28˚50´ – 8˚ |
感電注意
注 意
ぬれた手でさわらないこと
感電の原因になることがあります。
撮影距離情報: | カメラボディーへの撮影距離情報出力可能 |
ズーミング: | ズームリングによる回転式 |
ピント合わせ: | IF(ニコン内焦)方式、超音波モーターによるオートフォーカス、マニュアル |
| フォーカス可能 |
手ブレ補正: | ボイスコイルモーター(VCM)によるレンズシフト方式 |
Closest focus distance: | 1.1m (3.6 ft.) at all zoom settings |
No. of diaphragm blades: | 7 pcs. (rounded) |
Diaphragm: | Fully automatic |
Aperture range: | f/4 to f/22 (at 55mm), f/5.6 to f/32 (at 200mm) |
Exposure measurement: | Via |
Attachment size: | 52mm (P = 0.75mm) |
Maximale Blendenöffnung: | |
Objektivaufbau: | 15 Elemente in 11 Linsengruppen (1 |
Bildwinkel: | 28°50´ – 8˚ |
Brennweitenskala: | 55, 70, 85, 105, 135, 200mm |
Entfernungsdaten: | Werden an Kameras übertragen |
Zoomen: | Manuell über separaten Zoomring |
Fokussierung: | Innenfokussierung nach dem |
|
Focales: | 55, 70, 85, 105, 135, 200 mm |
Informations sur la distance: | A l’appareil |
Zooming: | Manuel avec bague de zoom séparée |
Mise au point : | Système de mise au point interne (IF) Nikon (utilisant un moteur |
| silencieux SMW), manuelle par bague de mise au point séparée |
Réduction de vibration : | Par déplacement d'un bloc optique en utilisant des moteurs voice coil (VCM) |
Distance de mise au | 1,1 m à tous les réglages zoom |
point minimale: |
放置禁止
製品は幼児の手の届かないところに置くこと
ケガの原因になることがあります。
使用しないときは、レンズにキャップをつけるか太陽光のあたらない所に保管すること
最短撮影距離: | 1.1m(ズーム全域) |
絞り羽根枚数: | 7枚(円形絞り) |
絞り方式: | 自動絞り |
絞りの範囲: | 焦点距離55mm時 f4―22、200mm時 f5.6―32 |
測光方式: | 開放測光 |
Dimensions: | Approx. 73mm dia. x 99.5mm extension from the camera’s |
| flange |
Weight: | Approx. 335g (11.8 oz) |
Specifications and designs are subject to change without any notice or obligation on the part of the manufacturer.
Bildstabilisator (VR): | |
Kürzeste Aufnahmedistanz: 1,1 m bei allen Zoomeinstellungen | |
Blende: | Irisblende mit 7 gerundeten Lamellen |
Blendenart: | Vollautomatisch |
Blendenbereich: | f/4 bis f/22 (bei 55 mm), f/5,6 bis f/32 (bei 200 mm) |
Nb. de lamelles du | 7 (circulaires) |
diaphragme : | |
Diaphragme: | Entièrement automatique |
Plage des ouvertures: | f/4 à f/22 (à 55 mm), f/5,6 à f/32 (à 200 mm) |
Mesure de l’exposition: | Par la méthode à pleine ouverture |
Taille des accessoires: | 52 mm (P = 0,75 mm) |
保管注意
移動禁止
太陽光が焦点を結び、火災の原因になることがあります。
三脚にカメラやレンズを取り付けたまま移動しないこと
転倒したりぶつけたりしてケガの原因になることがあります。
アタッチメントサイズ: 52mm(P = 0.75mm) | |
大きさ: | 約73mm(最大径)× 99.5mm(バヨネット基準面からレンズ先端まで) |
質 量: | 約335g |
●仕様、外観の一部を、改善のため予告なく変更することがあります。
Belichtungsmessung: | Offenblendenmessung |
Befestigungsgröße: | 52 mm (P = 0,75mm) |
Abmessungen: | Ca. 73 mm Durchm. x 99,5 mm zum Objetivmontageflansch der Kamera |
Gewicht: | Ca. 335 g |
Änderungen von technischen Daten und Design durch den Hersteller vorbehalten.
Dimensions: | Env. dia. 73 mm x rallonge 99,5 mm de la bride de montage d’objectif de |
| l’appareil |
Poids: | Env. 335 g |
Les caractéristiques et le dessin sont susceptibles d’être modifiés sans préavis ni obligation de la part du constructeur.