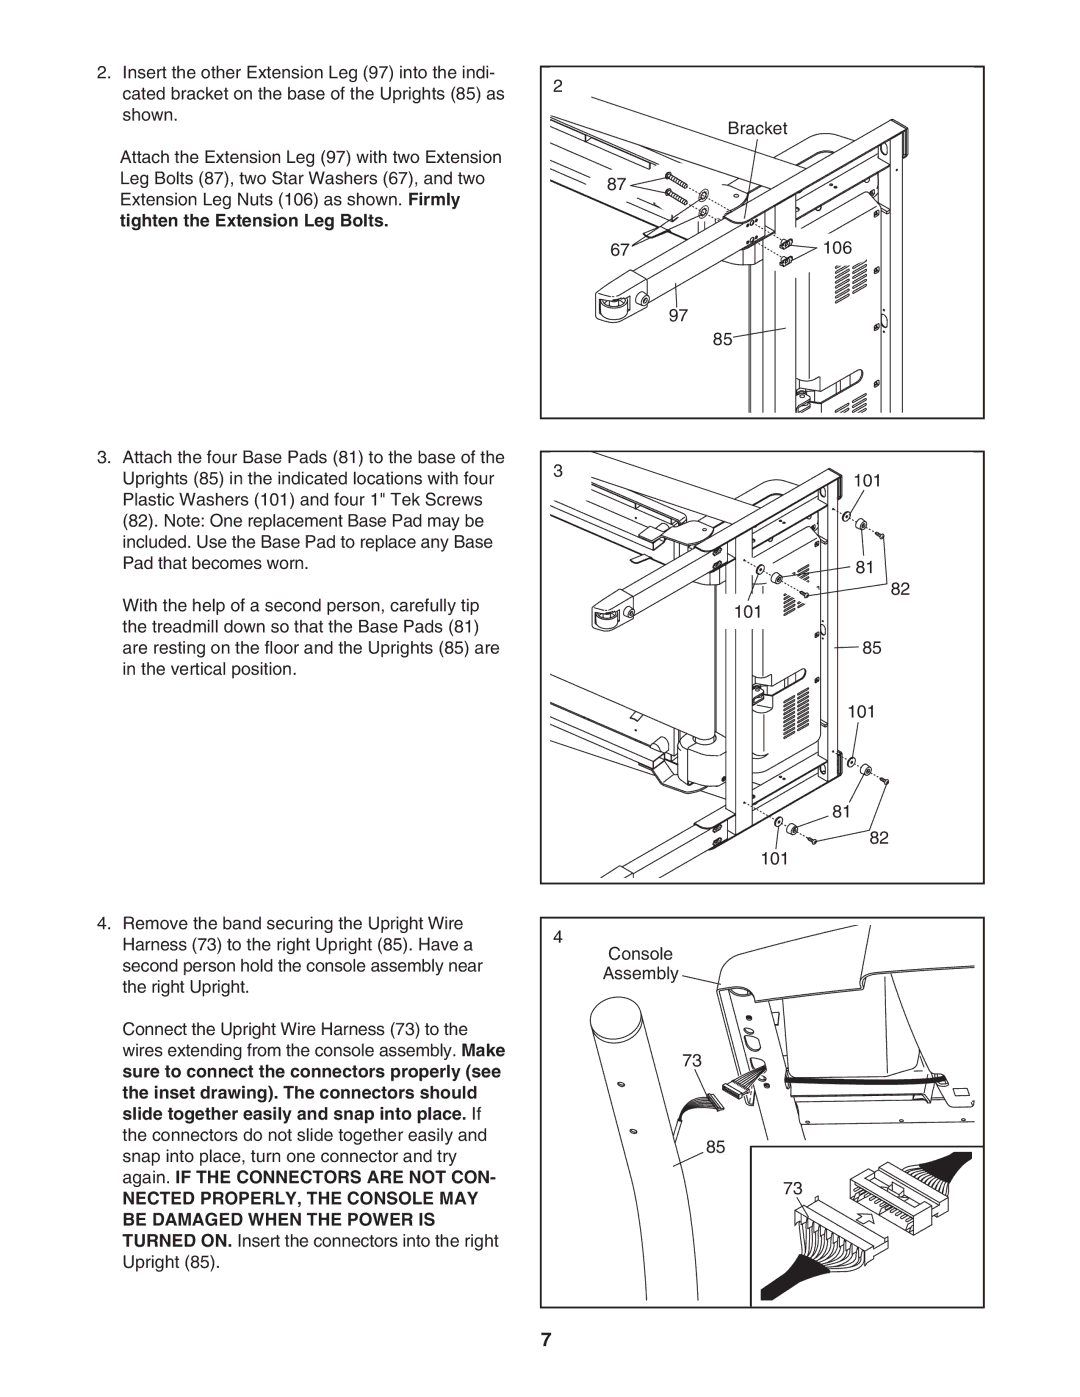
2. Insert the other Extension Leg (97) into the indi- | 2 |
| |
cated bracket on the base of the Uprights (85) as |
| ||
|
| ||
shown. |
| Bracket | |
|
| ||
Attach the Extension Leg (97) with two Extension |
|
| |
Leg Bolts (87), two Star Washers (67), and two | 87 |
| |
Extension Leg Nuts (106) as shown. Firmly |
| ||
|
| ||
tighten the Extension Leg Bolts. |
|
| |
| 67 | 106 | |
| 97 |
| |
|
| 85 | |
3. Attach the four Base Pads (81) to the base of the | 3 |
| |
Uprights (85) in the indicated locations with four | 101 | ||
| |||
Plastic Washers (101) and four 1" Tek Screws |
|
| |
(82). Note: One replacement Base Pad may be |
|
| |
included. Use the Base Pad to replace any Base |
|
| |
Pad that becomes worn. |
| 81 | |
With the help of a second person, carefully tip |
| 82 | |
| 101 | ||
the treadmill down so that the Base Pads (81) |
| ||
|
| ||
are resting on the floor and the Uprights (85) are |
| 85 | |
in the vertical position. |
|
| |
|
| 101 | |
|
| 81 | |
|
| 82 | |
|
| 101 | |
4. Remove the band securing the Upright Wire | 4 |
| |
Harness (73) to the right Upright (85). Have a |
| ||
Console |
| ||
second person hold the console assembly near |
| ||
Assembly |
| ||
the right Upright. |
| ||
|
| ||
Connect the Upright Wire Harness (73) to the |
|
| |
wires extending from the console assembly. Make | 73 |
| |
sure to connect the connectors properly (see |
| ||
|
| ||
the inset drawing). The connectors should |
|
| |
slide together easily and snap into place. If |
|
| |
the connectors do not slide together easily and |
| 85 | |
snap into place, turn one connector and try |
| ||
|
| ||
again. IF THE CONNECTORS ARE NOT CON- |
| 73 | |
NECTED PROPERLY, THE CONSOLE MAY |
| ||
|
| ||
BE DAMAGED WHEN THE POWER IS |
|
| |
TURNED ON. Insert the connectors into the right |
|
| |
Upright (85). |
|
| |
| 7 |
|
