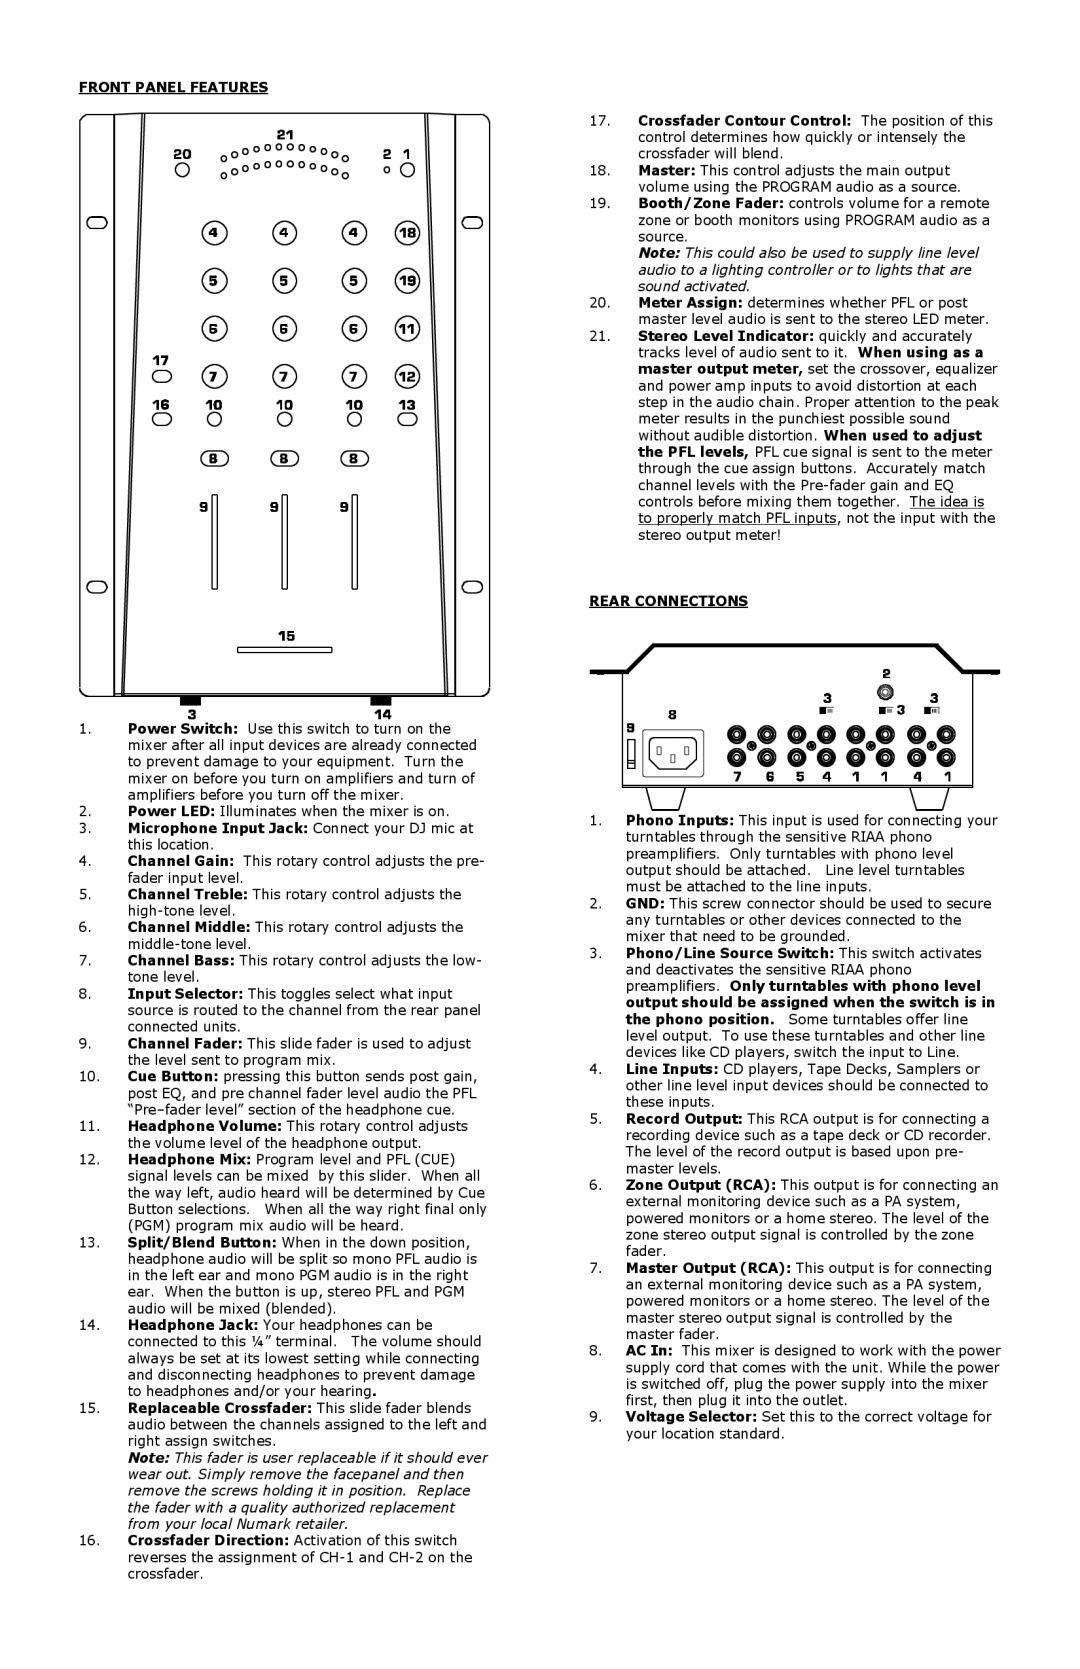
FRONT PANEL FEATURES

1.

Power Switch: Use this switch to turn on the


mixer after all input devices are already connected


to prevent damage to your equipment. Turn the


mixer on before you turn on amplifiers and turn of


amplifiers before you turn off the mixer.

2.Power LED: Illuminates when the mixer is on.

3.Microphone Input Jack: Connect your DJ mic at this location.

4.Channel Gain: This rotary control adjusts the pre- fader input level.

5.Channel Treble: This rotary control adjusts the high-tone level.

6.Channel Middle: This rotary control adjusts the middle-tone level.

7.Channel Bass: This rotary control adjusts the low- tone level.

8.Input Selector: This toggles select what input source is routed to the channel from the rear panel connected units.

9.Channel Fader: This slide fader is used to adjust the level sent to program mix.

10.Cue Button: pressing this button sends post gain, post EQ, and pre channel fader level audio the PFL “Pre–fader level” section of the headphone cue.

11.Headphone Volume: This rotary control adjusts the volume level of the headphone output.

12.Headphone Mix: Program level and PFL (CUE) signal levels can be mixed by this slider. When all the way left, audio heard will be determined by Cue Button selections. When all the way right final only (PGM) program mix audio will be heard.

13.Split/Blend Button: When in the down position, headphone audio will be split so mono PFL audio is in the left ear and mono PGM audio is in the right ear. When the button is up, stereo PFL and PGM audio will be mixed (blended).

14.Headphone Jack: Your headphones can be connected to this ¼” terminal. The volume should always be set at its lowest setting while connecting and disconnecting headphones to prevent damage to headphones and/or your hearing.

15.Replaceable Crossfader: This slide fader blends audio between the channels assigned to the left and right assign switches.

Note: This fader is user replaceable if it should ever wear out. Simply remove the facepanel and then remove the screws holding it in position. Replace the fader with a quality authorized replacement from your local Numark retailer.

16.Crossfader Direction: Activation of this switch reverses the assignment of CH-1 and CH-2 on the crossfader.

17.Crossfader Contour Control: The position of this control determines how quickly or intensely the crossfader will blend.

18.Master: This control adjusts the main output volume using the PROGRAM audio as a source.

19.Booth/Zone Fader: controls volume for a remote zone or booth monitors using PROGRAM audio as a source.

Note: This could also be used to supply line level audio to a lighting controller or to lights that are sound activated.

20.Meter Assign: determines whether PFL or post master level audio is sent to the stereo LED meter.

21.Stereo Level Indicator: quickly and accurately tracks level of audio sent to it. When using as a master output meter, set the crossover, equalizer and power amp inputs to avoid distortion at each step in the audio chain. Proper attention to the peak meter results in the punchiest possible sound without audible distortion. When used to adjust the PFL levels, PFL cue signal is sent to the meter through the cue assign buttons. Accurately match channel levels with the Pre-fader gain and EQ controls before mixing them together. The idea is to properly match PFL inputs, not the input with the stereo output meter!

REAR CONNECTIONS

1.Phono Inputs: This input is used for connecting your turntables through the sensitive RIAA phono preamplifiers. Only turntables with phono level output should be attached. Line level turntables must be attached to the line inputs.

2.GND: This screw connector should be used to secure any turntables or other devices connected to the mixer that need to be grounded.

3.Phono/Line Source Switch: This switch activates and deactivates the sensitive RIAA phono preamplifiers. Only turntables with phono level output should be assigned when the switch is in the phono position. Some turntables offer line level output. To use these turntables and other line devices like CD players, switch the input to Line.

4.Line Inputs: CD players, Tape Decks, Samplers or other line level input devices should be connected to these inputs.

5.Record Output: This RCA output is for connecting a recording device such as a tape deck or CD recorder. The level of the record output is based upon pre- master levels.

6.Zone Output (RCA): This output is for connecting an external monitoring device such as a PA system, powered monitors or a home stereo. The level of the zone stereo output signal is controlled by the zone fader.

7.Master Output (RCA): This output is for connecting an external monitoring device such as a PA system, powered monitors or a home stereo. The level of the master stereo output signal is controlled by the master fader.

8.AC In: This mixer is designed to work with the power supply cord that comes with the unit. While the power is switched off, plug the power supply into the mixer first, then plug it into the outlet.

9.Voltage Selector: Set this to the correct voltage for your location standard.

Page 3
Image 3
Numark Industries DM3050 manual Front Panel Features, Microphone Input Jack Connect your DJ mic at this location

DM3050 specifications

Numark Industries has been a leading name in the world of DJ equipment, and the DM3050 mixer is a testament to their commitment to quality and innovation. As a versatile and reliable piece of gear, the DM3050 is designed to meet the needs of both beginner and professional DJs, making it an appealing choice for various applications, from live performances to studio recordings.

One of the standout features of the DM3050 is its extensive connectivity options. The mixer includes multiple line inputs, allowing DJs to connect a wide range of audio sources, including turntables, CD players, and digital media devices. Additionally, the DM3050 is equipped with microphone inputs, enabling vocal performances and announcements during gigs. The ability to switch between different audio sources seamlessly positions the DM3050 as an essential tool for DJs looking to create a dynamic audio experience.

In terms of audio quality, the DM3050 prioritizes clarity and precision. It is designed with high-quality components that contribute to an optimal sound output, ensuring that each mix and transition is heard with accuracy. The built-in equalizers provide DJs with the ability to tailor their sound, giving them control over bass, mid, and treble frequencies. This level of customization is particularly beneficial during live performances, as DJs can adapt the sound to suit the venue and audience.

The DM3050 also features user-friendly controls that enhance the mixing experience. The layout includes large, easily accessible knobs, faders, and buttons, allowing for smooth and intuitive operation. Whether adjusting volume levels, EQ settings, or crossfading between tracks, the ergonomic design of the DM3050 ensures that DJs can focus on their performance without dealing with cumbersome controls.

Another noteworthy technology integrated into the DM3050 is the built-in effects processing. This feature allows DJs to add creative effects, such as echo, reverb, and flanger, directly to their mixes. By incorporating these effects, DJs can elevate their performances, adding an extra layer of excitement and engagement for the audience.

Additionally, the DM3050 is built to withstand the rigors of touring and live events. Its robust construction ensures durability, making it a reliable companion for DJs on the go. Whether it’s a club gig, festival, or intimate gathering, the DM3050 is ready to deliver outstanding performance in any environment.

In summary, the Numark Industries DM3050 mixer stands out due to its impressive features, including extensive connectivity, high-quality audio output, user-friendly controls, built-in effects processing, and durable design. This versatile mixer is a valuable addition to any DJ's arsenal, simplifying the mixing process while enhancing the overall sound experience.