CABLEADO

Todo el cableado debe cumplir con los códigos nacionales y locales y la unidad debe ser puesta a tierra correctamente.

1.Pase un cableado de alimentación de 120VCA y 60 Hz al interruptor de la pared (no provisto). La unidad debe ser cableada en un circuito separado de 20 amperios.

2.Pase un cable desde el interruptor hasta la caja de uniones de la caja del calentador. Afloje el tornillo que sostiene la compartimiento del cableado exterior y retire la tapa. Si necesita retirar la compartimiento del cableado interior, afloje el tornillo que está en la ranura de bocallave. Abra los agujeros ciegos que sean necesarios en la compartimiento del cableado e instale cajas de conexión aprobadas.

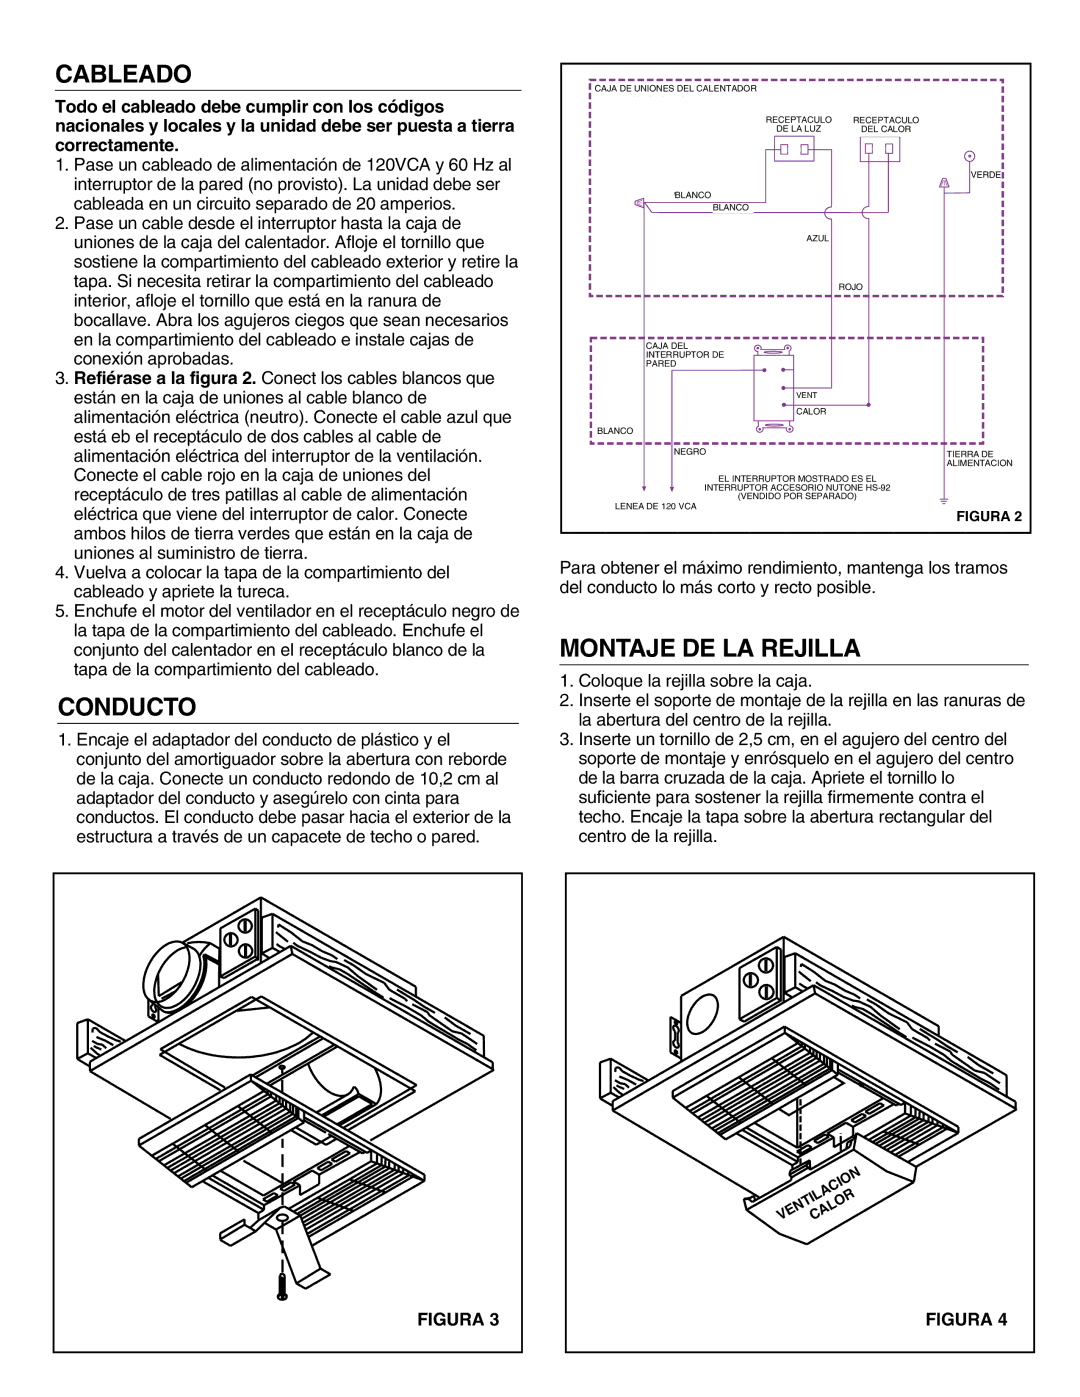
3.Refiérase a la figura 2. Conect los cables blancos que están en la caja de uniones al cable blanco de alimentación eléctrica (neutro). Conecte el cable azul que está eb el receptáculo de dos cables al cable de alimentación eléctrica del interruptor de la ventilación. Conecte el cable rojo en la caja de uniones del receptáculo de tres patillas al cable de alimentación eléctrica que viene del interruptor de calor. Conecte ambos hilos de tierra verdes que están en la caja de uniones al suministro de tierra.

4.Vuelva a colocar la tapa de la compartimiento del cableado y apriete la tureca.

5.Enchufe el motor del ventilador en el receptáculo negro de la tapa de la compartimiento del cableado. Enchufe el conjunto del calentador en el receptáculo blanco de la tapa de la compartimiento del cableado.

CONDUCTO

1.Encaje el adaptador del conducto de plástico y el conjunto del amortiguador sobre la abertura con reborde de la caja. Conecte un conducto redondo de 10,2 cm al adaptador del conducto y asegúrelo con cinta para conductos. El conducto debe pasar hacia el exterior de la estructura a través de un capacete de techo o pared.

FIGURA 3

CAJA DE UNIONES DEL CALENTADOR


HEATER JUNCTION BOX


RECEPTACULOVENT

RECEPTACULOHEAT

RECDEPTACLELA LUZ

RECEPTACLEDEL CALOR


VERDEGREEN

WHITEBLANCO


BWHITELANCO


AZULBL E


ROJORED

CAJAW LL DELSWITCH BOX


INTERRUPTOR DE


PARED


VENT


CALOHEAT R


BWHITELANCO


NEGROBLACK

TIERRASUPPLYDE


ALIMENTACIONGROU D

EL INTERRUPTORSWITCH SHOWNMOSTRADOIS NUTONE ES EL

INTERRUPTORACCESSORYACCESORIOWITCHNUTONEHS-91HS-92

(VENDIDO(SOLD SEPARATELY)POR SEPARADO)

LENEA120VACDE 120LINEVCA

FIGURA 2

Para obtener el máximo rendimiento, mantenga los tramos del conducto lo más corto y recto posible.

MONTAJE DE LA REJILLA

1.Coloque la rejilla sobre la caja.

2.Inserte el soporte de montaje de la rejilla en las ranuras de la abertura del centro de la rejilla.

3.Inserte un tornillo de 2,5 cm, en el agujero del centro del soporte de montaje y enrósquelo en el agujero del centro de la barra cruzada de la caja. Apriete el tornillo lo suficiente para sostener la rejilla firmemente contra el techo. Encaje la tapa sobre la abertura rectangular del centro de la rejilla.

FIGURA 4

Page 4
Image 4
NuTone 605RP installation instructions Cableado, Conducto, Montaje DE LA Rejilla

605RP specifications

The NuTone 605RP is a versatile and efficient ventilation fan designed to meet the needs of those seeking a reliable solution for indoor air quality. Known for its powerful performance and quiet operation, the 605RP is an excellent option for bathrooms, utility rooms, or any space requiring enhanced air circulation.

One of the standout features of the NuTone 605RP is its robust airflow capacity. With a rating of 50 CFM (cubic feet per minute), this fan effectively removes moisture and unwanted odors, helping to maintain a fresher and healthier environment. This airflow capability is particularly important in areas prone to humidity, such as bathrooms, where excess moisture can lead to mold and mildew growth.

Another key technology integrated into the 605RP is its low-noise operation. Operating at a sound level of only 2.5 sones, this ventilation fan ensures a quiet atmosphere, allowing users to maintain peace and comfort in their spaces. This feature is especially beneficial during nighttime use or in homes where noise levels need to be kept to a minimum.

The design of the NuTone 605RP is another aspect that enhances its appeal. It features a sleek and unobtrusive look that fits seamlessly into a variety of decors. Additionally, the fan comes with an easy-to-install housing, making it a user-friendly option for both contractors and DIY enthusiasts.

The durable construction of the 605RP is also noteworthy. Made from high-quality materials, this fan is built to last, reducing the need for frequent replacements and maintenance. Its energy-efficient design helps in lowering electricity consumption, making it an environmentally friendly choice.

Installation is made simple with the fan’s adjustable mounting brackets, allowing for flexible placement in different ceiling types. The 605RP is compatible with a variety of ducting options, enabling users to customize their setup according to their specific needs.

In summary, the NuTone 605RP serves as an excellent choice for anyone looking for an effective and quiet ventilation solution. With its powerful airflow, low-noise operation, durable construction, and user-friendly design, it stands out as a reliable option for enhancing indoor air quality and comfort.