MODELS 742RBNT • 742WHNT • 742SNNT

INSTALL THE HOUSING (continued)

Existing Construction

Page 3

CONNECT THE WIRING

SCHEMATIC WIRING DIAGRAM

L I G H T

R E D

B L U L I G H T W H T

S W I T C H


( W H I T E )

V E N T


B L K

B L K


W H T


V E N T

S W I T C H


( B L A C K )


B L K


W H T


L I N E W H T


I N


G R D

G R D


S W I T C H B O X


U N I T

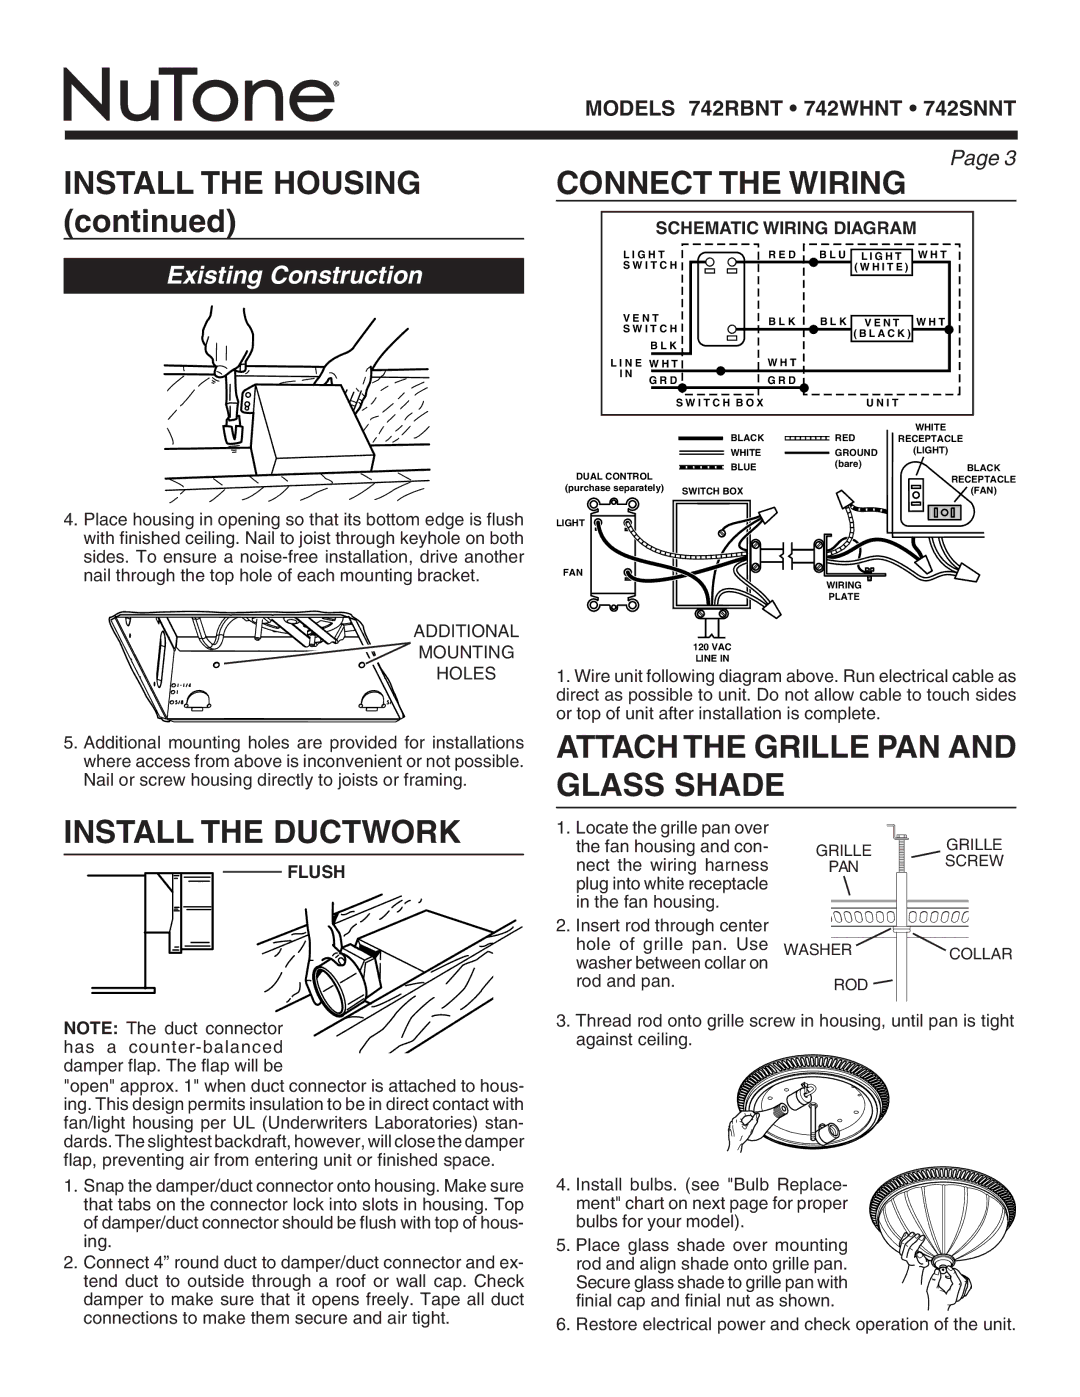
4.Place housing in opening so that its bottom edge is flush with finished ceiling. Nail to joist through keyhole on both sides. To ensure a noise-free installation, drive another nail through the top hole of each mounting bracket.

ADDITIONAL

DUAL CONTROL

(purchase separately)

LIGHT

FAN

BLACK

RED

WHITE

RECEPTACLE

WHITE

GROUND

(LIGHT)

BLUE

(bare)

BLACK


RECEPTACLE

SWITCH BOX


(FAN)

WIRING

PLATE

MOUNTING

HOLES

5.Additional mounting holes are provided for installations where access from above is inconvenient or not possible. Nail or screw housing directly to joists or framing.

120VAC LINE IN

1.Wire unit following diagram above. Run electrical cable as direct as possible to unit. Do not allow cable to touch sides or top of unit after installation is complete.

ATTACH THE GRILLE PAN AND GLASS SHADE

INSTALL THE DUCTWORK

FLUSH

1.Locate the grille pan over the fan housing and con- nect the wiring harness plug into white receptacle in the fan housing.

2.Insert rod through center hole of grille pan. Use washer between collar on rod and pan.

GRILLE

GRILLE

SCREW

PAN


WASHERCOLLAR

ROD

NOTE: The duct connector has a counter-balanced damper flap. The flap will be

"open" approx. 1" when duct connector is attached to hous- ing. This design permits insulation to be in direct contact with fan/light housing per UL (Underwriters Laboratories) stan- dards. The slightest backdraft, however, will close the damper flap, preventing air from entering unit or finished space.

1.Snap the damper/duct connector onto housing. Make sure that tabs on the connector lock into slots in housing. Top of damper/duct connector should be flush with top of hous- ing.

2.Connect 4” round duct to damper/duct connector and ex- tend duct to outside through a roof or wall cap. Check damper to make sure that it opens freely. Tape all duct connections to make them secure and air tight.

3.Thread rod onto grille screw in housing, until pan is tight against ceiling.

4. Install bulbs. (see "Bulb Replace- ment" chart on next page for proper

bulbs for your model).

5. Place glass shade over mounting rod and align shade onto grille pan. Secure glass shade to grille pan with

finial cap and finial nut as shown.

6. Restore electrical power and check operation of the unit.

Page 3
Image 3
NuTone 742SNNT Connect the Wiring, Attach the Grille PAN and Glass Shade Install the Ductwork, Schematic Wiring Diagram

742WHNT, 742RBNT, 742SNNT specifications

NuTone offers a remarkable line of bathroom ventilation fans, including the 742RBNT, 742WHNT, and 742SNNT models, designed to ensure a clean and comfortable environment while enhancing the style of any bathroom. These fans are equipped with advanced features and technologies to provide not only effective air circulation but also added functionality and aesthetic appeal.

One of the standout features of the NuTone 742 series is its powerful ventilation capabilities. Each model is designed to efficiently reduce humidity levels, eliminate odors, and prevent the growth of mold and mildew, creating a healthier indoor atmosphere. The fans are equipped with high-performance motors that deliver excellent airflow, ensuring that bathrooms remain fresh and inviting.

A key technology featured in the NuTone 742 series is the integrated quiet operation. Thanks to advanced sound-absorbing technology, these fans operate at remarkably low noise levels. This means you can enjoy the benefits of effective ventilation without the nuisance of loud fan noise, making your bathroom experience more tranquil and pleasant.

In terms of aesthetics, the NuTone 742RBNT, 742WHNT, and 742SNNT models come in a variety of finishes to suit different styles and preferences. The 742RBNT features a sophisticated brushed nickel finish, while the 742WHNT offers a classic white design, and the 742SNNT sports a sleek satin nickel look. This variety allows homeowners to choose a unit that perfectly complements their bathroom decor.

Another noteworthy characteristic of these models is their ease of installation. NuTone has designed the fans with user-friendly features that simplify the setup process, making it accessible even for those without extensive DIY experience. Whether you are a seasoned homeowner or a first-time installer, getting the NuTone 742 fan up and running is straightforward.

Additionally, these models are equipped with integrated lighting options, allowing homeowners to illuminate their bathrooms while ventilating them. The built-in light fixtures provide ample brightness, enhancing overall visibility and creating an inviting atmosphere. The lighting also adds a layer of convenience, making these fans an all-in-one solution for bathroom ventilation and illumination.

The NuTone 742RBNT, 742WHNT, and 742SNNT models stand out for their combination of performance, quiet operation, aesthetic appeal, and ease of installation. These features make them ideal choices for homeowners looking to improve their bathroom environments while ensuring they remain stylish and functional. Whether you are renovating your bathroom or simply upgrading your ventilation system, the NuTone 742 series is an excellent investment in comfort and quality.