NuTone 742RBNT Instalación DE LA Cubierta continuación, Instalación DEL Sistema DE Conductos

Models: 742WHNT 742RBNT 742SNNT

1 8
Download 8 pages 25.57 Kb
Page 7
Image 7

MODELOMODELS 742RBNT • 742WHNT • 742SNNT

INSTALACIÓN DE LA CUBIERTA (continuación)

Construcción existente

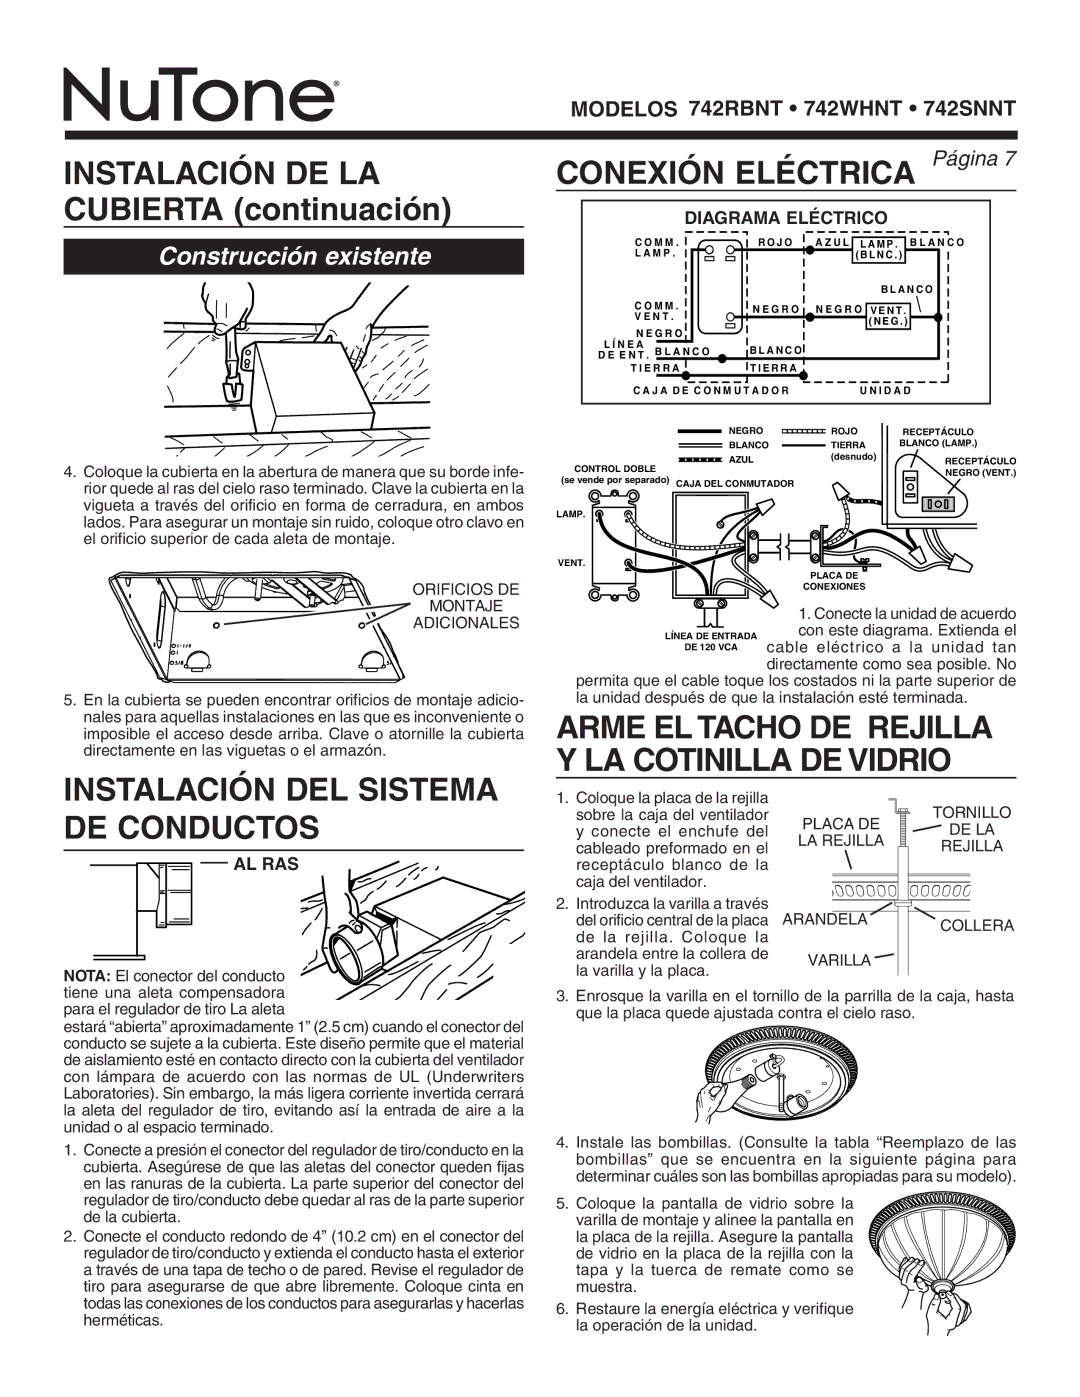
4.Coloque la cubierta en la abertura de manera que su borde infe- rior quede al ras del cielo raso terminado. Clave la cubierta en la vigueta a través del orificio en forma de cerradura, en ambos lados. Para asegurar un montaje sin ruido, coloque otro clavo en el orificio superior de cada aleta de montaje.

ORIFICIOS DE

MONTAJE

ADICIONALES

5.En la cubierta se pueden encontrar orificios de montaje adicio- nales para aquellas instalaciones en las que es inconveniente o imposible el acceso desde arriba. Clave o atornille la cubierta directamente en las viguetas o el armazón.

INSTALACIÓN DEL SISTEMA DE CONDUCTOS

AL RAS

NOTA: El conector del conducto tiene una aleta compensadora

para el regulador de tiro La aleta

estará “abierta” aproximadamente 1” (2.5 cm) cuando el conector del conducto se sujete a la cubierta. Este diseño permite que el material de aislamiento esté en contacto directo con la cubierta del ventilador con lámpara de acuerdo con las normas de UL (Underwriters Laboratories). Sin embargo, la más ligera corriente invertida cerrará la aleta del regulador de tiro, evitando así la entrada de aire a la unidad o al espacio terminado.

1.Conecte a presión el conector del regulador de tiro/conducto en la cubierta. Asegúrese de que las aletas del conector queden fijas en las ranuras de la cubierta. La parte superior del conector del regulador de tiro/conducto debe quedar al ras de la parte superior de la cubierta.

2.Conecte el conducto redondo de 4” (10.2 cm) en el conector del regulador de tiro/conducto y extienda el conducto hasta el exterior a través de una tapa de techo o de pared. Revise el regulador de tiro para asegurarse de que abre libremente. Coloque cinta en todas las conexiones de los conductos para asegurarlas y hacerlas herméticas.

CONEXIÓN ELÉCTRICA PáginaPage 7

DIAGRAMA ELÉCTRICO

C O M M .

R O J O

A Z U L L A M P . B L A N C O

L A M P .


( B L N C . )


B L A N C O


C O M M .

N E G R O

N E G R O V E N T .


V E N T .


( N E G . )


N E G R O


L Í N E A

B L A N C O


D E E N T . B L A N C O


T I E R R A

T I E R R A


C A J A D E C O N M U T A D O R

U N I D A D


NEGRO

ROJO

RECEPTÁCULO


BLANCO

TIERRA

BLANCO (LAMP.)


AZUL

(desnudo)

RECEPTÁCULO

CONTROL DOBLE


NEGRO (VENT.)

(se vende por separado) CAJA DEL CONMUTADOR


LAMP.


VENT.


PLACA DE


CONEXIONES


1. Conecte la unidad de acuerdo


con este diagrama. Extienda el

LÍNEA DE ENTRADA

DE 120 VCA

cable eléctrico a la unidad tan

directamente como sea posible. No permita que el cable toque los costados ni la parte superior de la unidad después de que la instalación esté terminada.

ARME EL TACHO DE REJILLA Y LA COTINILLA DE VIDRIO

1. Coloque la placa de la rejilla


TORNILLO

sobre la caja del ventilador

PLACA DE

y conecte el enchufe del

DE LA

LA REJILLA

cableado preformado en el

REJILLA


receptáculo blanco de la


caja del ventilador.


2. Introduzca la varilla a través

ARANDELA


del orificio central de la placa

COLLERA

de la rejilla. Coloque la


arandela entre la collera de

VARILLA


la varilla y la placa.


3.Enrosque la varilla en el tornillo de la parrilla de la caja, hasta que la placa quede ajustada contra el cielo raso.

4.Instale las bombillas. (Consulte la tabla “Reemplazo de las bombillas” que se encuentra en la siguiente página para determinar cuáles son las bombillas apropiadas para su modelo).

5.Coloque la pantalla de vidrio sobre la varilla de montaje y alinee la pantalla en

la placa de la rejilla. Asegure la pantalla de vidrio en la placa de la rejilla con la tapa y la tuerca de remate como se muestra.

6. Restaure la energía eléctrica y verifique la operación de la unidad.

Page 7
Image 7
NuTone 742RBNT Instalación DE LA Cubierta continuación, Instalación DEL Sistema DE Conductos, Al Ras, Diagrama Eléctrico

742WHNT, 742RBNT, 742SNNT specifications

NuTone offers a remarkable line of bathroom ventilation fans, including the 742RBNT, 742WHNT, and 742SNNT models, designed to ensure a clean and comfortable environment while enhancing the style of any bathroom. These fans are equipped with advanced features and technologies to provide not only effective air circulation but also added functionality and aesthetic appeal.

One of the standout features of the NuTone 742 series is its powerful ventilation capabilities. Each model is designed to efficiently reduce humidity levels, eliminate odors, and prevent the growth of mold and mildew, creating a healthier indoor atmosphere. The fans are equipped with high-performance motors that deliver excellent airflow, ensuring that bathrooms remain fresh and inviting.

A key technology featured in the NuTone 742 series is the integrated quiet operation. Thanks to advanced sound-absorbing technology, these fans operate at remarkably low noise levels. This means you can enjoy the benefits of effective ventilation without the nuisance of loud fan noise, making your bathroom experience more tranquil and pleasant.

In terms of aesthetics, the NuTone 742RBNT, 742WHNT, and 742SNNT models come in a variety of finishes to suit different styles and preferences. The 742RBNT features a sophisticated brushed nickel finish, while the 742WHNT offers a classic white design, and the 742SNNT sports a sleek satin nickel look. This variety allows homeowners to choose a unit that perfectly complements their bathroom decor.

Another noteworthy characteristic of these models is their ease of installation. NuTone has designed the fans with user-friendly features that simplify the setup process, making it accessible even for those without extensive DIY experience. Whether you are a seasoned homeowner or a first-time installer, getting the NuTone 742 fan up and running is straightforward.

Additionally, these models are equipped with integrated lighting options, allowing homeowners to illuminate their bathrooms while ventilating them. The built-in light fixtures provide ample brightness, enhancing overall visibility and creating an inviting atmosphere. The lighting also adds a layer of convenience, making these fans an all-in-one solution for bathroom ventilation and illumination.

The NuTone 742RBNT, 742WHNT, and 742SNNT models stand out for their combination of performance, quiet operation, aesthetic appeal, and ease of installation. These features make them ideal choices for homeowners looking to improve their bathroom environments while ensuring they remain stylish and functional. Whether you are renovating your bathroom or simply upgrading your ventilation system, the NuTone 742 series is an excellent investment in comfort and quality.