LÍNEA DE ENTRADA
DE 120 VCA

MODELO 768CHNT

Página 11

INSTALACIÓN DE LA CUBIERTA (continuación)

Construcción existente

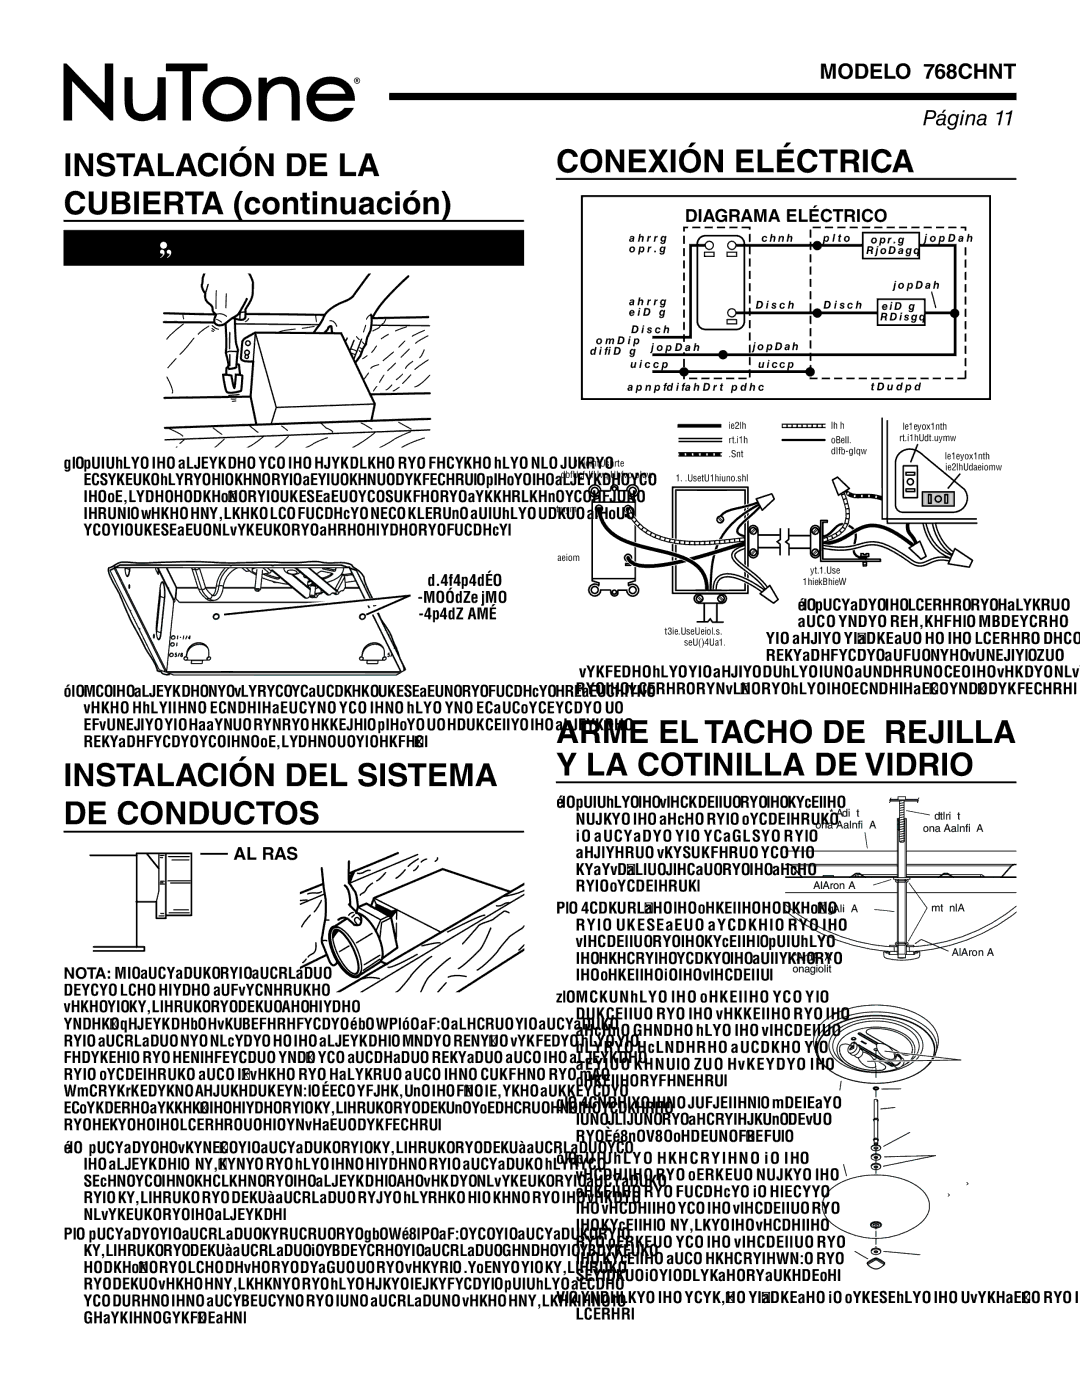
4.Coloque la cubierta en la abertura de manera que su borde inferior quede al ras del cielo raso terminado. Clave la cubierta en la vigueta a través del orificio en forma de cerradura, en ambos lados. Para asegurar un montaje sin ruido, coloque otro clavo en el orificio superior de cada aleta de montaje.

ORIFICIOS

DE MONTAJE

ADICIONALES

5.En la cubierta se pueden encontrar orificios de montaje adicionales para aquellas instalaciones en las que es inconveniente o imposible el acceso desde arriba. Clave o atornille la cubierta directamente en las viguetas o el armazón.

INSTALACIÓN DEL SISTEMA DE CONDUCTOS

AL RAS

NOTA: El conector del conducto tiene una aleta compensadora

para el regulador de tiro La aleta

estará “abierta” aproximadamente 1” (2.5 cm) cuando el conector del conducto se sujete a la cubierta. Este diseño permite que el material de aislamiento esté en contacto directo con la cubierta del ventilador con lámpara de acuerdo con las normas de UL (Underwriters Laboratories). Sin embargo, la más ligera corriente invertida cerrará la aleta del regulador de tiro, evitando así la entrada de aire a la unidad o al espacio terminado.

1.Conecte a presión el conector del regulador de tiro/conducto en la cubierta. Asegúrese de que las aletas del conector queden fijas en las ranuras de la cubierta. La parte superior del conector del regulador de tiro/conducto debe quedar al ras de la parte superior de la cubierta.

2.Conecte el conducto redondo de 4” (10.2 cm) en el conector del regulador de tiro/conducto y extienda el conducto hasta el exterior a través de una tapa de techo o de pared. Revise el regulador de tiro para asegurarse de que abre libremente. Coloque cinta en todas las conexiones de los conductos para asegurarlas y hacerlas herméticas.

CONEXIÓN ELÉCTRICA

DIAGRAMA ELÉCTRICO

C O M M .

R O J O

A Z U L L A M P . B L A N C O

L A M P .


( B L N C . )


B L A N C O

C O M M .

N E G R O

N E G R O V E N T .

V E N T .


( N E G . )

N E G R O


L Í N E A

B L A N C O


D E E N T . B L A N C O


T I E R R A

T I E R R A


C A J A D E C O N M U T A D O R


U N I D A D


NEGRO

ROJO


RECEPTÁCULO


BLANCO

TIERRA


BLANCO (LAMP.)


AZUL

(desnudo)

RECEPTÁCULO

CONTROL DOBLE


NEGRO (VENT.)

(se vende por separado) CAJA DEL CONMUTADOR


LAMP.


VENT.


PLACA DE


CONEXIONES


1.Conecte la unidad de acuerdo

con este diagrama. Extienda el cable eléctrico a la unidad tan directamente como sea posible. No

permita que el cable toque los costados ni la parte superior de la unidad después de que la instalación esté terminada.

ARME EL TACHO DE REJILLA Y LA COTINILLA DE VIDRIO

1. Coloque la planrtillo de la rejilla

PLATILLO

TORNILLO

sobre la caja del ventilador

DE LA REJILLA

DE LA REJILLA

y conecte el enchufe del


cableado preformado en el


receptáculo blanco de la caja


del ventilador.

ARANDELA


2. Introduzca la varilla a través

VARILLA

COLLERA

del orificio central de la


plantillo de la rejilla. Coloque


ARANDELA

la arandela entre la collera de

PANTALLA


la varilla y la plantillo.

DE VIDRIO


3. Enrosque la varilla en el


tornillo de la parrilla de la


FOCOS DE

caja, hasta que la plantillo


CANDELABRO


DE BASE B10

quede ajustada contra el


60 WATTS

cielo raso. No apriete la


MÁX.

varilla demasiado.


(SE REQ. 2)


ARANDELA

4. Instale las bombillas. Utilice

PLATILLO DE

VARILLA

los bulbos de candelabro, tipo

LA REJILLA

ARANDELA

de B10, 60 vatios máximo.

PANTALLA

DE ACERO

5. Coloque arandelas y la

ARANDELA

DE VIDRIO

DE FIELTRO

pantalla de vidrio sobre la


(Agregue la

varilla de montaje y alinee


segunda


arandela como

la pantalla en la plantillo de


necesario para

la rejilla. Asegure la pantalla


asegurar la

TUERCA

pantalla

de vidrio en la plantillo de

DECORATIVA

firmemente.)

ARANDELA

la rejilla con arandela(s) de


DE FIELTRO

fieltro y el tuerca decorativa.


6.Restaure la energía eléctrica y verifique la operación de la unidad.

Page 11
Image 11
NuTone 768CHNT Instalación DEL Sistema DE Conductos, Conexión Eléctrica, Arme EL Tacho DE Rejilla Y LA Cotinilla DE Vidrio

768CHNT specifications

The NuTone 768CHNT is a versatile and highly efficient ventilation fan designed to provide superior air movement and noise reduction, making it an excellent choice for a variety of residential and commercial applications. This model is specifically engineered to enhance indoor air quality while seamlessly blending into the aesthetics of modern spaces.

One of the standout features of the NuTone 768CHNT is its powerful motor. Equipped with a robust, high-performance AC motor, this ventilation fan delivers a substantial airflow rating, effectively exhausting stale air, moisture, and odors from bathrooms, kitchens, or laundry areas. This capability ensures that indoor environments remain fresh, contributing to overall comfort and health.

The NuTone 768CHNT is also notable for its whisper-quiet operation. With a low sone rating, this fan minimizes noise, allowing users to enjoy a tranquil atmosphere without disruptive fan sounds. This characteristic is particularly valuable in residential settings, where peace and quiet are often paramount.

Installation of the NuTone 768CHNT is straightforward, designed for easy integration into both new constructions and existing spaces. It features a durable housing designed for long-lasting performance, and the fan is compatible with a variety of duct configurations, enhancing its flexibility for different installation scenarios.

In terms of design, the NuTone 768CHNT showcases a sleek and unobtrusive appearance. Its contemporary styling allows it to blend seamlessly with various ceiling types, maintaining the aesthetic integrity of living spaces. The compact design also contributes to its attractiveness, making it suitable for various room sizes without overwhelming the space.

The fan also incorporates advanced technologies aimed at energy efficiency. With Energy Star® certification, users can be assured of reduced energy consumption, contributing to lower utility bills while promoting environmental sustainability.

Additional features include an integrated light, which allows the NuTone 768CHNT to double as an effective lighting source, enhancing its utility. The fixture is compatible with various bulb types, providing flexibility in illumination options.

Overall, the NuTone 768CHNT is a powerful, quiet, and energy-efficient ventilation solution ideal for improving indoor air quality while maintaining stylish design and functionality. Its combination of performance, ease of installation, and modern aesthetics makes it a top choice for homeowners and builders alike.