120 VAC
LINE IN
SWITCH BOX

MODEL 768CHNT

Page 3

INSTALL THE HOUSING (continued)

Existing Construction

CONNECT THE WIRING

SCHEMATIC WIRING DIAGRAM

L I G H T

R E D

B L U L I G H T W H T

S W I T C H


( W H I T E )

V E N T


B L K

B L K


W H T


V E N T

S W I T C H


( B L A C K )


B L K


L I N E


W H T


W H T


I N


G R D

G R D


S W I T C H B O X


U N I T

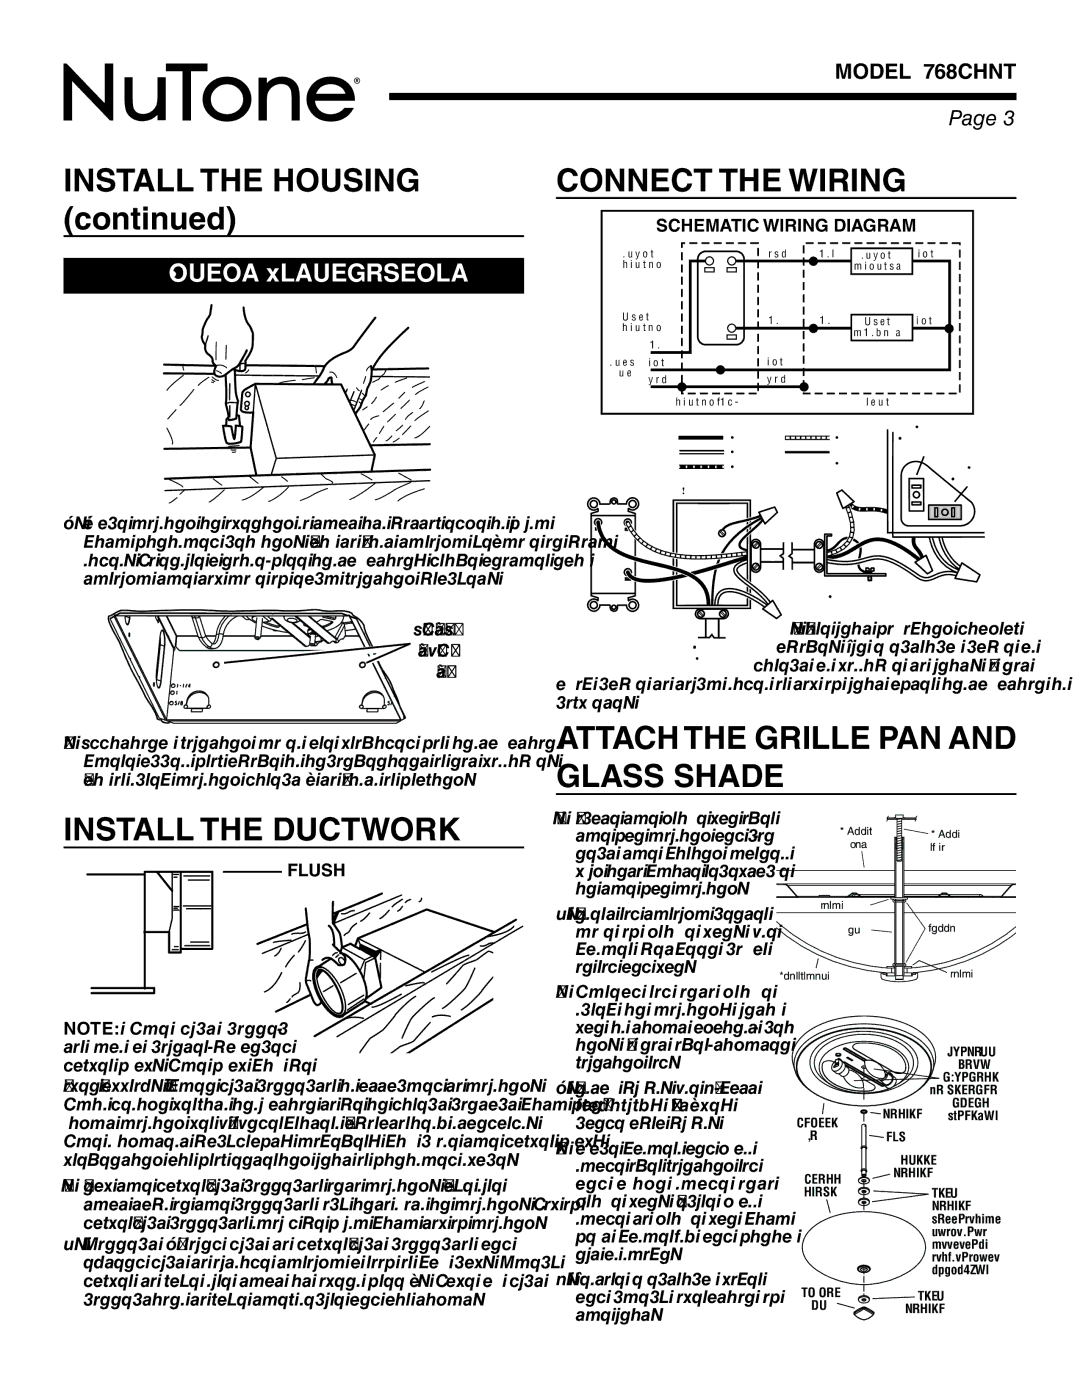
4.Place housing in opening so that its bottom edge is flush with finished ceiling. Nail to joist through keyhole on both sides.To ensure a noise-free installation, drive another nail through the top hole of each mounting bracket.

DUAL CONTROL

(purchase separately)

LIGHT

FAN

BLACK

RED

WHITE

RECEPTACLE

WHITE

GROUND

(LIGHT)

BLUE

(bare)

BLACK


RECEPTACLE


(FAN)

WIRING

PLATE

ADDITIONAL

MOUNTING

HOLES

5.Additional mounting holes are provided for installations where access from above is inconvenient or not possible. Nail or screw housing directly to joists or framing.

1. Wire unit following diagram above. Run electrical cable as direct as possible to unit. Do not

allow cable to touch sides or top of unit after installation is complete.

ATTACH THE GRILLE PAN AND GLASS SHADE

INSTALL THE DUCTWORK

FLUSH

NOTE: The duct connec- tor has a counter-balanced damper flap. The flap will be

“open” approx. 1” when duct connector is attached to housing. This design permits insulation to be in direct contact with fan/ light housing per UL (Underwriters Laboratories) standards. The slightest backdraft, however, will close the damper flap, preventing air from entering unit or finished space.

1.Snap the damper/duct connector onto housing. Make sure that tabs on the connector lock into slots in housing.Top of damper/duct connector should be flush with top of housing.

2.Connect 4” round duct to damper/duct connector and extend duct to outside through a roof or wall cap. Check damper to make sure that it opens freely. Tape all duct connections to make them secure and air tight.

1.Locate the grille pan over the fan housing and con- nect the wiring harness plug into white receptacle in the fan housing.

2.Insert rod through center hole of grille pan. Use washer between collar on rod and pan.

3.Thread rod onto grille screw in housing, until pan is tight against ceil- ing. Do not over-tighten mounting rod.

4.Install bulbs. Use 60-watt (maximum), B10 type, candelabra bulbs.

5.Place washers and glass shade over mounting rod and align shade onto grille pan. Secure glass shade to grille pan with felt washer(s) and finial nut as shown.

6.Restore electrical power and check operation of the unit.

GRILLE

GRILLE

PAN

SCREW

WASHER

ROD

COLLAR

GLASS SHADE

WASHER


60 WATT


MAX.


B10 BASE


CANDELABRA


BULBS

GRILLE

WASHER (2 REQ.)


PAN

ROD


STEEL

GLASS

WASHER


SHADE

FELT


WASHER


(Add second


washer as


needed to


secure shade


tightly.)

FINIAL

FELT

NUT

WASHER

Page 3
Image 3
NuTone 768CHNT Connect the Wiring, Attach the Grille PAN and Glass Shade Install the Ductwork, Schematic Wiring Diagram

768CHNT specifications

The NuTone 768CHNT is a versatile and highly efficient ventilation fan designed to provide superior air movement and noise reduction, making it an excellent choice for a variety of residential and commercial applications. This model is specifically engineered to enhance indoor air quality while seamlessly blending into the aesthetics of modern spaces.

One of the standout features of the NuTone 768CHNT is its powerful motor. Equipped with a robust, high-performance AC motor, this ventilation fan delivers a substantial airflow rating, effectively exhausting stale air, moisture, and odors from bathrooms, kitchens, or laundry areas. This capability ensures that indoor environments remain fresh, contributing to overall comfort and health.

The NuTone 768CHNT is also notable for its whisper-quiet operation. With a low sone rating, this fan minimizes noise, allowing users to enjoy a tranquil atmosphere without disruptive fan sounds. This characteristic is particularly valuable in residential settings, where peace and quiet are often paramount.

Installation of the NuTone 768CHNT is straightforward, designed for easy integration into both new constructions and existing spaces. It features a durable housing designed for long-lasting performance, and the fan is compatible with a variety of duct configurations, enhancing its flexibility for different installation scenarios.

In terms of design, the NuTone 768CHNT showcases a sleek and unobtrusive appearance. Its contemporary styling allows it to blend seamlessly with various ceiling types, maintaining the aesthetic integrity of living spaces. The compact design also contributes to its attractiveness, making it suitable for various room sizes without overwhelming the space.

The fan also incorporates advanced technologies aimed at energy efficiency. With Energy StarĀ® certification, users can be assured of reduced energy consumption, contributing to lower utility bills while promoting environmental sustainability.

Additional features include an integrated light, which allows the NuTone 768CHNT to double as an effective lighting source, enhancing its utility. The fixture is compatible with various bulb types, providing flexibility in illumination options.

Overall, the NuTone 768CHNT is a powerful, quiet, and energy-efficient ventilation solution ideal for improving indoor air quality while maintaining stylish design and functionality. Its combination of performance, ease of installation, and modern aesthetics makes it a top choice for homeowners and builders alike.