Existing Construction

1.Choose heater location. make sure the heater will not be mounted closer than 6" from a vertical surface or 5" from the floor.

2.Refer to Figure 2. Make wall cutout next to a wall stud. Cutout size: 818" high x 11" wide.

NOTE: Cutout must be 458" above inside of wall.

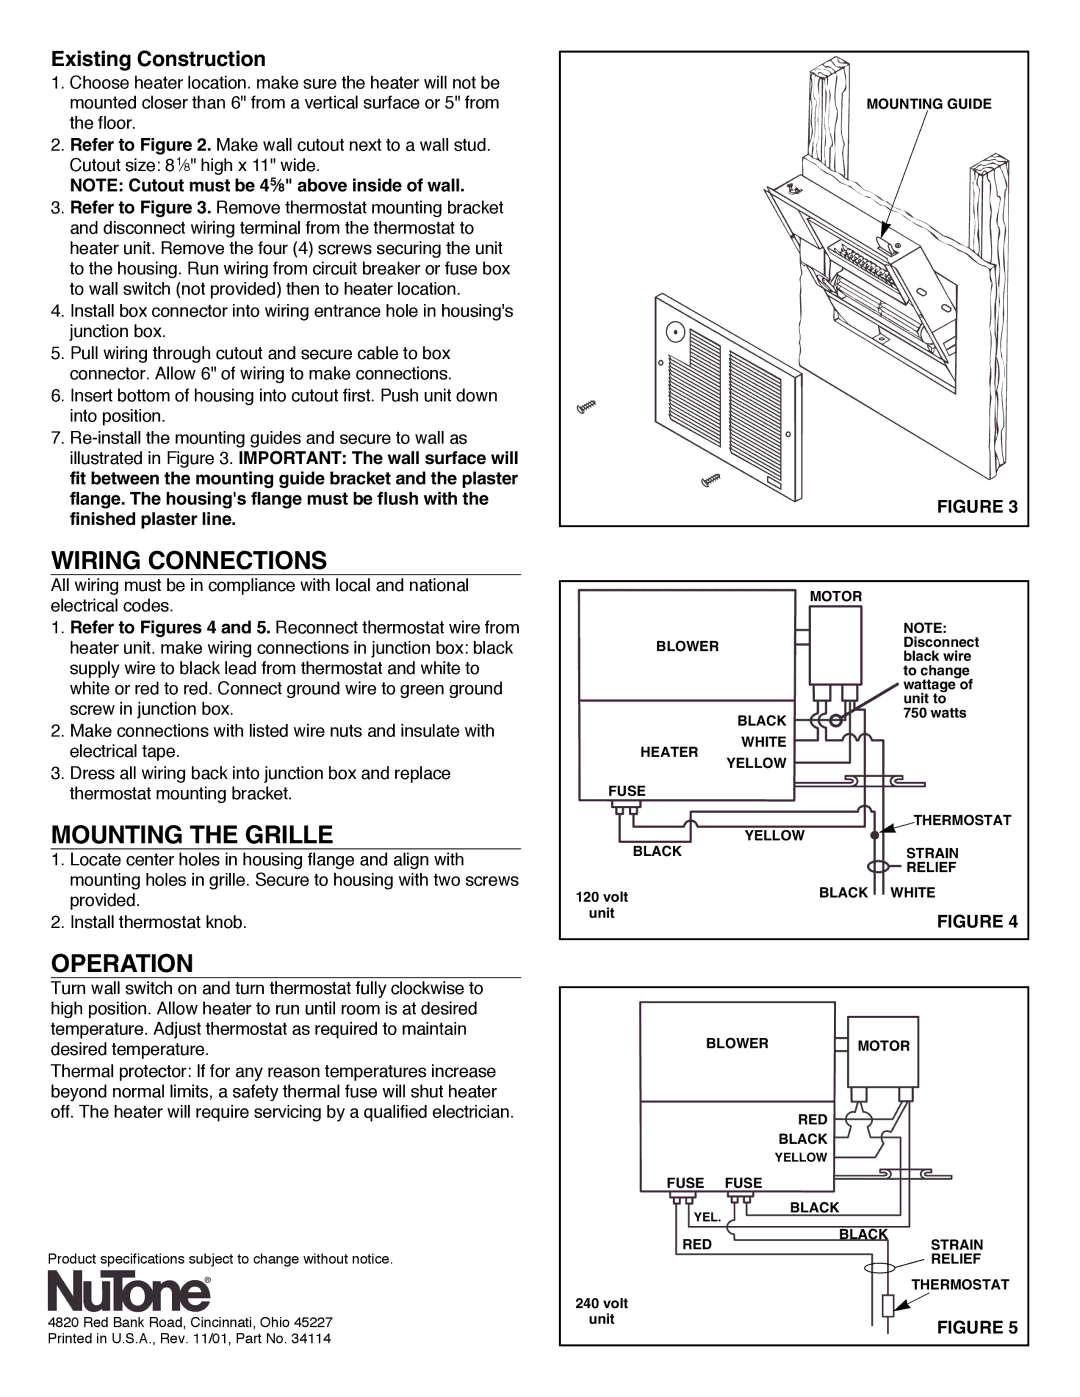
3.Refer to Figure 3. Remove thermostat mounting bracket and disconnect wiring terminal from the thermostat to heater unit. Remove the four (4) screws securing the unit to the housing. Run wiring from circuit breaker or fuse box to wall switch (not provided) then to heater location.

4.Install box connector into wiring entrance hole in housing's junction box.

5.Pull wiring through cutout and secure cable to box connector. Allow 6" of wiring to make connections.

6.Insert bottom of housing into cutout first. Push unit down into position.

7.Re-install the mounting guides and secure to wall as illustrated in Figure 3. IMPORTANT: The wall surface will fit between the mounting guide bracket and the plaster flange. The housing's flange must be flush with the finished plaster line.

WIRING CONNECTIONS

All wiring must be in compliance with local and national electrical codes.

1. Refer to Figures 4 and 5. Reconnect thermostat wire from

heater unit. make wiring connections in junction box: black

MOUNTING GUIDE

FIGURE 3

MOTOR

NOTE:

BLOWERDisconnect black wire

supply wire to black lead from thermostat and white to

white or red to red. Connect ground wire to green ground

screw in junction box.

2. Make connections with listed wire nuts and insulate with

BLACK

to change wattage of unit to

750 watts

electrical tape.

HEATER

WHITE

3. Dress all wiring back into junction box and replace

thermostat mounting bracket.

MOUNTING THE GRILLE

1.Locate center holes in housing flange and align with mounting holes in grille. Secure to housing with two screws provided.

2.Install thermostat knob.

YELLOW

FUSE


THERMOSTAT

BLACK

YELLOW

STRAIN


RELIEF

120 volt

BLACK WHITE

unit

FIGURE 4


OPERATION

Turn wall switch on and turn thermostat fully clockwise to high position. Allow heater to run until room is at desired temperature. Adjust thermostat as required to maintain desired temperature.

Thermal protector: If for any reason temperatures increase beyond normal limits, a safety thermal fuse will shut heater off. The heater will require servicing by a qualified electrician.

Product specifications subject to change without notice.

4820 Red Bank Road, Cincinnati, Ohio 45227

Printed in U.S.A., Rev. 11/01, Part No. 34114

BLOWER

MOTOR


RED


BLACK


YELLOW

FUSE FUSE


YEL.

BLACK


RED

BLACK

STRAIN


RELIEF


THERMOSTAT

240 volt


unit

FIGURE 5


Page 2
Image 2
NuTone 9315XT, 9315T installation instructions Wiring Connections, Mounting the Grille, Operation, Existing Construction

9315T, 9315XT specifications

NuTone has long been a reputable name in the home improvement industry, particularly known for its ventilation products. Among its extensive line of innovative offerings are the NuTone 9315XT and 9315T ceiling exhaust fans. These models are designed to enhance both functionality and aesthetics in home bathrooms and other humid spaces.

The NuTone 9315XT and 9315T are equipped with powerful motors that ensure effective air circulation while maintaining a quiet operation. This feature is crucial for spaces where peace and tranquillity are paramount, such as bathrooms and powder rooms. With a CFM (cubic feet per minute) rating designed for optimal airflow, these fans efficiently eliminate excess moisture, preventing mold growth and providing a more comfortable environment.

One of the standout features of the NuTone 9315XT model is its sleek, modern design. The fan's grille blends seamlessly with ceiling finishes, ensuring that it adds to rather than detracts from the room's aesthetic. The 9315T, while similar in function, offers a slightly different design orientation, catering to varied consumer preferences. Both models are easy to install, making them suitable for professional and DIY enthusiasts.

In terms of energy efficiency, both models are designed to operate with minimal power consumption. They are compliant with the latest regulations and standards, ensuring homeowners not only benefit from improved ventilation but also contribute to energy savings in their residences.

For those looking for added convenience, these models can be integrated with wall switches or home automation systems. This feature allows users to operate their exhaust fans with ease, enhancing the overall experience of the product.

Furthermore, both the 9315XT and 9315T models boast durable construction, designed to withstand the rigors of humid environments. The high-quality materials used in these fans ensure longevity, reducing the need for frequent replacements and repairs.

Overall, the NuTone 9315XT and 9315T ceiling exhaust fans offer a blend of power, efficiency, and modern design. Whether for new construction or renovations, these fans serve as a reliable choice for enhancing indoor air quality while also elevating the decor of any space. With their combination of stylish aesthetics and advanced technology, they continue to stand out in the competitive market of home ventilation solutions.