MODELO QTXEN110SFLT

Página 

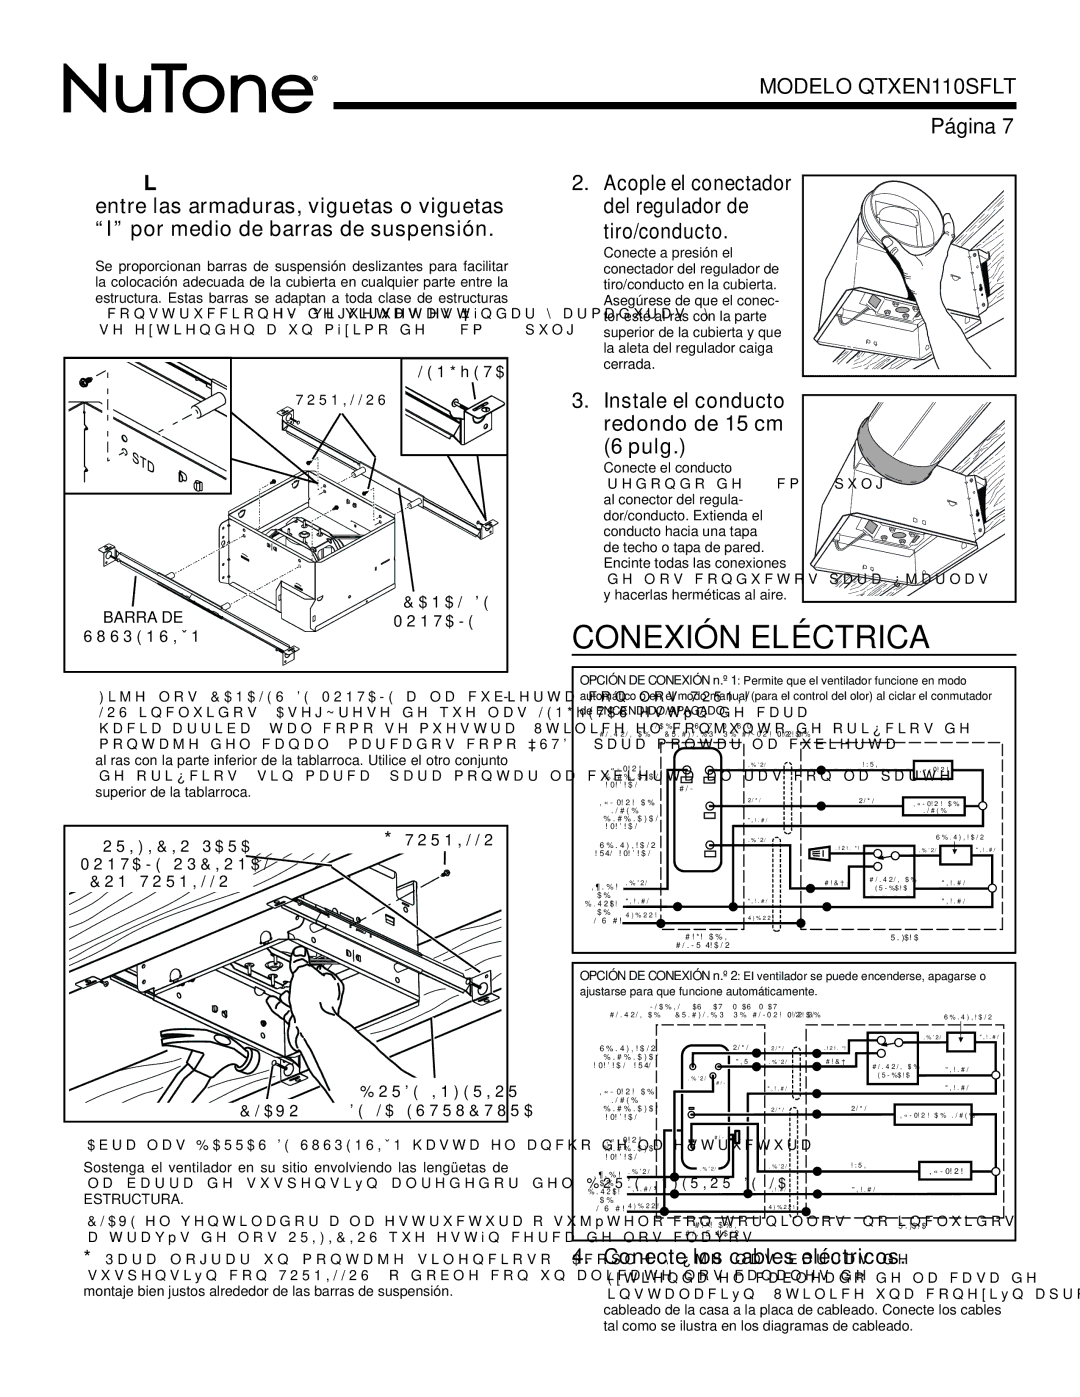
1b.Instale la cubierta en cualquier parte entre las armaduras, viguetas o viguetas “I” por medio de barras de suspensión.

Se proporcionan barras de suspensión deslizantes para facilitar la colocación adecuada de la cubierta en cualquier parte entre la estructura. Estas barras se adaptan a toda clase de estructuras (construcciones de viguetas “I”, viguetas estándar y armaduras) y se extienden a un máximo de 61 cm (24 pulg.).


LENGÜETA


TORNILLOS (4)

BARRA DE

CANAL DE

MONTAJE (2)

SUSPENSIÓN

(4)

Fije los CANALES DE MONTAJE a la cubierta con los TORNIL- LOS incluidos. Asegúrese de que las LENGÜETAS estén de cara hacia arriba, tal como se muestra. Utilice el conjunto de orificios de montaje del canal (marcados como “STD”) para montar la cubierta al ras con la parte inferior de la tablarroca. Utilice el otro conjunto de orificios (sin marca) para montar la cubierta al ras con la parte superior de la tablarroca.

ORIFICIO PARA

* TORNILLO (2)

MONTAJE OPCIONAL


CON TORNILLO (4)


BORDE INFERIOR

CLAVO (4)

DE LA ESTRUCTURA

Abra las BARRAS DE SUSPENSIÓN hasta el ancho de la estructura.

Sostenga el ventilador en su sitio envolviendo las lengüetas de la barra de suspensión alrededor del BORDE INFERIOR DE LA ESTRUCTURA.

CLAVE el ventilador a la estructura o sujételo con tornillos (no incluidos) a través de los ORIFICIOS que están cerca de los clavos.

*Para lograr un montaje silencioso: Acople y fije las barras de suspensión con TORNILLOS, o doble con un alicate los canales de montaje bien justos alrededor de las barras de suspensión.

2. Acople el conectador del regulador de tiro/conducto.

Conecte a presión el conectador del regulador de tiro/conducto en la cubierta. Asegúrese de que el conec- tor esté al ras con la parte superior de la cubierta y que la aleta del regulador caiga cerrada.

3.Instale el conducto redondo de 15 cm

(6 pulg.)

Conecte el conducto redondo de 15 cm (6 pulg.) al conector del regula- dor/conducto. Extienda el conducto hacia una tapa de techo o tapa de pared. Encinte todas las conexiones de los conductos para fijarlas y hacerlas herméticas al aire.

CONEXIÓN ELÉCTRICA

OPCIÓN DE CONEXIÓN n.º 1: Permite que el ventilador funcione en modo automático o en el modo manual (para el control del olor) al ciclar el conmutador de ENCENDIDO/APAGADO.

-/$%,/ 67 0607

#/.42/, $% $&5.#)/.%3&3%.#/-02! 0/2 3%0!2!$/

,«-0!2!2

.%'2/


!:5,


,«-0!2!2


%.#%.$)$/


!0!'!$/

#/-


,«-0!2!2$%

2/*/


2/*/

,«-0!2!2$%


./#(%


./#(%


%.#%.$)$/

",!.#/


!0!'!$/


6%.4),!$/2

.%'2/


6%.4),!$/2


.!2!.*!


.%'2/

",!.#/

!54/!0!'!$/


,¶.%!

.%'2/


#!&²

#/.42/, $%

",!.#/


(5-%$!$


$%

",!.#/

",!.#/


",!.#/


%.42!$!


$%

4)%22!

4)%22!


/ 66#!


#!*!!$%,$


5.)$!$


#/.-54!$/2


OPCIÓN DE CONEXIÓN n.º 2: El ventilador se puede encenderse, apagarse o ajustarse para que funcione automáticamente.


-/$%,/ $6 $7 0$6 0$7


#/.42/, $% $&5.#)/.%3&3%.#/-02! 0/2 3%0!2!$/


6%.4),!$/2

6%.4),!$/2


2/*/

2/*/


.!2!.*!


.%'2/


",!.#/


%.#%.$)$/


",5

.%'2/


#!&²


!0!'!$/!54/


#/.42/, $%


",!.#/


(5-%$!$


.%'2/


#/-


,«-0!2!2$%


",!.#/


",!.#/


./#(%


%.#%.$)$/


2/*/


2/*/


,«-0!2!2$% ./#(%


!0!'!$/


,«-0!2!2


#/-


%.#%.$)$/


!0!'!$/


,¶.%!

.%'2/


.%'2/


.%'2/


!:5,


,«-0!2!


$%

",!.#/


",!.#/


",!.#/


%.42!$!


$%


4)%22!


/ 66#!


4)%22!


#!*!!$%,$


5.)$!$


#/.-54!$/2


4. Conecte los cables eléctricos.

Extienda el cableado de la casa de 120 V CA al lugar de la instalación. Utilice una conexión aprobada por UL para afianzar el cableado de la casa a la placa de cableado. Conecte los cables tal como se ilustra en los diagramas de cableado.

Page 7
Image 7
NuTone QTXEN110SFLT warranty Conexión Eléctrica, Pulg, Conecte los cables eléctricos, Instale el conducto redondo de 15 cm

QTXEN110SFLT specifications

The NuTone QTXEN110SFLT is a versatile and highly efficient ventilation fan designed for residential use, particularly in bathrooms. This model combines modern aesthetics with advanced technology, making it a popular choice for homeowners seeking to enhance air quality while maintaining a peaceful environment.

One of the main features of the QTXEN110SFLT is its powerful yet quiet operation. With a noise level rating of just 0.7 sones, this fan is one of the quietest on the market, allowing for discreet air circulation without disruptive sound. This is particularly beneficial in bathroom settings where tranquility is desired.

The fan boasts an impressive airflow rate of 110 cubic feet per minute (CFM), which efficiently removes moisture and odors from the air. Effective moisture control is crucial in preventing mold growth and maintaining a healthy indoor environment, especially in humid areas like bathrooms. The QTXEN110SFLT is designed to handle spaces of up to 105 square feet, making it suitable for a variety of bathroom sizes.

In addition to its superior performance, the QTXEN110SFLT features a sleek and modern design that seamlessly blends into any décor. The fan comes equipped with an energy-efficient integrated LED light, which not only illuminates the space but also helps reduce energy consumption. The light is dimmable, offering versatility in brightness levels to suit different moods and activities.

Installation is made easy with the fan's flexible duct options and included mounting hardware. The design allows for both new construction and remodel applications, giving homeowners flexibility in how they incorporate this fan into their spaces.

Another notable characteristic is the ENERGY STAR certification, which signifies the product's commitment to energy efficiency. This translates to lower utility bills and reduced environmental impact, appealing to eco-conscious consumers.

The NuTone QTXEN110SFLT also includes a four-function wall switch for convenient control. This switch allows users to operate the fan, light, and dimming features easily, promoting user-friendly interaction.

In conclusion, the NuTone QTXEN110SFLT stands out in the ventilation fan market due to its quiet operation, impressive airflow, energy efficiency, modern design, and ease of installation. It is an ideal choice for homeowners looking to improve air quality in their bathrooms while enjoying a stylish and functional fixture.