MODELO QTXN110SL

Página 

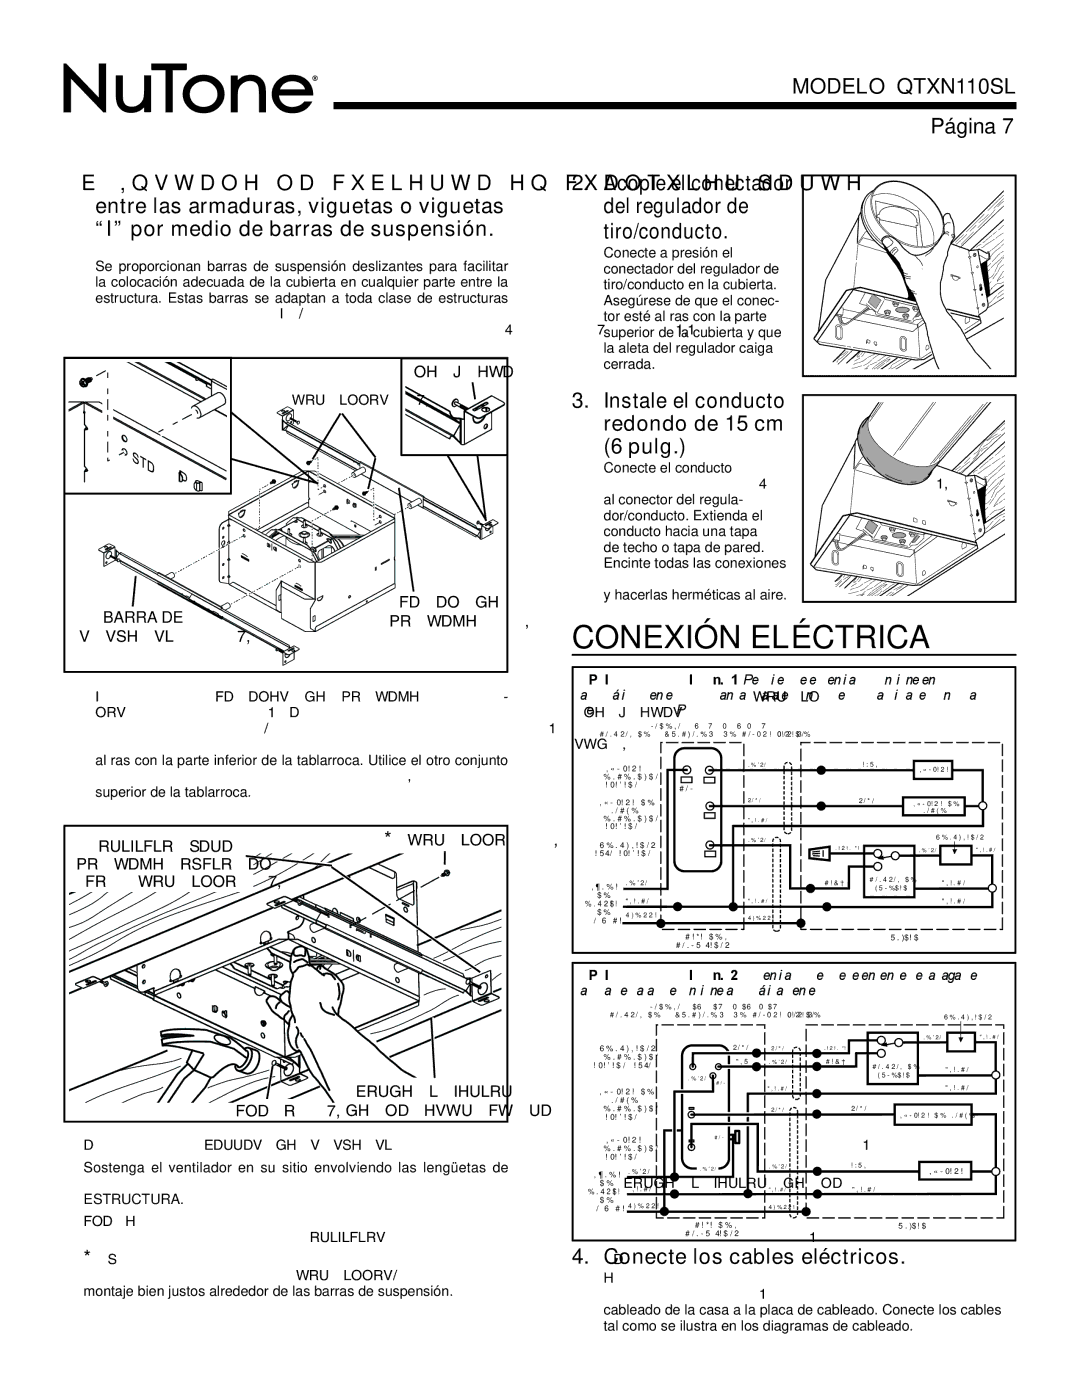
1b.Instale la cubierta en cualquier parte entre las armaduras, viguetas o viguetas “I” por medio de barras de suspensión.

Se proporcionan barras de suspensión deslizantes para facilitar la colocación adecuada de la cubierta en cualquier parte entre la estructura. Estas barras se adaptan a toda clase de estructuras (construcciones de viguetas “I”, viguetas estándar y armaduras) y se extienden a un máximo de 61 cm (24 pulg.).


LENGÜETA


TORNILLOS (4)

BARRA DE

CANAL DE

MONTAJE (2)

SUSPENSIÓN

(4)

Fije los CANALES DE MONTAJE a la cubierta con los TORNIL- LOS incluidos. Asegúrese de que las LENGÜETAS estén de cara hacia arriba, tal como se muestra. Utilice el conjunto de orificios de montaje del canal (marcados como “STD”) para montar la cubierta al ras con la parte inferior de la tablarroca. Utilice el otro conjunto de orificios (sin marca) para montar la cubierta al ras con la parte superior de la tablarroca.

ORIFICIO PARA

* TORNILLO (2)

MONTAJE OPCIONAL


CON TORNILLO (4)


BORDE INFERIOR

CLAVO (4)

DE LA ESTRUCTURA

Abra las BARRAS DE SUSPENSIÓN hasta el ancho de la estructura.

Sostenga el ventilador en su sitio envolviendo las lengüetas de la barra de suspensión alrededor del BORDE INFERIOR DE LA ESTRUCTURA.

CLAVE el ventilador a la estructura o sujételo con tornillos (no incluidos) a través de los ORIFICIOS que están cerca de los clavos.

*Para lograr un montaje silencioso: Acople y fije las barras de suspensión con TORNILLOS, o doble con un alicate los canales de montaje bien justos alrededor de las barras de suspensión.

2. Acople el conectador del regulador de tiro/conducto.

Conecte a presión el conectador del regulador de tiro/conducto en la cubierta. Asegúrese de que el conec- tor esté al ras con la parte superior de la cubierta y que la aleta del regulador caiga cerrada.

3.Instale el conducto redondo de 15 cm

(6 pulg.)

Conecte el conducto redondo de 15 cm (6 pulg.) al conector del regula- dor/conducto. Extienda el conducto hacia una tapa de techo o tapa de pared. Encinte todas las conexiones de los conductos para fijarlas y hacerlas herméticas al aire.

CONEXIÓN ELÉCTRICA

OPCIÓN DE CONEXIÓN n.º 1: Permite que el ventilador funcione en modo automático o en el modo manual (para el control del olor) al ciclar el conmutador de ENCENDIDO/APAGADO.

-/$%,/ 67 0607

#/.42/, $% $&5.#)/.%3&3%.#/-02! 0/2 3%0!2!$/

,«-0!2!2

.%'2/


!:5,


,«-0!2!2


%.#%.$)$/


!0!'!$/

#/-


,«-0!2!2$%

2/*/


2/*/

,«-0!2!2$%


./#(%


./#(%


%.#%.$)$/

",!.#/


!0!'!$/


6%.4),!$/2

.%'2/


6%.4),!$/2


.!2!.*!


.%'2/

",!.#/

!54/!0!'!$/


,¶.%!

.%'2/


#!&²

#/.42/, $%

",!.#/


(5-%$!$


$%

",!.#/

",!.#/


",!.#/


%.42!$!


$%

4)%22!

4)%22!


/ 66#!


#!*!!$%,$


5.)$!$


#/.-54!$/2


OPCIÓN DE CONEXIÓN n.º 2: El ventilador se puede encenderse, apagarse o ajustarse para que funcione automáticamente.


-/$%,/ $6 $7 0$6 0$7


#/.42/, $% $&5.#)/.%3&3%.#/-02! 0/2 3%0!2!$/


6%.4),!$/2

6%.4),!$/2


2/*/

2/*/


.!2!.*!


.%'2/


",!.#/


%.#%.$)$/


",5

.%'2/


#!&²


!0!'!$/!54/


#/.42/, $%


",!.#/


(5-%$!$


.%'2/


#/-


,«-0!2!2$%


",!.#/


",!.#/


./#(%


%.#%.$)$/


2/*/


2/*/


,«-0!2!2$% ./#(%


!0!'!$/


,«-0!2!2


#/-


%.#%.$)$/


!0!'!$/


,¶.%!

.%'2/


.%'2/


.%'2/


!:5,


,«-0!2!


$%

",!.#/


",!.#/


",!.#/


%.42!$!


$%


4)%22!


/ 66#!


4)%22!


#!*!!$%,$


5.)$!$


#/.-54!$/2


4. Conecte los cables eléctricos.

Extienda el cableado de la casa de 120 V CA al lugar de la instalación. Utilice una conexión aprobada por UL para afianzar el cableado de la casa a la placa de cableado. Conecte los cables tal como se ilustra en los diagramas de cableado.

Page 7
Image 7
NuTone QTXN110SL manual Conexión Eléctrica, Pulg, Conecte los cables eléctricos, Instale el conducto redondo de 15 cm

QTXN110SL specifications

The NuTone QTXN110SL is an advanced ventilation fan designed to enhance indoor air quality and comfort in residential spaces. It emphasizes power, efficiency, and innovative technology, making it an ideal choice for bathrooms and other humidity-prone areas.

At the heart of this model is its powerful motor, rated at 110 CFM, which effectively removes excess moisture and odors, ensuring a fresh and pleasant environment. The fan operates at a quiet level of only 0.7 sones, allowing for restful indoor experiences without disruptive noise, making it perfect for late-night use or in homes with sleeping occupants.

One of the notable features of the QTXN110SL is its designation as a high-performance energy-efficient appliance. The Energy Star certification signifies that this model meets stringent energy efficiency guidelines set by the EPA. This not only promotes lower energy bills but also contributes to a more sustainable home environment. The fan draws minimal power while delivering optimal airflow, which is a significant advantage for energy-conscious consumers.

The installation process is also simplified with the QTXN110SL’s ducting options. It is designed for easy installation, fitting into various ceiling types while providing flexibility with its adjustable ducting capabilities. The fan can be mounted in different orientations to suit the layout of the space, further enhancing its versatility.

Another impressive characteristic of the QTXN110SL is its integrated lighting feature. The fan includes a bright, energy-efficient 11-watt LED light, which offers ample illumination for bathrooms or utility rooms. This dual functionality of ventilation and lighting adds convenience and increases the fan's utility in everyday use.

Additionally, the QTXN110SL is equipped with a robust grille design that is not only aesthetically pleasing but also effective in distributing airflow evenly throughout the room. The contemporary look of the grille complements various home decors, making it a favorable choice for modern interiors.

Overall, the NuTone QTXN110SL stands out with its blend of powerful airflow, energy efficiency, quiet operation, easy installation, and dual functionality with integrated lighting. It is an exceptional choice for homeowners looking to improve indoor air quality while maintaining a stylish and functional space. Its innovative features and technologies make it a reliable option for any residential environment.