PREPARATION

1.Use the dimensional drawings (Refer to FIGURES 1 - 3) to lay out the range hood’s mounting holes, wiring access and ductwork by marking the cabinet bottom and drywall where applicable.

2.Make cutouts for wiring and ductwork.

3.If the hood is to be ducted, install the ductwork so that is flush to the range hood’s mounting surface.

Refer to FIGURE 1 if the range hood is to be installed with a horizontal discharge.

Refer to FIGURE 2 and FIGURE 3 if the range hood is to be installed with a vertical discharge.

4.Run two-conductor wire (with ground) from a power source to the hood location. Bring approximately 12” of wiring through wiring hole in cabinet.

5.Drill four 3/32” diameter pilot holes at points where mounting holes are marked in cabinet bottom.

6.Insert four (4) mounting screws, leaving approximately ¼” of thread exposed.

7.Remove and retain the mounting screws securing the 3¼” x 10” and 7” duct transitions to the hood. Install the appropriate duct transition as described in the installation section.

INSTALLATION

1.Remove the necessary duct opening and wiring knockout from the range hood.

If the range hood is to be installed as a non-ducted unit, remove the wiring knockout only.

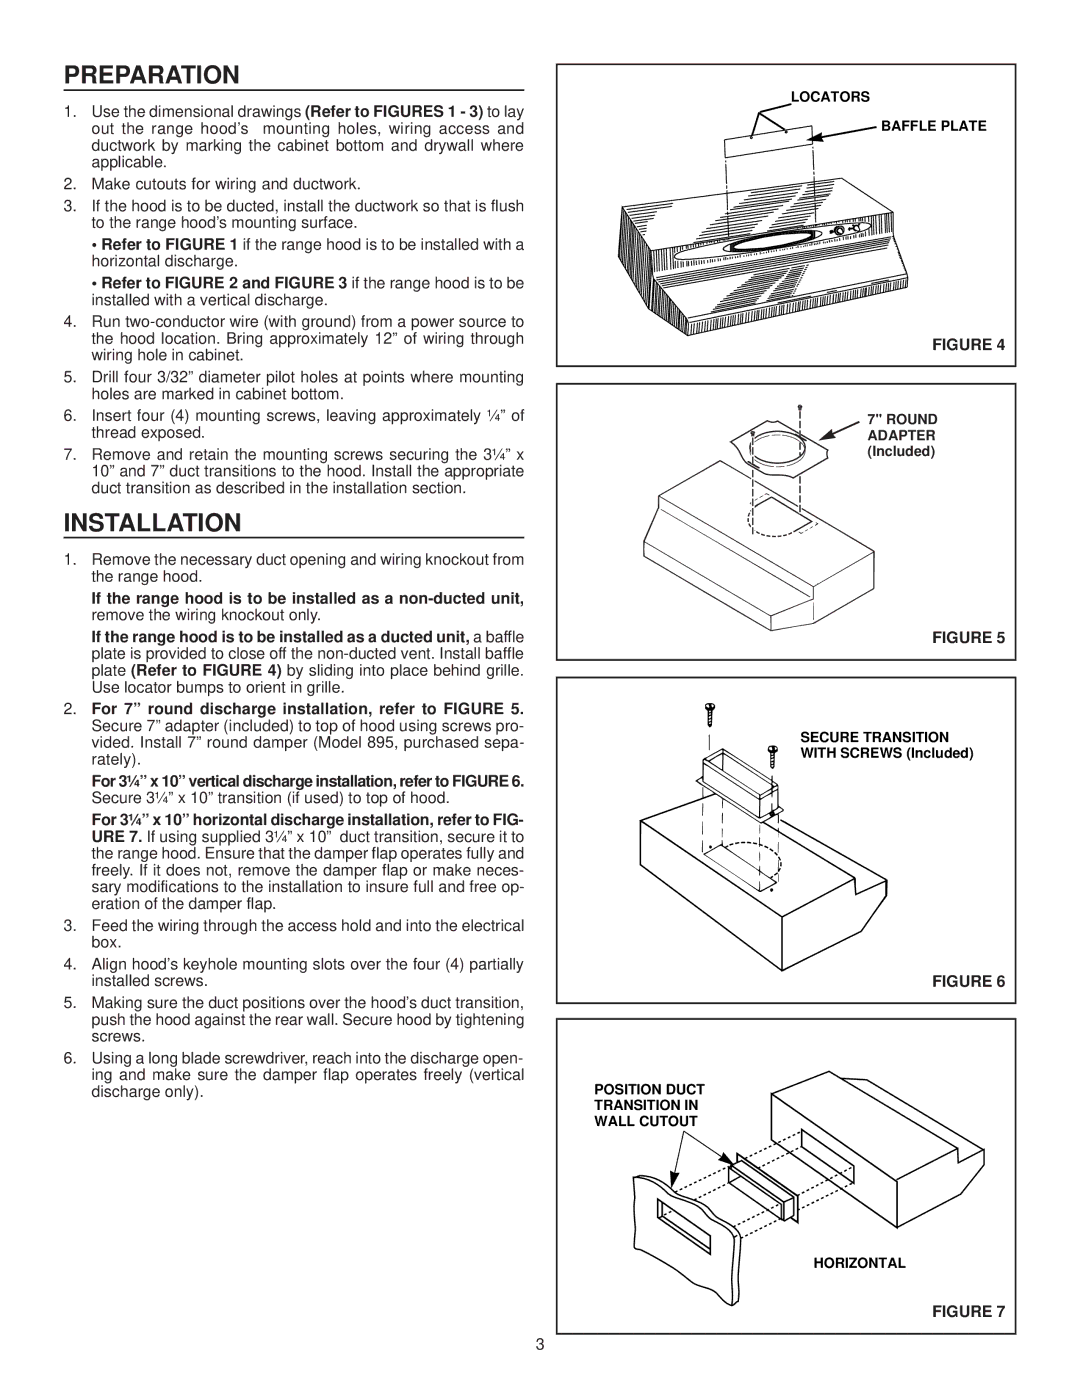
If the range hood is to be installed as a ducted unit, a baffle plate is provided to close off the non-ducted vent. Install baffle plate (Refer to FIGURE 4) by sliding into place behind grille. Use locator bumps to orient in grille.

2.For 7” round discharge installation, refer to FIGURE 5. Secure 7” adapter (included) to top of hood using screws pro- vided. Install 7” round damper (Model 895, purchased sepa- rately).

For 3¼” x 10” vertical discharge installation, refer to FIGURE 6. Secure 3¼” x 10” transition (if used) to top of hood.

For 3¼” x 10” horizontal discharge installation, refer to FIG- URE 7. If using supplied 3¼” x 10” duct transition, secure it to the range hood. Ensure that the damper flap operates fully and freely. If it does not, remove the damper flap or make neces- sary modifications to the installation to insure full and free op- eration of the damper flap.

3.Feed the wiring through the access hold and into the electrical box.

4.Align hood’s keyhole mounting slots over the four (4) partially installed screws.

5.Making sure the duct positions over the hood’s duct transition, push the hood against the rear wall. Secure hood by tightening screws.

6.Using a long blade screwdriver, reach into the discharge open- ing and make sure the damper flap operates freely (vertical discharge only).

LOCATORS

BAFFLE PLATE

FIGURE 4

7" ROUND ADAPTER (Included)

FIGURE 5

SECURE TRANSITION

WITH SCREWS (Included)

FIGURE 6

POSITION DUCT

TRANSITION IN

WALL CUTOUT

HORIZONTAL

FIGURE 7

3

Page 3
Image 3
NuTone WA6500 installation instructions Preparation, Installation

WA6500 specifications

The NuTone WA6500 is a cutting-edge bathroom exhaust fan that combines innovative technology with elegant design, making it a standout choice for homeowners looking to enhance their bathroom's air quality and aesthetics. This model is designed specifically to eliminate humidity, odors, and pollutants, thereby ensuring a fresher and healthier environment.

One of the main features of the WA6500 is its powerful yet efficient motor. With a strong airflow rating, it can effectively vent large bathrooms quickly, reducing moisture levels that can lead to mold and mildew growth. The fan operates quietly, providing a soothing atmosphere without the disruptive noise often associated with traditional exhaust fans. This is a significant advantage for users seeking peace and tranquility while engaging in their daily routines.

The WA6500 is equipped with advanced technology, including a built-in humidity sensor that automatically activates the fan when moisture levels exceed a preset threshold. This smart feature helps to maintain a consistent level of humidity in the bathroom, ensuring that the space remains dry and comfortable.

Another notable aspect of the NuTone WA6500 is its stylish design. The fan features a sleek and modern appearance, seamlessly integrating into various bathroom decors. Available in different finishes, it allows homeowners to choose an option that best matches their aesthetic preferences.

Installation is made easier with the WA6500, as it comes with a flexible duct connection and a mounting template, allowing for a hassle-free setup process. The fan is also compatible with different ceiling types and can be retrofitted into existing installations, giving homeowners flexibility in upgrading their ventilation systems.

Energy efficiency is a priority for the WA6500, as it meets or exceeds ENERGY STAR requirements. This makes it an environmentally friendly option, reducing electricity consumption and lowering utility bills over time.

Overall, the NuTone WA6500 is an exceptional bathroom exhaust fan that not only enhances indoor air quality but also adds an element of sophistication to any space. Its combination of power, efficiency, and stylish design makes it an outstanding choice for modern bathrooms, ensuring a comfortable and fresh environment for all users.