O2 DSL Router Classic
Quick start guide
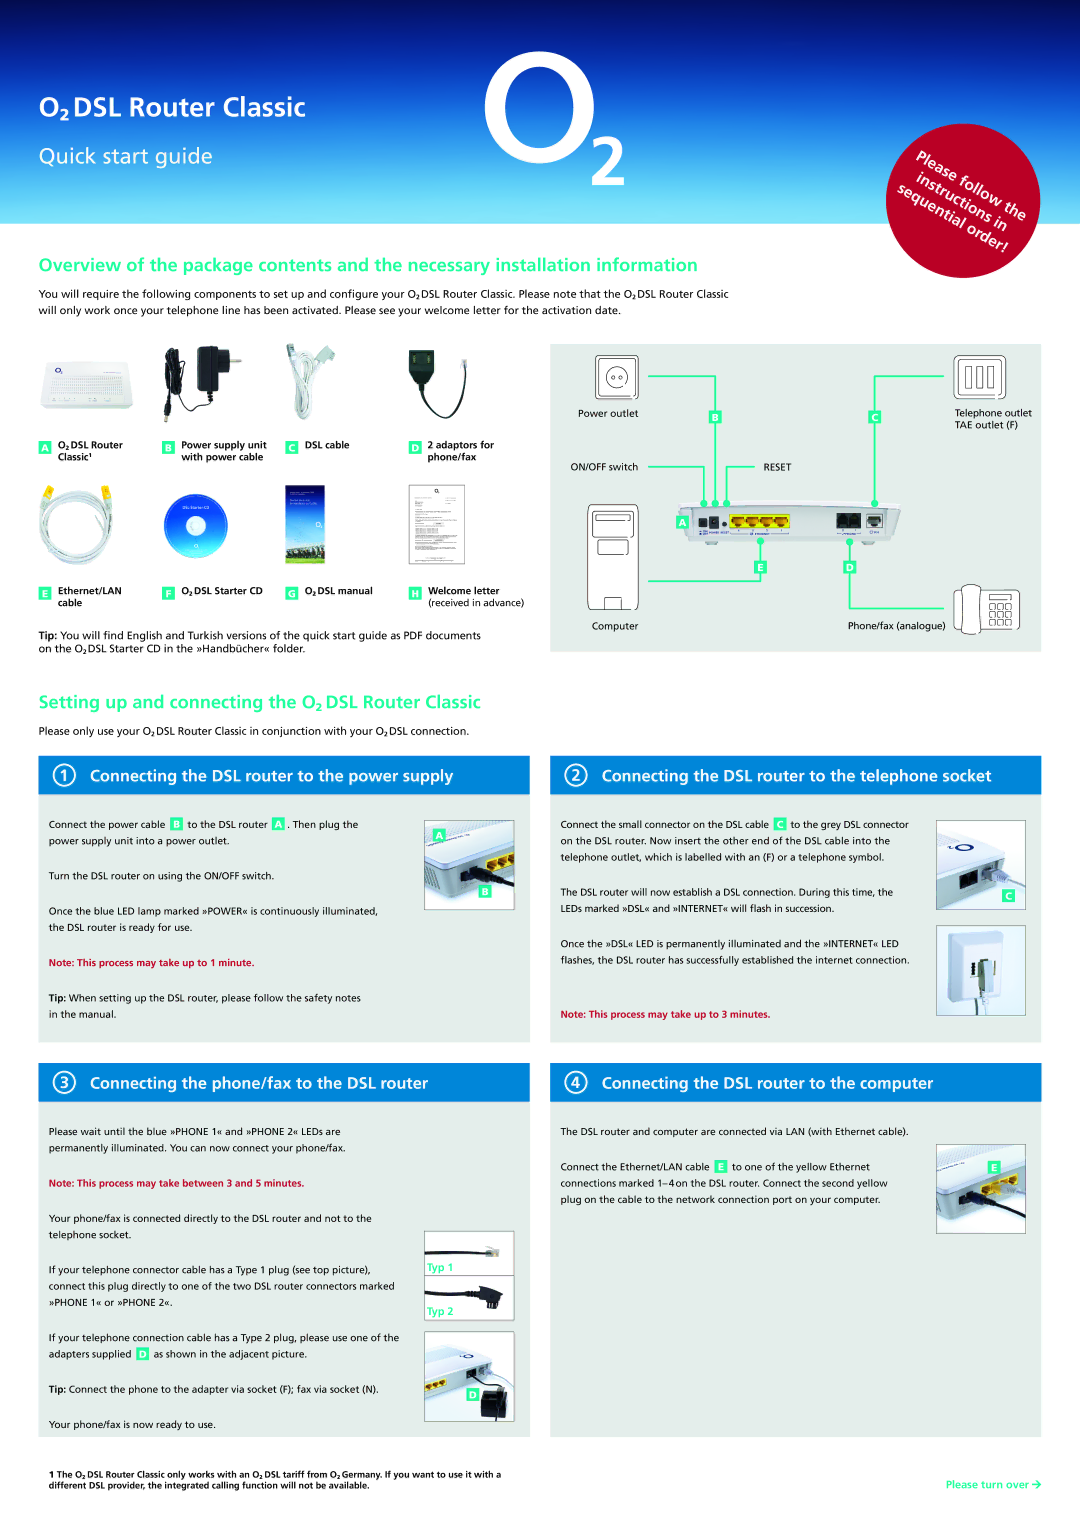
Overview of the package contents and the necessary installation information
You will require the following components to set up and configure your O2 DSL Router Classic. Please note that the O2 DSL Router Classic will only work once your telephone line has been activated. Please see your welcome letter for the activation date.
Please |
|
|
|
instructions |
| ||
| follow |
| |
sequential | in | ||
|
|
| the |
|
| order! | |
Power outlet
A | O2 DSL Router | B | Power supply unit | C | DSL cable | D | 2 adaptors for |
| Classic1 |
| with power cable |
|
|
| phone/fax |
ON/OFF switch
A |
E | Ethernet/LAN | F | O2 DSL Starter CD | G | O2 DSL manual | H | Welcome letter |
| cable |
|
|
|
|
| (received in advance) |
B |
RESET
E |
C |
D |
Telephone outlet TAE outlet (F)
Tip: You will find English and Turkish versions of the quick start guide as PDF documents on the O2 DSL Starter CD in the »Handbücher« folder.
Computer
Phone/fax (analogue)
Setting up and connecting the O2 DSL Router Classic
Please only use your O2 DSL Router Classic in conjunction with your O2 DSL connection.
1 Connecting the DSL router to the power supply
2 Connecting the DSL router to the telephone socket
Connect the power cable B to the DSL router A . Then plug the power supply unit into a power outlet.
Turn the DSL router on using the ON/OFF switch.
Once the blue LED lamp marked »POWER« is continuously illuminated, the DSL router is ready for use.
Note: This process may take up to 1 minute.
Tip: When setting up the DSL router, please follow the safety notes in the manual.
A |
B |
Connect the small connector on the DSL cable C to the grey DSL connector on the DSL router. Now insert the other end of the DSL cable into the telephone outlet, which is labelled with an (F) or a telephone symbol.
The DSL router will now establish a DSL connection. During this time, the | C |
| |
LEDs marked »DSL« and »INTERNET« will flash in succession. |
|
Once the »DSL« LED is permanently illuminated and the »INTERNET« LED flashes, the DSL router has successfully established the internet connection.
Note: This process may take up to 3 minutes.
3 Connecting the phone/fax to the DSL router
Please wait until the blue »PHONE 1« and »PHONE 2« LEDs are permanently illuminated. You can now connect your phone/fax.
Note: This process may take between 3 and 5 minutes.
Your phone/fax is connected directly to the DSL router and not to the telephone socket.
If your telephone connector cable has a Type 1 plug (see top picture), | Typ 1 | ||
connect this plug directly to one of the two DSL router connectors marked |
| ||
»PHONE 1« or »PHONE 2«. | Typ 2 | ||
|
|
| |
If your telephone connection cable has a Type 2 plug, please use one of the |
| ||
| |||
| |||
adapters supplied |
| as shown in the adjacent picture. |
|
D |
| ||
Tip: Connect the phone to the adapter via socket (F); fax via socket (N). | D |
|
Your phone/fax is now ready to use.
4 Connecting the DSL router to the computer
The DSL router and computer are connected via LAN (with Ethernet cable).
Connect the Ethernet/LAN cable E to one of the yellow Ethernet connections marked
E |
1 The O2 DSL Router Classic only works with an O2 DSL tariff from O2 Germany. If you want to use it with a different DSL provider, the integrated calling function will not be available.
Please turn over![]()