Set the recording mode (see “Recording Modes”).
Press the 9/+ or 0/– button to set the hour.

Inserting Batteries

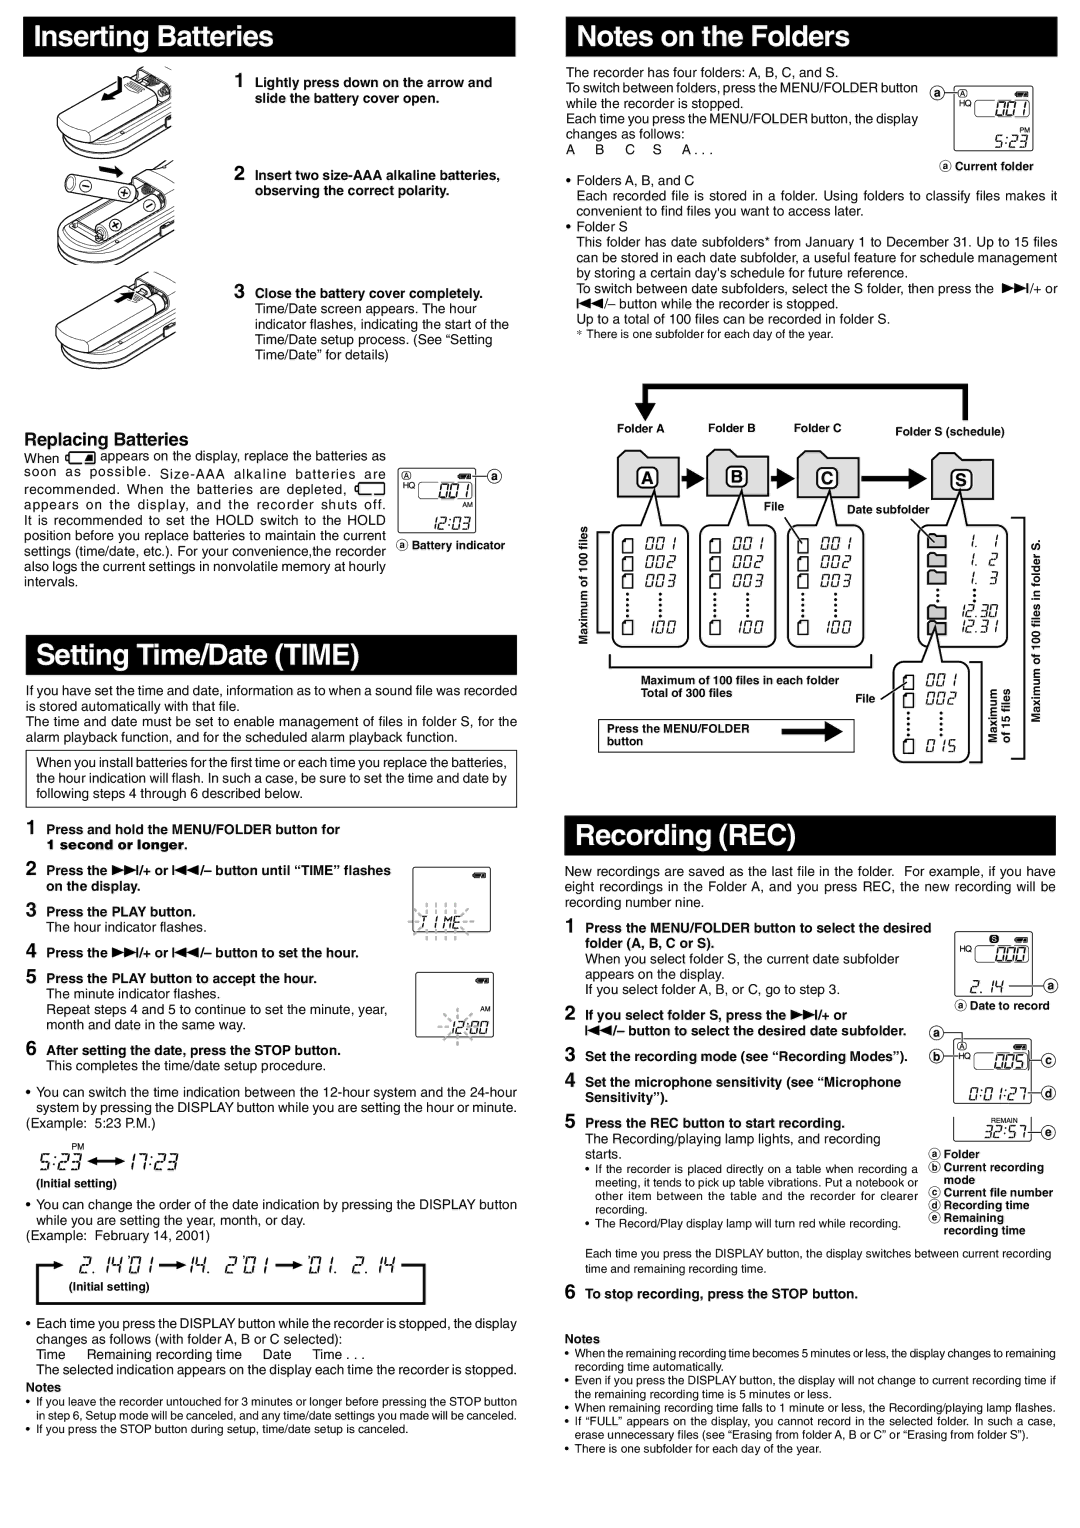
1 Lightly press down on the arrow and slide the battery cover open.

2 Insert two size-AAA alkaline batteries, observing the correct polarity.

3 Close the battery cover completely. Time/Date screen appears. The hour indicator flashes, indicating the start of the Time/Date setup process. (See “Setting Time/Date” for details)

Notes on the Folders

The recorder has four folders: A, B, C, and S.

To switch between folders, press the MENU/FOLDER button while the recorder is stopped.

Each time you press the MENU/FOLDER button, the display

changes as follows:

A B C S A . . .

aCurrent folder

Folders A, B, and C

Each recorded file is stored in a folder. Using folders to classify files makes it convenient to find files you want to access later.

Folder S

This folder has date subfolders* from January 1 to December 31. Up to 15 files can be stored in each date subfolder, a useful feature for schedule management by storing a certain day's schedule for future reference.

To switch between date subfolders, select the S folder, then press the 9/+ or 0/– button while the recorder is stopped.

Up to a total of 100 files can be recorded in folder S.

*There is one subfolder for each day of the year.

Replacing Batteries

When

appears on the display, replace the batteries as

soon as possible. Size-AAA alkaline batteries are

recommended. When the batteries are depleted,

appears on the display, and the recorder shuts off.

It is recommended to set the HOLD switch to the HOLD

Folder A

Folder B

Folder C

Folder S (schedule)


File

Date subfolder

position before you replace batteries to maintain the current

aBattery indicator

settings (time/date, etc.). For your convenience,the recorder

also logs the current settings in nonvolatile memory at hourly intervals.

Setting Time/Date (TIME)

If you have set the time and date, information as to when a sound file was recorded is stored automatically with that file.

The time and date must be set to enable management of files in folder S, for the alarm playback function, and for the scheduled alarm playback function.

When you install batteries for the first time or each time you replace the batteries, the hour indication will flash. In such a case, be sure to set the time and date by following steps 4 through 6 described below.

Maximum of 100 files

Maximum of 100 files in each folder Total of 300 files

Press the MENU/FOLDER button

File

Maximum of 15 files

Maximum of 100 files in folder S.

1 Press and hold the MENU/FOLDER button for

1 second or longer.

2 Press the 9/+ or 0/– button until “TIME” flashes on the display.

3 Press the PLAY button. The hour indicator flashes.

4

5 Press the PLAY button to accept the hour. The minute indicator flashes.

Recording (REC)

New recordings are saved as the last file in the folder. For example, if you have eight recordings in the Folder A, and you press REC, the new recording will be recording number nine.

1 Press the MENU/FOLDER button to select the desired folder (A, B, C or S).

When you select folder S, the current date subfolder appears on the display.

If you select folder A, B, or C, go to step 3.

Repeat steps 4 and 5 to continue to set the minute, year, month and date in the same way.

6 After setting the date, press the STOP button. This completes the time/date setup procedure.

• You can switch the time indication between the 12-hour system and the 24-hour system by pressing the DISPLAY button while you are setting the hour or minute.

(Example: 5:23 P.M.)

(Initial setting)

You can change the order of the date indication by pressing the DISPLAY button while you are setting the year, month, or day.

(Example: February 14, 2001)

2 If you select folder S, press the 9/+ or

0/– button to select the desired date subfolder.

3

4 Set the microphone sensitivity (see “Microphone Sensitivity”).

5 Press the REC button to start recording.

The Recording/playing lamp lights, and recording starts.

If the recorder is placed directly on a table when recording a meeting, it tends to pick up table vibrations. Put a notebook or other item between the table and the recorder for clearer recording.

The Record/Play display lamp will turn red while recording.

aDate to record

aFolder

bCurrent recording mode

cCurrent file number dRecording time eRemaining

recording time

(Initial setting)

Each time you press the DISPLAY button while the recorder is stopped, the display

changes as follows (with folder A, B or C selected): Time Remaining recording time Date Time . . .

The selected indication appears on the display each time the recorder is stopped.

Notes

If you leave the recorder untouched for 3 minutes or longer before pressing the STOP button in step 6, Setup mode will be canceled, and any time/date settings you made will be canceled.

If you press the STOP button during setup, time/date setup is canceled.

Each time you press the DISPLAY button, the display switches between current recording time and remaining recording time.

6 To stop recording, press the STOP button.

Notes

When the remaining recording time becomes 5 minutes or less, the display changes to remaining recording time automatically.

Even if you press the DISPLAY button, the display will not change to current recording time if the remaining recording time is 5 minutes or less.

When remaining recording time falls to 1 minute or less, the Recording/playing lamp flashes.

If “FULL” appears on the display, you cannot record in the selected folder. In such a case, erase unnecessary files (see “Erasing from folder A, B or C” or “Erasing from folder S”).

There is one subfolder for each day of the year.

Page 2
Image 2
Olympus 3600, 1800, 900 manual Inserting Batteries, Setting Time/Date Time, Recording REC, Replacing Batteries

3600, 900, 1800 specifications

The Olympus 1800, 900, and 3600 are widely recognized for their cutting-edge imaging technology and versatility in various applications, ranging from biomedical research to industrial inspections. Each model is designed to meet specific needs while maintaining high-quality performance and reliability.

The Olympus 1800 is characterized by its compact design and user-friendly interface, making it an ideal choice for fieldwork and laboratory environments. With a high-resolution imaging system, it offers excellent detail and clarity. The device is equipped with advanced optics that allow for superior light transmission, enabling users to capture sharp images even in low-light conditions. The 1800 also features automated settings to enhance usability, allowing for quick adjustments to suit varying conditions. This model is particularly favored in educational institutions for its ease of operation.

The Olympus 900, on the other hand, is known for its robust build and enhanced capabilities. This model features a larger sensor size, which contributes to improved image quality and depth. It comes with advanced imaging technologies such as phase contrast and fluorescence microscopy, allowing researchers to study specimens with remarkable precision. The 900 also supports digital connectivity, enabling seamless integration with software for data analysis and image sharing. Its ergonomic design promotes comfortable prolonged use, making it a popular choice for research labs.

Finally, the Olympus 3600 distinguishes itself with its cutting-edge imaging technologies and multifunctionality. Representing the pinnacle of Olympus' engineering, the 3600 incorporates high-speed imaging capabilities, making it suitable for dynamic studies, such as live-cell imaging. It features a sophisticated autofocus system that adjusts in real time, ensuring that rapid changes in subjects don’t affect image quality. Additionally, the 3600 supports advanced imaging modalities, integrating fluorescence, confocal, and live imaging techniques into a single platform. This versatility allows scientists to conduct comprehensive studies without switching equipment.

Together, the Olympus 1800, 900, and 3600 represent a commitment to innovation in imaging technology. Each model provides unique features and functionalities, catering to various users' needs in diverse fields while adhering to Olympus’s high standards of quality and performance. Whether for educational purposes, research applications, or industrial use, these microscopes are poised to deliver exceptional results.