E330_QSG_EN.fm Page 1 Wednesday, December 28, 2005 11:53 AM
Quick Start Guide
S
T
E
P
S
T
E
P
S
T
E
P
S
T
E
P
| VH487701 | UNPACK THE BOX CONTENTS |
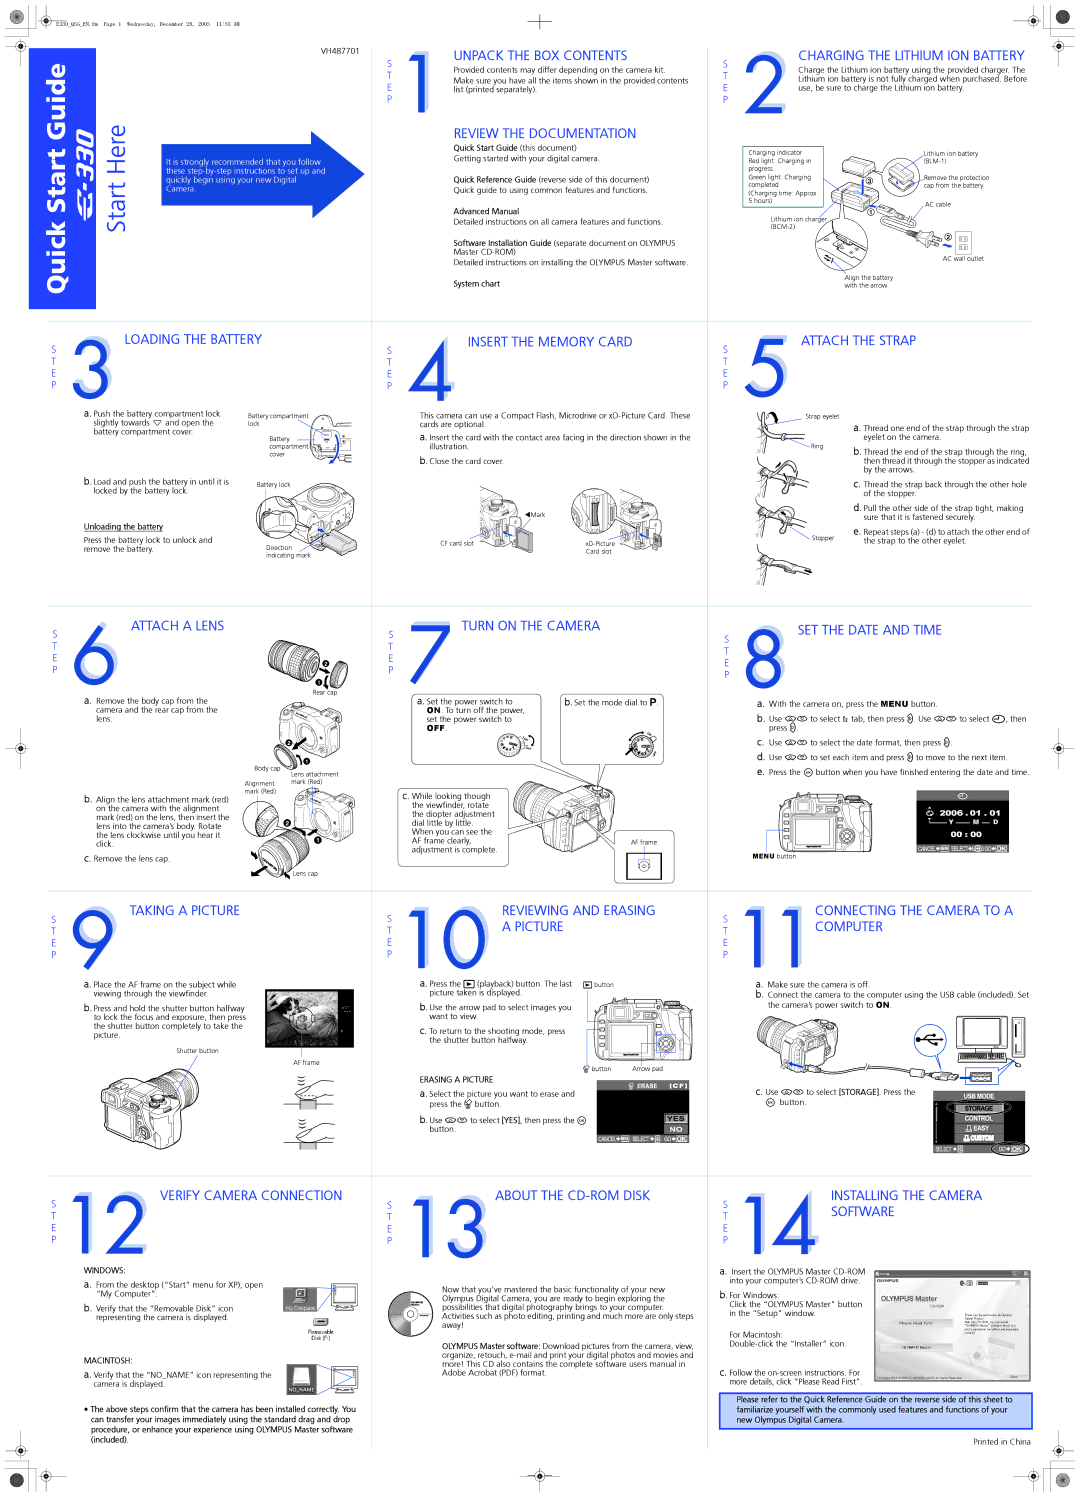
| CHARGING THE LITHIUM ION BATTERY | ||
| S | S | ||||
| Provided contents may differ depending on the camera kit. | Charge the Lithium ion battery using the provided charger. The | ||||
| T | T | ||||
| Make sure you have all the items shown in the provided contents | Lithium ion battery is not fully charged when purchased. Before | ||||
| E | E | ||||
| list (printed separately). | use, be sure to charge the Lithium ion battery. | ||||
| P |
| P |
|
|
|
Here |
| REVIEW THE DOCUMENTATION |
|
|
|
|
| Quick Start Guide (this document) |
| Charging indicator |
| Lithium ion battery | |
| Getting started with your digital camera. |
|
| |||
It is strongly recommended that you follow |
| Red light: Charging in |
| |||
|
|
| ||||
these |
|
| progress |
|
| |
Start | quickly begin using your new Digital | Quick Reference Guide (reverse side of this document) |
| Green light: Charging | 3 | Remove the protection |
Camera. | Quick guide to using common features and functions. |
| completed |
| cap from the battery. | |
| (Charging time: Approx. |
|
| |||
|
|
|
| |||
|
|
|
| 5 hours) |
| AC cable |
|
| Advanced Manual |
|
|
| |
|
|
| Lithium ion charger | 1 |
| |
|
| Detailed instructions on all camera features and functions. |
|
|
| |
|
|
|
|
|
| |
|
| Software Installation Guide (separate document on OLYMPUS |
|
|
| 2 |
|
|
|
|
|
| |
|
| Master |
|
|
| AC wall outlet |
|
| Detailed instructions on installing the OLYMPUS Master software. |
|
|
| |
|
|
|
|
|
| |
|
| System chart |
|
| Align the battery |
|
|
|
|
| with the arrow |
| |
LOADING THE BATTERY | S | INSERT THE MEMORY CARD | S | ATTACH THE STRAP | ||||
|
|
|
|
|
|
| ||
|
|
| T |
|
| T |
|
|
|
|
| E |
|
| E |
|
|
|
|
| P |
|
| P |
|
|
a. Push the battery compartment lock | Battery compartment |
| This camera can use a Compact Flash, Microdrive or |
| Strap eyelet |
| ||
slightly towards | and open the | lock |
| cards are optional. |
|
|
| a. Thread one end of the strap through the strap |
battery compartment cover. |
|
|
|
|
| |||
Battery |
| a. Insert the card with the contact area facing in the direction shown in the |
|
| eyelet on the camera. | |||
|
|
|
|
| ||||
|
| compartment |
| illustration. |
|
| Ring | b. Thread the end of the strap through the ring, |
|
| cover |
| b. Close the card cover. |
|
|
| |
|
|
|
|
|
|
| then thread it through the stopper as indicated | |
|
|
|
|
|
|
|
| by the arrows. |
b. Load and push the battery in until it is | Battery lock |
|
|
|
|
| c. Thread the strap back through the other hole | |
locked by the battery lock. |
|
|
|
|
|
| of the stopper. | |
|
|
|
|
|
|
|
| |
|
|
|
|
| WMark |
|
| d. Pull the other side of the strap tight, making |
Unloading the battery |
|
|
|
|
|
| sure that it is fastened securely. | |
|
|
|
|
|
|
| e. Repeat steps (a) - (d) to attach the other end of | |
Press the battery lock to unlock and |
|
|
|
|
| Stopper | ||
|
| CF card slot |
| the strap to the other eyelet. | ||||
Direction |
|
|
| |||||
remove the battery. |
|
|
| Card slot |
|
|
| |
|
| indicating mark |
|
|
|
|
|
|
ATTACH A LENS |
| S | TURN ON THE CAMERA | S | SET THE DATE AND TIME | |
|
|
|
| |||
|
| T |
|
|
| |
|
|
|
| T |
| |
|
| E |
|
|
| |
| 2 |
|
| E |
| |
| P |
|
|
| ||
|
|
|
| P |
| |
| 1 |
|
|
|
| |
|
|
|
|
|
| |
a. Remove the body cap from the | Rear cap |
| a. Set the power switch to | b. Set the mode dial to P. |
|
|
|
|
| a. With the camera on, press the MENU button. | |||
camera and the rear cap from the |
|
| ON. To turn off the power, |
|
| b. Use ac to select tab, then press d. Use ac to select X, then |
lens. |
|
| set the power switch to |
|
| |
|
|
| OFF. |
|
| press d. |
| 2 |
|
|
|
| c. Use ac to select the date format, then press d. |
| 1 |
|
|
|
| d. Use ac to set each item and press d to move to the next item. |
Body cap |
|
|
|
|
| |
Lens attachment |
|
|
|
| e. Press the i button when you have finished entering the date and time. | |
|
|
|
|
| ||
Alignment | mark (Red) |
|
|
|
|
|
mark (Red) |
|
| c. While looking though |
|
|
|
b. Align the lens attachment mark (red) |
|
|
|
|
| |
|
| the viewfinder, rotate |
|
|
| |
on the camera with the alignment |
|
|
|
|
| |
|
| the diopter adjustment |
|
|
| |
mark (red) on the lens, then insert the |
|
|
|
|
| |
2 |
| dial little by little. |
|
|
| |
lens into the camera’s body. Rotate |
|
|
|
| ||
|
| When you can see the |
|
|
| |
the lens clockwise until you hear it |
|
|
|
|
| |
1 |
| AF frame clearly, | AF frame |
|
| |
click. |
|
|
| |||
|
| adjustment is complete. |
|
|
| |
c. Remove the lens cap. |
|
|
|
| MENU button | |
|
|
|
|
| ||
| Lens cap |
|
|
|
|
|
TAKING A PICTURE | S | REVIEWING AND ERASING | S | CONNECTING THE CAMERA TO A | |
| A PICTURE |
| COMPUTER | ||
| T |
| T | ||
| E |
|
| E |
|
| P |
|
| P |
|
a. Place the AF frame on the subject while |
| a. Press the q(playback) button. The last q button |
|
| a. Make sure the camera is off. |
viewing through the viewfinder. |
| picture taken is displayed. |
|
| b. Connect the camera to the computer using the USB cable (included). Set |
b. Press and hold the shutter button halfway |
| b. Use the arrow pad to select images you |
|
| the camera’s power switch to ON. |
to lock the focus and exposure, then press |
| want to view. |
|
|
|
the shutter button completely to take the |
| c. To return to the shooting mode, press |
|
|
|
picture. |
|
|
|
| |
| the shutter button halfway. |
|
|
| |
|
|
|
|
| |
Shutter button |
|
|
|
|
|
| AF frame | S button | Arrow pad |
|
|
|
|
|
| ||
|
| ERASING A PICTURE |
|
|
|
|
| a. Select the picture you want to erase and |
|
| c. Use ac to select [STORAGE]. Press the |
|
| press the S button. |
|
| i button. |
|
| b. Use acto select [YES], then press the i |
|
|
|
|
| button. |
|
|
|
VERIFY CAMERA CONNECTION | ABOUT THE | S | INSTALLING THE CAMERA | |
S |
| SOFTWARE | ||
T |
| T | ||
|
| |||
E |
| E |
| |
P |
| P |
| |
WINDOWS: |
| a. Insert the OLYMPUS Master | ||
a. From the desktop (“Start” menu for XP), open | Now that you’ve mastered the basic functionality of your new |
| into your computer’s | |
|
| |||
“My Computer”. | b. For Windows: | |||
Olympus Digital Camera, you are ready to begin exploring the | ||||
b. Verify that the “Removable Disk” icon |
| Click the “OLYMPUS Master” button | ||
possibilities that digital photography brings to your computer. |
| |||
| in the “Setup” window. | |||
representing the camera is displayed. | Activities such as photo editing, printing and much more are only steps |
| ||
|
| |||
| away! |
|
| |
|
|
| For Macintosh: | |
| OLYMPUS Master software: Download pictures from the camera, view, |
| ||
MACINTOSH: | organize, retouch, |
|
| |
more! This CD also contains the complete software users manual in |
|
| ||
| c. Follow the | |||
a. Verify that the “NO_NAME” icon representing the | Adobe Acrobat (PDF) format. | |||
camera is displayed. |
|
| more details, click “Please Read First”. | |
|
|
| Please refer to the Quick Reference Guide on the reverse side of this sheet to | |
• The above steps confirm that the camera has been installed correctly. You |
|
| familiarize yourself with the commonly used features and functions of your | |
can transfer your images immediately using the standard drag and drop |
|
| new Olympus Digital Camera. | |
procedure, or enhance your experience using OLYMPUS Master software |
|
|
| |
(included). |
|
| Printed in China | |