E330_QSG_EN.fm Page 2 Wednesday, December 28, 2005 11:53 AM
Quick Reference Guide
INDEX | 1. | Camera Diagram and Controls |
| ||
| 2. | How to use the mode dial |
| 3. | How to use the buttons and control dial |
| 4. | How to Use the Autofocus |
| 5. | Image Quality Modes |
| 6. | Flash Modes |
| 7. | Viewing Pictures on a TV |
| 8. | How to Erase All Pictures |
| 9. | |
| 10. | Printing a Picture |
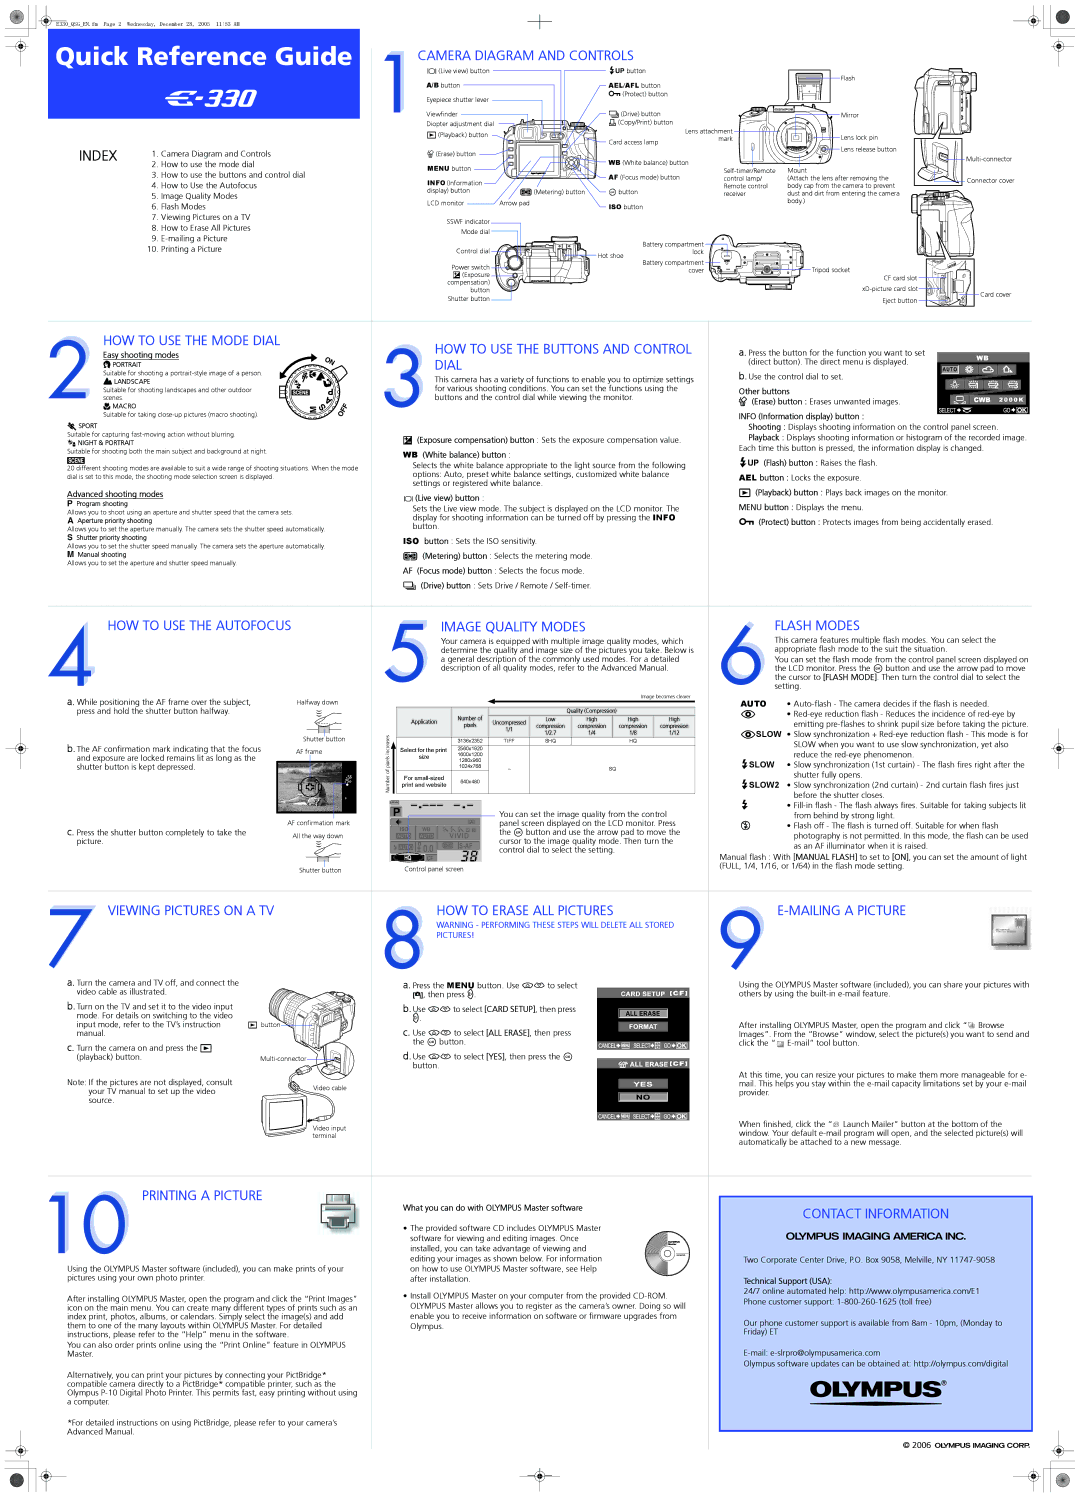
CAMERA DIAGRAM AND CONTROLS
u(Live view) button |
| #UP button |
|
| Flash |
|
A/B button |
| AEL/AFL button |
|
|
| |
|
|
|
|
| ||
Eyepiece shutter lever |
| 0 (Protect) button |
|
|
|
|
|
|
|
|
|
| |
Viewfinder |
| j (Drive) button |
|
| Mirror |
|
Diopter adjustment dial |
| < (Copy/Print) button | Lens attachment |
|
| |
q (Playback) button |
|
| Lens lock pin |
| ||
| Card access lamp |
| mark |
| ||
|
|
|
| |||
|
|
|
| Lens release button |
| |
S (Erase) button |
|
|
|
|
| |
| WB (White balance) button |
|
| |||
|
|
|
| |||
MENU button |
|
| Mount |
| ||
| AF (Focus mode) button |
|
| |||
INFO (Information |
|
| control lamp/ | (Attach the lens after removing the | Connector cover | |
|
|
| Remote control | body cap from the camera to prevent | ||
display) button | d (Metering) button | i button |
|
| ||
| receiver | dust and dirt from entering the camera |
| |||
LCD monitor | Arrow pad | ISO button |
|
| body.) |
|
|
|
|
| |||
|
|
|
|
|
| |
SSWF indicator |
|
|
|
|
|
|
Mode dial |
|
|
|
|
|
|
Control dial |
| Battery compartment |
|
|
| |
| Hot shoe | lock |
|
|
| |
|
|
|
|
|
| |
Power switch |
| Battery compartment |
| Tripod socket |
| |
|
| cover |
|
| ||
F (Exposure |
|
|
|
| ||
|
|
|
| CF card slot |
| |
compensation) |
|
|
|
|
| |
|
|
|
|
| ||
button |
|
|
|
| Card cover | |
Shutter button |
|
|
|
| Eject button | |
|
|
|
|
| ||
HOW TO USE THE MODE DIAL
Easy shooting modes
i PORTRAIT
Suitable for shooting a
Suitable for shooting landscapes and other outdoor scenes.
& MACRO
Suitable for taking
jSPORT
Suitable for capturing
/NIGHT & PORTRAIT
Suitable for shooting both the main subject and background at night.
20 different shooting modes are available to suit a wide range of shooting situations. When the mode dial is set to this mode, the shooting mode selection screen is displayed.
Advanced shooting modes
PProgram shooting
Allows you to shoot using an aperture and shutter speed that the camera sets.
AAperture priority shooting
Allows you to set the aperture manually. The camera sets the shutter speed automatically.
SShutter priority shooting
Allows you to set the shutter speed manually. The camera sets the aperture automatically.
MManual shooting
Allows you to set the aperture and shutter speed manually.
HOW TO USE THE AUTOFOCUS
HOW TO USE THE BUTTONS AND CONTROL DIAL
This camera has a variety of functions to enable you to optimize settings for various shooting conditions. You can set the functions using the buttons and the control dial while viewing the monitor.
F(Exposure compensation) button : Sets the exposure compensation value.
WB (White balance) button :
Selects the white balance appropriate to the light source from the following options: Auto, preset white balance settings, customized white balance settings or registered white balance.
u (Live view) button :
Sets the Live view mode. The subject is displayed on the LCD monitor. The display for shooting information can be turned off by pressing the INFO button.
ISO button : Sets the ISO sensitivity.
d(Metering) button : Selects the metering mode. AF (Focus mode) button : Selects the focus mode. j (Drive) button : Sets Drive / Remote /
IMAGE QUALITY MODES
Your camera is equipped with multiple image quality modes, which determine the quality and image size of the pictures you take. Below is a general description of the commonly used modes. For a detailed description of all quality modes, refer to the Advanced Manual.
a. Press the button for the function you want to set (direct button). The direct menu is displayed.
b. Use the control dial to set.
Other buttons
S (Erase) button : Erases unwanted images.
INFO (Information display) button :
Shooting : Displays shooting information on the control panel screen.
Playback : Displays shooting information or histogram of the recorded image. Each time this button is pressed, the information display is changed.
#UP (Flash) button : Raises the flash.
AEL button : Locks the exposure.
q(Playback) button : Plays back images on the monitor. MENU button : Displays the menu.
0 (Protect) button : Protects images from being accidentally erased.
FLASH MODES
This camera features multiple flash modes. You can select the appropriate flash mode to the suit the situation.
You can set the flash mode from the control panel screen displayed on the LCD monitor. Press the i button and use the arrow pad to move the cursor to [FLASH MODE]. Then turn the control dial to select the setting.
a. While positioning the AF frame over the subject, press and hold the shutter button halfway.
b. The AF confirmation mark indicating that the focus and exposure are locked remains lit as long as the shutter button is kept depressed.
c. Press the shutter button completely to take the picture.
Halfway down
Shutter button AF frame
AF confirmation mark All the way down
|
|
|
|
|
|
|
|
|
|
|
|
|
|
|
|
|
|
|
|
| Image becomes clearer | |
|
|
|
|
|
|
|
|
|
|
|
|
|
|
|
|
|
|
|
|
|
|
|
|
|
|
|
|
|
|
|
|
|
|
|
|
|
|
|
|
| Quality (Compression) |
|
| ||
|
| Application |
| Number of | Uncompressed | Low |
| High |
| High | High | |||||||||||
|
|
|
| pixels | compression |
| compression |
| compression | compression | ||||||||||||
|
|
|
|
|
|
|
|
|
|
|
| 1/1 |
|
| ||||||||
|
|
|
|
|
|
|
|
|
|
|
|
|
|
| 1/2.7 |
| 1/4 |
| 1/8 | 1/12 | ||
increases |
|
|
|
|
|
|
|
|
|
|
|
|
|
|
|
|
|
| ||||
Select for the print |
| 2560x1920 |
| TIFF | SHQ |
|
|
| HQ |
| ||||||||||||
|
|
|
|
|
|
|
|
|
|
| 3136x2352 |
|
|
|
|
| ||||||
pixels |
|
| size |
| 1600x1200 |
|
|
|
|
|
|
|
| |||||||||
|
|
| 1024x768 |
|
|
|
|
|
|
|
| |||||||||||
|
|
|
|
|
|
|
|
|
|
| 1280x960 |
|
|
|
|
|
|
|
| |||
of |
|
|
|
|
|
|
|
|
|
|
|
|
|
|
| – |
|
| SQ |
|
| |
For |
|
|
|
|
|
|
|
|
|
|
|
|
| |||||||||
Number |
|
| 640x480 |
|
|
|
|
|
|
|
| |||||||||||
print and website |
|
|
|
|
|
|
|
|
|
| ||||||||||||
|
|
|
|
|
|
|
|
|
|
| ||||||||||||
|
|
|
|
|
|
|
|
|
|
|
|
|
| |||||||||
|
|
|
|
|
|
|
|
|
|
|
|
|
|
|
|
|
|
|
|
|
|
|
|
|
|
|
|
|
|
|
|
|
|
|
|
|
|
|
|
|
|
|
|
|
|
You can set the image quality from the control panel screen displayed on the LCD monitor. Press the i button and use the arrow pad to move the cursor to the image quality mode. Then turn the control dial to select the setting.
AUTO •
!•
!SLOW • Slow synchronization +
#SLOW • Slow synchronization (1st curtain) - The flash fires right after the shutter fully opens.
#SLOW2 • Slow synchronization (2nd curtain) - 2nd curtain flash fires just before the shutter closes.
#•
$ | • Flash off - The flash is turned off. Suitable for when flash |
| photography is not permitted. In this mode, the flash can be used |
| as an AF illuminator when it is raised. |
Manual flash : With [MANUAL FLASH] to set to [ON], you can set the amount of light (FULL, 1/4, 1/16, or 1/64) in the flash mode setting.
Shutter button
VIEWING PICTURES ON A TV
Control panel screen
HOW TO ERASE ALL PICTURES |
|
WARNING - PERFORMING THESE STEPS WILL DELETE ALL STORED
PICTURES!
a. Turn the camera and TV off, and connect the video cable as illustrated.
b. Turn on the TV and set it to the video input mode. For details on switching to the video input mode, refer to the TV’s instruction manual.
c. Turn the camera on and press the q (playback) button.
Note: If the pictures are not displayed, consult your TV manual to set up the video source.
q button
![]()
![]()
Video cable
Video input terminal
a. Press the MENU button. Use ac to select |
| Using the OLYMPUS Master software (included), you can share your pictures with |
[W], then press d. |
| others by using the |
b. Use acto select [CARD SETUP], then press |
|
|
d. |
| After installing OLYMPUS Master, open the program and click “ Browse |
c. Use ac to select [ALL ERASE], then press |
| |
| Images”. From the “Browse” window, select the picture(s) you want to send and | |
the i button. |
| click the “ |
d. Use ac to select [YES], then press the i |
|
|
|
| |
button. |
| At this time, you can resize your pictures to make them more manageable for e- |
|
| |
|
| mail. This helps you stay within the |
|
| provider. |
|
| When finished, click the “ Launch Mailer” button at the bottom of the |
|
| |
|
| window. Your default |
|
| automatically be attached to a new message. |
PRINTING A PICTURE
Using the OLYMPUS Master software (included), you can make prints of your pictures using your own photo printer.
After installing OLYMPUS Master, open the program and click the “Print Images” icon on the main menu. You can create many different types of prints such as an index print, photos, albums, or calendars. Simply select the image(s) and add them to one of the many layouts within OLYMPUS Master. For detailed instructions, please refer to the “Help” menu in the software.
You can also order prints online using the “Print Online” feature in OLYMPUS Master.
Alternatively, you can print your pictures by connecting your PictBridge* compatible camera directly to a PictBridge* compatible printer, such as the Olympus
*For detailed instructions on using PictBridge, please refer to your camera’s Advanced Manual.
What you can do with OLYMPUS Master software | CONTACT INFORMATION | ||||||
|
|
| |||||
• The provided software CD includes OLYMPUS Master |
|
|
|
| |||
software for viewing and editing images. Once |
|
|
|
| |||
|
|
|
| ||||
installed, you can take advantage of viewing and |
|
|
|
| |||
editing your images as shown below. For information | Two Corporate Center Drive, P.O. Box 9058, Melville, NY | ||||||
on how to use OLYMPUS Master software, see Help |
|
|
|
|
|
| |
|
|
|
|
| |||
after installation. | Technical Support (USA): | ||||||
• Install OLYMPUS Master on your computer from the provided | 24/7 online automated help: http://www.olympusamerica.com/E1 | ||||||
Phone customer support: | |||||||
OLYMPUS Master allows you to register as the camera’s owner. Doing so will | |||||||
|
|
|
| ||||
enable you to receive information on software or firmware upgrades from | Our phone customer support is available from 8am - 10pm, (Monday to | ||||||
Olympus. | |||||||
Friday) ET | |||||||
|
|
| |||||
|
|
| |||||
|
|
| Olympus software updates can be obtained at: http://olympus.com/digital | ||||
|
|
|
|
|
|
| |
© 2006 ![]()
![]()
![]()
![]()
![]()
![]()
![]()
![]()
![]()
![]()
![]()
![]()
![]()
![]()
![]()
![]()