Fig. B

Mounting Options

Before you begin, decide which mounting option and ball shaft are

appropriate for your speaker.


OPTION II:


OPTION III:


For Speakers That Require a Mounting


For Wood Speakers with NO Threaded Inserts


Plate to AccessThreaded Inserts


You must affix the mounting plate to the ball shaft before


NOTE: When no threaded inserts for mounting


attaching the mounting plate to the speaker:


purposes have been provided by the speaker manu-


Pick up the ball shaft and mounting plate. Insert the threaded end


facturer, a speaker can still be safely mounted on the


of the ball shaft into the top of the mounting plate until it butts up


wall or ceiling. But you have to be sure that it is put


against the bottom of the jam nut.


together with materials strong enough to support its


20.0 Speaker Mount

Installation Instructions

Before You Start

Read This Section Carefully

To use the 20.0 Speaker Mount Kit, your speaker must meet ONE of the following criteria:

This mount is ONLY for speakers weighing up to 20lbs (9 kg).

Your speaker must have one of the following means of securing the mount:

A factory installed 3/8”-16 threaded insert

Factory installed, correctly spaced threaded inserts for use with our mounting plate

Sturdy wood frame that can be safely drilled into and securely attached to our mounting plate with the #14 course thread screws provided.

CAUTION: If you have any questions or concerns regarding the mounting of your speaker, contact a professional installer or the

speaker manufacturer as necessary.

KIT COMPONENTS AND THEIR USE

Tools Required

You will need at least these tools for the installation

5/32” hex wrench (supplied)

Drill bits: ¼” (for drywall installation) or 5/16” (for wood and masonry surfaces)

916”(11mm) open wrench or small crescent wrench

Phillips screwdriver, medium size

Wire cutters

Hammer

An electric drill


Fig. D

own weight with the #14 course thread screws


provided. Most compact speakers are made well


enough and use adequate materials thick enough for


mounting with an OmniMount assembly. The #14


screws should not be used in Masonite®, thin panel


wood or plastic. Such materials will likely require


Fig. C


different fastening hardware and methods and


Pick up the extra jam nut. Position it so


possible reinforcement to be mounted safely. If your


that the circular part of the nut faces the


evaluation raises any questions about the speaker’s


end of the ball shaft protruding from the bottom of the mounting plate.


construction or material strength, contact your dealer


Thread the nut onto the shaft a few turns only—until the top of the


or the speaker manufacturer and ASK QUESTIONS.


nut is even with the end of the ball shaft. (Fig. C)


Place the mounting plate on a flat surface and pull up on the ball


20.0 Wall Mount— To mount on a wall, the


shaft. Screw the top jam nut down against the top of the mounting


mounting plate will be affixed to the back of the


plate.


Attach the mounting plate to the speaker by placing the slotted holes


speaker. If you are mounting on a side wall, the


over the threaded insertsand tightening the screws. (Fig. D)


mounting plate will be affixed to the side of the


Using the 9/16” open end wrench or small crescent wrench, tighten


speaker. The 20.0 straight ball shaft can also be used


the jam nut securely against the top of the mounting plate.


for a ceiling application by affixing the mounting


OPTION III:


plate to the top of the speaker.


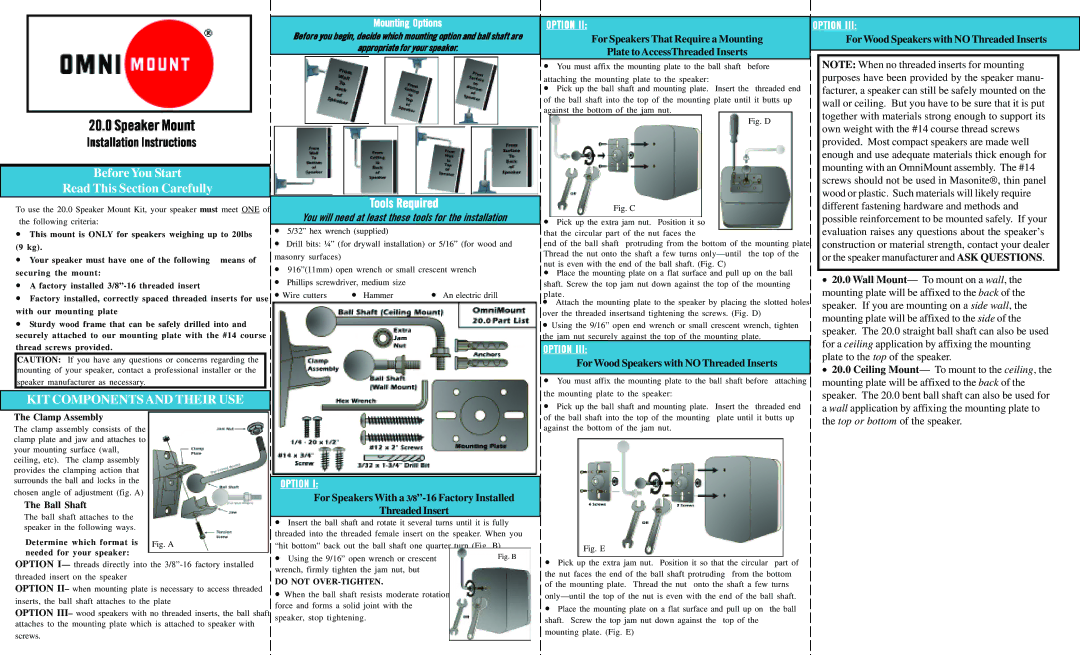
For Wood Speakers with NO Threaded Inserts


20.0 Ceiling Mount— To mount to the ceiling, the


You must affix the mounting plate to the ball shaft before attaching


mounting plate will be affixed to the back of the


the mounting plate to the speaker:


speaker. The 20.0 bent ball shaft can also be used for


Pick up the ball shaft and mounting plate. Insert the threaded end

a wall application by affixing the mounting plate to

The Clamp Assembly

The clamp assembly consists of the clamp plate and jaw and attaches to your mounting surface (wall, ceiling, etc). The clamp assembly provides the clamping action that surrounds the ball and locks in the

chosen angle of adjustment (fig. A)

The Ball Shaft

The ball shaft attaches to the speaker in the following ways.

Determine which format is Fig. A needed for your speaker:

OPTION Ithreads directly into the 3/8”-16 factory installed threaded insert on the speaker

OPTION IIwhen mounting plate is necessary to access threaded inserts, the ball shaft attaches to the plate

OPTION IIIwood speakers with no threaded inserts, the ball shaft attaches to the mounting plate which is attached to speaker with screws.

OPTION I:

For Speakers With a 3/8”-16 Factory Installed

Threaded Insert

Insert the ball shaft and rotate it several turns until it is fully threaded into the threaded female insert on the speaker. When you “hit bottom” back out the ball shaft one quarter turn (Fig. B).

Using the 9/16” open wrench or crescent wrench, firmly tighten the jam nut, but

DO NOT OVER-TIGHTEN.

When the ball shaft resists moderate rotational force and forms a solid joint with the

speaker, stop tightening.

of the ball shaft into the top of the mounting plate until it butts up


the top or bottom of the speaker.


against the bottom of the jam nut.


Fig. E

Pick up the extra jam nut. Position it so that the circular part of the nut faces the end of the ball shaft protruding from the bottom of the mounting plate. Thread the nut onto the shaft a few turns only—until the top of the nut is even with the end of the ball shaft.

Place the mounting plate on a flat surface and pull up on the ball shaft. Screw the top jam nut down against the top of the mounting plate. (Fig. E)

Page 1
Image 1
Omnimount 20.0 installation instructions Option, For Wood Speakers with no Threaded Inserts

20.0 specifications

Omnimount 20.0 is an innovative mounting solution that has garnered significant attention for its advanced features, cutting-edge technologies, and user-friendly characteristics. Designed to enhance the way users interact with their audiovisual equipment, Omnimount 20.0 aims to deliver unmatched flexibility and robust performance whether at home, in educational institutions, or within corporate environments.

One of the standout features of Omnimount 20.0 is its versatile mounting options. The system supports a wide range of devices, from televisions to projectors, ensuring compatibility with various display sizes and weights. This adaptability makes it an ideal choice for any space, whether it’s a small living room or a large conference hall.

The technology behind Omnimount 20.0 is also noteworthy. The solution incorporates advanced tilt and swivel capabilities, allowing for optimal viewing angles without the hassle of manual adjustments. This feature is particularly beneficial in environments where multiple viewers are present, as it helps to minimize glare and enhance the overall viewing experience. Additionally, the quick-release mechanism simplifies installation and maintenance, giving users the convenience of easily accessing their devices for upgrades or repairs.

Durability and build quality are key characteristics of Omnimount 20.0. Constructed from high-grade materials, this mounting solution is engineered to withstand the test of time. It is designed to securely hold heavier devices, providing peace of mind to users concerned about stability and safety. The sleek, modern design seamlessly complements contemporary spaces, making it not just functional but also visually appealing.

Another significant aspect of Omnimount 20.0 is its ease of installation. Accompanied by detailed instructions and all necessary hardware, the mounting solution can be set up quickly, even by those with limited technical skills. The intuitive mounting bracket system eliminates guesswork, ensuring that users can confidently install their equipment.

In conclusion, Omnimount 20.0 represents a remarkable advancement in the realm of mounting solutions. With its versatile compatibility, innovative technologies, robust design, and user-friendly characteristics, it stands as a top choice for anyone looking to enhance their audiovisual experience. Whether for personal or professional use, Omnimount 20.0 delivers on its promise of quality and convenience, making it a must-have product in today’s tech-savvy world.