Digital thermometer | | |
Model Eco Temp II | | |
(Water-resistant) | | |
| | |
• Digitales Fieberthermometer | | |
DE | |
• Thermomètre digital | | |
FR | |
• Termometro digitale | | |
IT | |
• Termómetro digital | | |
ES | |
• Termómetro digital | | |
PT | |
• Digitalt termometer | | |
DK | |
• Digitaalinen kuumemittari | | |
FI | |
• Digitalt termometer | | |
NO | |
• Digitalt feberthermometeret | | |
SE | |
• Digitale koortsthermometer | | |
NL | |
• Ψηφιακό θερµόµετρο | | |
EL | |
• Dijital klinik termometresi | | |
TR | |
• Цифровой термометр | | |
RU | |
| | | |
| | IM-MC-241W-E-03-08/08 |
| |
| | | 1664195-7C |
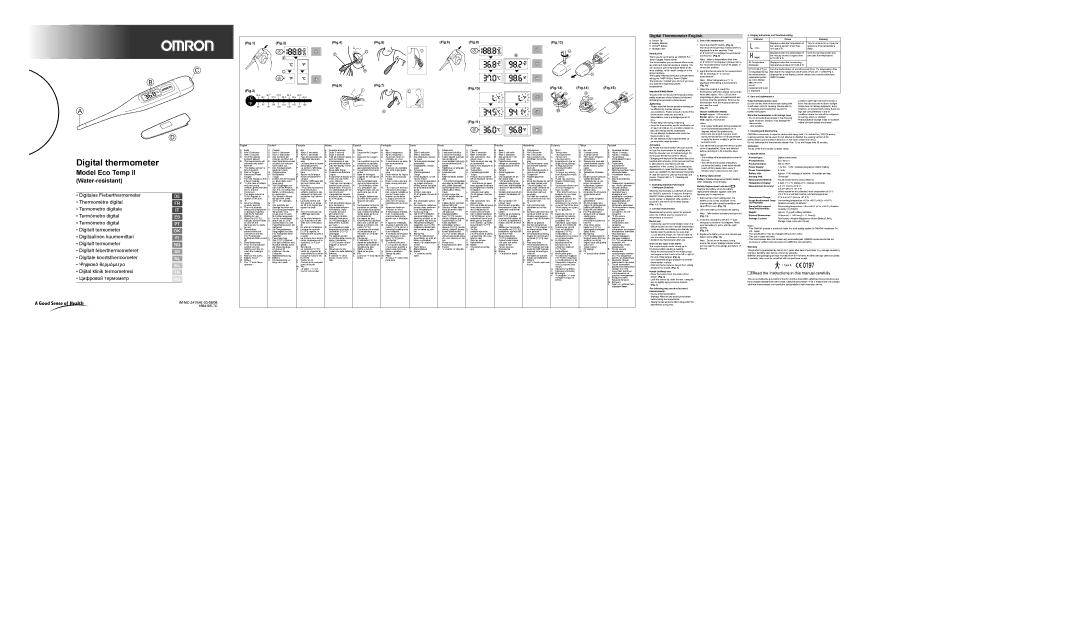
English
A.Beep
B.After 5 seconds
C.After 2 seconds
D.All of the display symbols appear.
E.The thermometer will automatically switch itself off.
F.The display section is faced upwards.
G.Root of Tongue
H.Placement Points
I.Tongue
J.Turn the display so that it faces inwards.
K.* In the case of infants and very young children, gently hold the arm to prevent movement.
L.The angle should be 35-45 degrees in relation to the arm.
M.°F
N.All of the display symbols appear.
O.The most recently measured temperature is displayed together with the M indicator.
P.Waiting for use.
Q.When the [°C(°F)] indicator symbol blinks on and off, the thermometer is ready for use.
R.Temperature measurement will commence and the [°C(°F)] indicator symbol will blink on and off.
S.Beep-beep-beep
T.The [°C(°F)] indicator symbol will stop blinking and stay on when the reading is ready.
U.Remove the screw.
V.Battery Cover
W.Battery
X.The “+” mark faces upwards
Deutsch
A.Piepton
B.Nach 5 Sekunden
C.Nach 2 Sekunden
D.Alle Symbole der Anzeige leuchten auf.
E.Das Fieberthermometer schaltet sich automa- tisch selbst aus.
F.Der Anzeigebereich zeigt nach oben.
G.Zungenwurzel
H.Messpunkte
I.Zunge
J.Drehen Sie die Anzeige so, dass diese nach innen zeigt.
K.*Bei Säuglingen und sehr kleinen Kindern den Arm vorsichtig fest- halten, um Bewegung zu verhindern.
L.Der Winkel in Bezug auf den Arm sollte
35 bis 45° betragen.
M.°F
N.Alle Symbole der Anzeige leuchten auf.
O.Die zuletzt gemessene Temperatur wird zusammen mit dem M-Symbol angezeigt.
P.Vor der Anwendung.
Q.Wenn das [°C(°F)]- Symbol blinkt, ist das Fieberthermometer ein- satzbereit.
R.Die Temperaturmes- sung beginnt und das [°C(°F)]-Symbol blinkt weiterhin.
S.Piep-Piep-Piep
T.Das [°C(°F)]-Symbol hört auf zu blinken und leuchtet ständig, wenn die Messung abge- schlossen ist.
U.Entfernen Sie die Schraube.
V.Batterieabdeckung
W.Batterie
X.Die Markierung „+“ zeigt nach oben
Français | Italiano |
A. | Bip | A. | Segnale acustico |
B. | Après 5 secondes | B. | Dopo 5 secondi |
C. | Après 2 secondes | C. | Dopo 2 secondi |
D. | Tous les symboles de | D. | Tutti gli indicatori appa- |
| l’affichage apparais- | E. | iono sul display. |
E. | sent. | Il termometro si spe- |
Le thermomètre s’éteint | F. | gne automaticamente. |
F. | automatiquement. | Lato del display rivolto |
La section d’affichage | G. | verso l’alto. |
| est tournée vers le | Base della lingua |
G. | haut. | H. | Posizioni da utilizzare |
Racine de la langue | I. | Lingua |
H. | Points de placement | J. | Posizionare il display in |
I. | Langue | | modo che sia rivolto |
J. | Orienter l’affichage afin | K. | verso l’interno. |
| qu’il soit tourné vers | * Nell’uso con neonati o |
K. | l’intérieur. | | bambini molto piccoli, |
* Pour des nourrissons | | tenere fermo il braccio |
| et de très jeunes | | con delicatezza per evi- |
| enfants, maintenir déli- | L. | tare movimenti. |
| catement le bras pour | L’angolazione rispetto |
| empêcher tout mouve- | | al braccio deve essere |
L. | ment. | M. | di 35-45 gradi. |
Le thermomètre doit | °F |
| être placé à un angle | N. | Tutti gli indicatori appa- |
| de 35 à 45 degrés par | O. | iono sul display. |
M. | rapport au bras. | Valore della tempera- |
°F | | tura rilevato, viene |
N. | Tous les symboles de | | mostrato assieme |
| l’affichage apparais- | P. | all’indicatore M. |
O. | sent. | Attesa per l’utilizzo. |
La dernière tempéra- | Q. | Quando l’indicatore |
| ture mesurée est affi- | | [°C(°F)] lampeggia, il |
| chée avec l’indicateur | | termometro è pronto |
M.per l’uso.
P.En attente d’utilisation. R. La misurazione della
Q. | Lorsque le symbole | | temperatura ha inizio e |
| [°C(°F)] clignote, le | | l’indicatore [°C(°F)] |
| thermomètre est prêt à | S. | lampeggia. |
R. | l’emploi. | Tre segnali acustici |
La mesure de la tempé- T. | Al termine della misura- |
| rature commence et le | | zione, l’indicatore |
| symbole [°C(°F)] cli- | | [°C(°F)] smette di lam- |
S. | gnote. | | peggiare e rimane |
Bip-bip-bip | U. | fisso. |
T. | Le symbole [°C(°F)] | Rimuovere la vite. |
| cesse de clignoter et | V. | Coperchio della batteria |
| reste allumé en continu | W. | Batteria |
| lorsque la mesure est | X. | Il simbolo “+” deve |
U. | terminée. | | essere rivolto verso |
Retirer la vis. | | l’alto |
V.Couvercle du comparti- ment de la pile
W.Pile
X.Le signe « + » est tourné vers le haut
Español
A.Pitido
B.Después de 5 segun- dos
C.Después de 2 segun- dos
D.Se muestran todos los símbolos en pantalla.
E.El termómetro se apa- gará automáticamente.
F.La pantalla mira hacia arriba.
G.Base de la lengua
H.Lugares de colocación
I.Lengua
J.Gire la pantalla para que mire hacia dentro.
K.* En lactantes y niños muy pequeños, sos- tenga el brazo con cui- dado para que no se mueva.
L.El ángulo debería ser de entre 35-45 grados respecto al brazo.
M.°F
N.Se muestran todos los símbolos en pantalla.
O.Se muestra la tempera- tura medida inmediata- mente antes junto con el indicador M.
P.En espera de uso.
Q.El termómetro está listo para usar cuando par- padea el símbolo indi- cador [°C(°F)].
R.Comenzará la medida de temperatura y el indicador [°C(°F)] par- padeará.
S.Pip-pip-pip
T.El indicador [°C(°F)] dejará de parpadear y quedará fijo cuando la medida esté lista.
U.Retire el tornillo.
V.Tapa de las pilas
W.Pila
X.La marca “+” mira hacia arriba
Português
A.Bip
B.Após 5 segundos
C.Após 2 segundos
D.Aparecem todos os símbolos no visor.
E.O termómetro irá desli- gar-se automatica- mente.
F.A secção de visualiza- ção está virada para cima.
G.Parte inferior da língua
H.Pontos de colocação
I.Língua
J.Rode o visor para que fique virado para den- tro.
K.* Ao usar com bebés e crianças muito peque- nas, segure cuidadosa- mente o braço para impedir movimentos.
L.O ângulo deverá ser entre 35 e 45 graus relativamente ao braço.
M.°F
N.Aparecem todos os símbolos no visor.
O.A temperatura medida mais recentemente
é apresentada junta- mente com o indicador M.
P.A aguardar utilização.
Q.Quando o símbolo indi- cador [°C(°F)] piscar, o termómetro está pronto a ser utilizado.
R.A medição da tempera- tura começa e o sím- bolo [°C(°F)] pisca.
S.Bip-bip-bip
T.O símbolo indicador [°C(°F)] pára de piscar e fica aceso quando a leitura está concluída.
U.Retire o parafuso.
V.Tampa da pilha
W.Pilha
X.A marca “+” está virado para cima
Dansk
A.Bip
B.Efter 5 sekunder
C.Efter 2 sekunder
D.Alle displayets symbo- ler vises.
E.Termometeret slukker automatisk.
F.Displaydelen vender opad.
G.Tungerod
H.Placeringssteder
I.Tunge
J.Vend displayet, så det vender indad.
K.* Hvis det er spædbørn og meget små børn, holdes armen forsigtigt for at forhindre bevæ- gelse.
L.Vinklen skal være
35-45 grader i forhold til armen.
M.°F
N.Alle displayets symbo- ler vises.
O.Den seneste målte tem- peratur vises sammen med M-indikatoren.
P.Venter på brug.
Q.Når [°C(°F)] indikator- symbolet blinker for tændt og slukket, er ter- mometeret klar til brug.
R.Temperaturmålingen begynder, og [°C(°F)] indikatorsymbolet blin- ker for tændt og sluk- ket.
S.Bip-bip-bip
T.[°C(°F)] indikatorsym- bolet holder op med at blinke og forbliver tændt, når aflæsningen er klar.
U.Fjern skruen.
V.Batteridæksel
W.Batteri
X.“+” mærket vender opad
Suomi
A.Äänimerkki
B.5 sekunnin kuluttua
C.2 sekunnin kuluttua
D.Kaikki näytön symbolit tulevat näkyviin.
E.Kuumemittari kytkeytyy automaattisesti pois päältä.
F.Näyttöosa on ylöspäin.
G.Kielen juuri
H.Asetuskohdat
I.Kieli
J.Käännä näyttö sisään- päin.
K.* Jos mittaria käytetään vauvoilla ja pienillä lap- silla, pitele varovasti käsivarresta kiinni, ettei mittari pääse liikku- maan.
L.Kulman tulee olla 35–45 astetta käsivar- teen nähden.
M.°F
N.Kaikki näytön symbolit tulevat näkyviin.
O.Viimeksi mitattu lämpö- tila ja M-merkki näky- vät yhdessä.
P.Odottaa käyttöä.
Q.Kun [°C(°F)] -merkki vilkkuu näkyviin ja pois, kuumemittari on val- miina käyttöön.
R.Lämpötilan mittaus alkaa ja [°C(°F)] -merkki vilkkuu näkyviin ja pois.
S.Kolme äänimerkkiä
T.[°C(°F)] -merkki lakkaa vilkkumasta ja jää näky- viin, kun lukema on val- mis.
U.Poista ruuvi.
V.Paristolokeron kansi
W.Paristo
X.“+”-merkki on ylöspäin
Norsk | Svenska |
A. | Pipelyd | A. | Beep |
B. | Etter 5 sekunder | B. | Efter 5 sekunder |
C. | Etter 2 sekunder | C. | Efter 2 sekunder |
D. | Alle symbolene i dis- | D. | Alla symboler i dis- |
E. | playet vises. | E. | playen visas. |
Termometeret slår seg | Febertermometern |
F. | av automatisk. | F. | stängs av automatiskt. |
Siden med displayet er | Displaysidan är vänd |
G. | vendt opp. | G. | uppåt. |
Tungeroten | Tungrot |
H. | Plasseringspunkter | H. | Placeringspunkt |
I. | Tunge | I. | Tunga |
J. | Plasser termometeret | J. | Vrid displayen så att |
| slik at displayet vender | K. | den pekar inåt. |
K. | innover. | * Vid användning på |
* Hold armen på sped- | | spädbarn eller mycket |
| barn og svært små barn | | små barn, håll försiktigt |
| forsiktig fast for å hindre | | i armen för att förhindra |
L. | bevegelse. | L. | rörelse. |
Vinkelen skal være | Vinkeln skall vara 35-45 |
| 35–45 grader i forhold | | grader i förhållande till |
| til armen. | M. | armen. |
M. °F | °F |
N. | Alle symbolene i dis- | N. | Alla symboler i dis- |
O. | playet vises. | O. | playen visas. |
Den sist målte tempera- | Den senast uppmätta |
| turen vises sammen | | temperaturen visas till- |
P. | med indikatoren M. | | sammans med M-indi- |
Venter på å bli brukt. | P. | katorn. |
Q. | Når indikatorsymbolet | Väntar på användning. |
| [°C(°F)] blinker, er ter- | Q. | När [°C(°F)]-indika- |
R. | mometeret klar til bruk. | | torns symbol blinkar till |
Målingen av tempera- | | och från, är febertermo- |
| turen starter, og indika- | | metern klar för använd- |
| torsymbolet [°C(°F)] | R. | ning. |
S. | blinker. | Mätning av temperatu- |
Tre Pip | | ren startar och [°C(°F)]- |
T. | Indikatorsymbolet | | indikatorns symbol blin- |
| [°C(°F)] slutter å blinke | S. | kar till och från. |
| og lyser fast når resul- | Beep-beep-beep |
U. | tatet er klart. | T. | [°C(°F)]-indikatorns |
Skru løs skruen. | | symbol slutar blinka |
V. | Batterideksel | | och lyser när avläs- |
W. | Batteri | U. | ningen är klar. |
X. | Kryssmerket vender | Ta bort skruven. |
| opp | V. | Batterilucka |
| | W. | Batteri |
| | X. | “+” märket är uppåt |
| | | |
Nederlands
A.Piepsignaal
B.Na 5 seconden
C.Na 2 seconden
D.Alle symbolen zijn zichtbaar op het dis- play.
E.De thermometer scha- kelt zichzelf automa- tisch uit.
F.Het displaygedeelte is naar boven gericht.
G.Tongwortel
H.Plaatsingspunten
I.Tong
J.Draai het display zo dat het naar binnen wijst.
K.* Houd bij baby’s en heel jonge kinderen de arm voorzichtig vast, zodat deze niet kan bewegen.
L.De hoek ten opzichte van de arm moet 35 tot 45 graden zijn.
M.°F
N.Alle symbolen zijn zichtbaar op het dis- play.
O.De laatst gemeten tem- peratuur wordt op het display weergegeven, samen met de indicator “M”.
P.Wacht op gebruik.
Q.Als het indicatorsym- bool [°C(°F)] knippert, is de thermometer klaar voor gebruik.
R.De temperatuurmeting begint en het indicator- symbool [°C(°F)] knip- pert.
S.Piep-piep-piep
T.Het indicatorsymbool [°C(°F)] stopt met knip- peren en blijft branden wanneer de meting is voltooid.
U.Verwijder de schroef.
V.Kapje van batterijvak
W.Batterij
X.Het “+”-teken wijst naar boven
Ελληνική
A.Μπιπ
B.Ύστερα από
5 δευτερόλεπτα
C.Ύστερα από
2 δευτερόλεπτα
D.Εµφανίζονται όλα τα σύµβολα της οθόνης.
E.Το θερµόµετρο θα απενεργοποιηθεί αυτόµατα.
F.Το τµήµα της οθόνης είναι στραµµένο προς τα επάνω.
G.Η ρίζα της γλώσσας
H.Σηµεία τοποθέτησης
I.Γλώσσα
J.Γυρίστε την οθόνη ώστε να είναι στραµµένη προς τα µέσα.
K.* Στην περίπτωση των βρεφών και των πολύ µικρών παιδιών, κρατήστε µαλακά τον βραχίονα για να αποτρέψετε την κίνηση.
L.Η γωνία πρέπει να είναι 35-45 µοίρες σε σχέση µε τον βραχίονα.
M.°F
N.Εµφανίζονται όλα τα σύµβολα της οθόνης.
O.Η θερµοκρασία που µετρήθηκε πιο πρόσφατα εµφανίζεται µαζί µε την ένδειξη Μ.
P.Αναµονή για χρήση.
Q.Όταν το ενδεικτικό σύµβολο [°C(°F)]
αναβοσβήσει, το
θερµόµετρο είναι έτοιµο να χρησιµοποιηθεί.
R.Η µέτρηση της θερµοκρασίας θα ξεκινήσει και το ενδεικτικό σύµβολο
[°C(°F)] θα αναβοσβήσει.
S.Μπιπ-µπιπ-µπιπ
T.Το ενδεικτικό σύµβολο [°C(°F)] θα σταµατήσει να αναβοσβήνει και θα παραµείνει αναµµένο όταν η µέτρηση είναι έτοιµη.
U.Αφαίρεση της βίδας.
V.Κάλυµµα µπαταρίας
W.Μπαταρία
X.Το σύµβολο “+” είναι στραµµένο προς τα επάνω
Türkçe
A.Bip sesi
B.5 saniye sonra
C.2 saniye sonra
D.Tüm ekran simgeleri görüntülenir.
E.Termometre otomatik olarak kendini kapatõr.
F.Ekran bölümü yukarõ bakar.
G.Dil Kökü
H.Yerleştirme Noktalarõ
I.Dil
J.Ekranõ içeriye bakacak şekilde döndürün.
K.* Bebeklerde ve çok küçük çocuklarda kullanõrken, hareket etmemesi için kolu hafifçe tutun.
L.Kola göre 35-45 derece açõyla tutulmalõdõr.
M.°F
N.Tüm ekran simgeleri görüntülenir.
O.En son ölçülen ateş değeri M göstergesiyle birlikte görüntülenir.
P.Kullanõm için bekliyor.
Q.[°C(°F)] göstergesi simgesi açõk ve kapalõ olarak yanõp söndüğünde termometre kullanõma hazõrdõr.
R.Ateş ölçüm işlemi başlar ve [°C(°F)] göstergesinin simgesi yanõp söner.
S.Bip-bip-bip
T.[°C(°F)] göstergesinin simgesi yanõp sönmeyi durdurur ve ölçüm değeri hazõr olduğunda yanõk kalõr.
U.Vidayõ çõkarõn.
V.Pil Kapağõ
W.Pil
X.“+” işareti yukarõ bakar
Русский
A.Звуковой сигнал
B.Через 5 секунд
C.Через 2 секунды
D.На дисплее отображаются все символы.
E.Термометр
выключится автоматически.
F.Дисплей должен быть обращен вверх.
G.Основание языка языка
H.Места измерения
I.Язык
J.Поверните термометр так, чтобы дисплей смотрел внутрь.
K.* При измерении температуры у младенца или маленького ребенка необходимо мягко придерживать его руку, чтобы не допускать движений.
L.По отношению к плечу угол должен составлять 35–45 градусов.
M.°F (по шкале Фаренгейта)
N.На дисплее отображены все символы.
O.Символ «M» обозначает последнее измеренное значение температуры.
P.Режим ожидания.
Q.Мигание символа [°C (°F)] на дисплее означает, что термометр готов к измерению.
R.После начала измерения температуры символ [°C (°F)] продолжит мигать на индикаторе.
S.Звуковой сигнал повторяется три раза.
T.После получения результата измерения символ [°C (°F)]
перестает мигать и отображается на дисплее неподвижно.
U.Выкрутите винт.
V.Крышка батареи
W.Батарея
X.Знак «+» должен быть обращен вверх
 Caution
Do handle the thermometer with care and do not use the thermometer for anything else than the intended use on human beings. Do not expose the thermometer to shocks. Changing and disposal of the battery has to be handled with reference to this manual and has to take place in accordance with the regulations of the country. Do not attempt to disassemble or repair the thermometer. After each use, disinfect the thermometer especially in case the device is used by more than one person. Please refer to “7. Cleaning and Disinfecting”.
1.Switching between Fahrenheit/ Centigrade (Celsius)
While the thermometer is switched off, press the ON/OFF button for 5 seconds. Keep the ON/OFF button pressed, while the current metric system is displayed. After another 2 seconds it will switch to the other system.
(Fig. 1, 2, 3)
2. Correct measurement
Measurement accuracy cannot be assured when the method used to measure the temperature is incorrect.
Rectal use:
•Commonly used for small children when it is difficult to take an oral or armpit temperature.
•Lubricate with non-irritating skin-friendly gel.
•Gently insert the probe tip no more than
1.3 cm into the rectum. Do not force the tip into the rectum if resistance is encountered.
•Disinfect the thermometer after use.
Oral use (for ages 4 and older): The mouth should remain closed up to 5 minutes before starting a reading.
•Place the thermometer in the mouth under the tongue so that it rests to the left or right of the root of the tongue. (Fig. 4)
•Use downward tongue pressure to hold the thermometer in place.
•Hold the thermometer to keep it from sliding around in the mouth. (Fig. 5)
Armpit (axillary) use:
•Place the sensor tip in the centre of the armpit. (Fig. 6)
•Lock the sensor tip under the arm, using the arm to slightly apply pressure inwards.
(Fig. 7)
The following may result in incorrect measurements.
•Heavy armpit perspiration
Correct: Wipe off any armpit perspiration before taking the temperature.
•Taking the temperature after being under the blankets for a long time.
4. Turn off the thermometer and remove probe |
cover (if applicable). Clean and disinfect |
before returning it to its protective case. |
Notes: |
• The reading will automatically be stored in |
memory. |
• Turn off the thermometer manually to |
conserve the battery. It will automatically |
switch off 30 minutes after use or 3 |
minutes when turned on but not used. |
4. Battery replacement
Battery: Alkaline-Magnesium Button Battery LR41 (available commercially)
Battery Replacement Indicator ( ) Replace the battery when the battery replacement indicator appears when the thermometer is switched on.
1.Remove the screw holding down the battery cover on the underside of the thermometer with a small screwdriver and take off the cover. (Fig. 12)
2.Use a thin stiff rod to remove the battery.
Note: Take caution as battery may pop out (Fig. 13).
3.Insert the new battery with the “+” pole facing up as shown in the diagram. Make sure the battery is put in with the right polarity.
(Fig. 14)
4.Replace the battery cover and reinsert and fasten screw. (Fig. 15)
Note: Do not loose the black O-ring around the screw. Waterproofness will fail and can lead to misreadings and failure of the unit.
 Caution
The tip of the thermometer contains Nickel.
8. Specifications
Product type: | Digital thermometer |
Product Name: | Eco Temp II |
Product Number: | MC-241W-E |
Power Supply: | 1.5V DC, 1 LR41 Alkaline-Magnesium Button Battery |
Power Consumption: | 0.1mW |
Battery Life: | Approx. 1100 readings (If used for 10 minutes per day). |
Sensing Unit: | Thermistor |
Measurement Method: | Actual measurement (non-predictive) |
Temperature Display: | 4-digit, +°C (°F) display in 0.1 degree increments |
Measurement Accuracy: | ± 0.1°C (32.0 to 42.0°C) |
| ± 0.2°F (89.6 to 107.6°F) |
| (when measured at a standard room temperature of 23°C |
| (73.4°F) in a test tank held at constant temperature) |
Measurement Range: | 32.0 to 42.0°C (89.6 to 107.6°F) |
Usage Environment Temp | Surrounding temperature +10 to +40°C (+50 to +104°F), |
and Humidity: | Relative Humidity 30-85%RH |
Storage Environment | Surrounding temperature -20 to +60°C (-4 to +140°F), Relative |
Temp and Humidity: | Humidity 10-95%RH |
Weight: | Approx. 11g (with battery installed) |
External Dimensions: | 18.4mm(w) × 130.0mm(l) × 11.3mm(d) |
Package Content: | Test Battery (Alkaline-Magnesium Button Battery LR41), |
| Storage Case, Instruction Sheet. |
Notes:
•This OMRON product is produced under the strict quality system of OMRON Healthcare Co. Ltd., Japan.
•The specifications may be changed without prior notice.
•This unit is water-resistant.
•This thermometer does not contain any serviceable part. OMRON recommends that the accuracy is verified every two years by OMRON’s representative.
Warranty
This product is guaranteed by Omron for 3 years after date of purchase. Any damage caused by improper handling shall not be covered by warranty.
Batteries and packaging are also excluded from the warranty. All other damage claims excluded. A warranty claim must be submitted with the purchase receipt.
= Type B
 Read the Instructions in this manual carefully.
This device fulfills the provisions of the EC directive 93/42/EEC (Medical Device Directive) and the European Standard EN12470:2000, Clinical thermometers - Part 3: Performance of compact electrical thermometers (non-predictive and predictive) with maximum device.