4.Press SET to accept the change and switch to the next setting.
5.When you are finished, press ![]() to exit the setup menu.
to exit the setup menu.
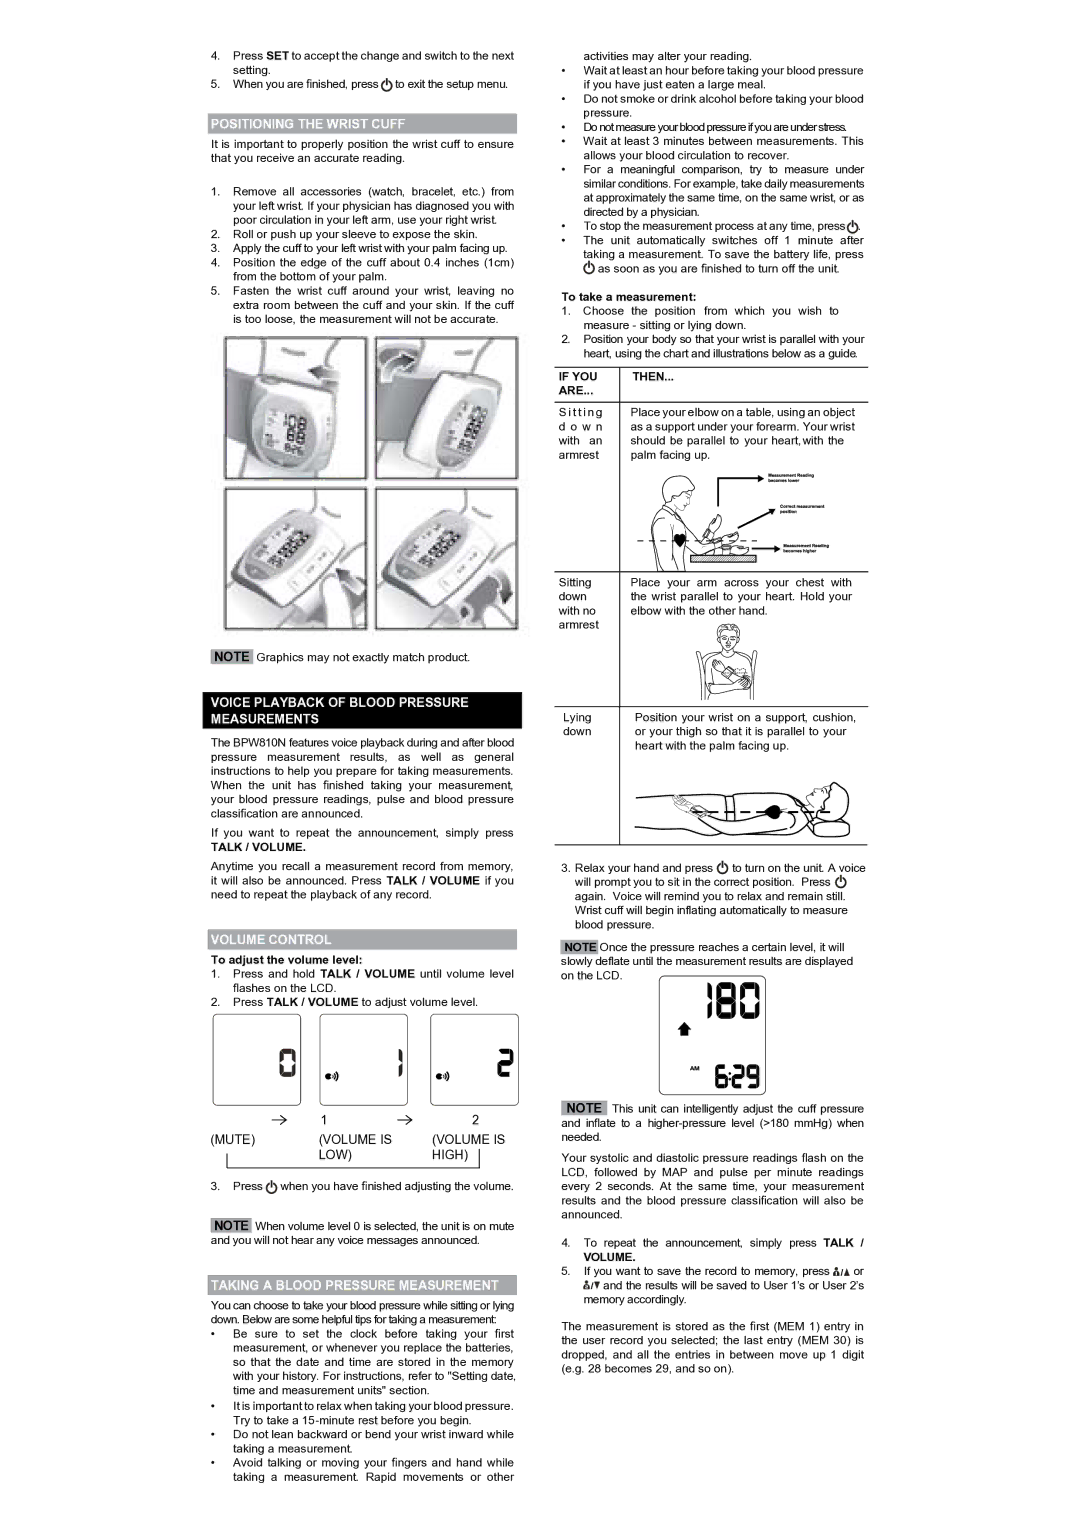
POSITIONING THE WRIST CUFF
It is important to properly position the wrist cuff to ensure that you receive an accurate reading.
1.Remove all accessories (watch, bracelet, etc.) from your left wrist. If your physician has diagnosed you with poor circulation in your left arm, use your right wrist.
2.Roll or push up your sleeve to expose the skin.
3.Apply the cuff to your left wrist with your palm facing up.
4.Position the edge of the cuff about 0.4 inches (1cm) from the bottom of your palm.
5.Fasten the wrist cuff around your wrist, leaving no extra room between the cuff and your skin. If the cuff is too loose, the measurement will not be accurate.
NOTE Graphics may not exactly match product.
VOICE PLAYBACK OF BLOOD PRESSURE MEASUREMENTS
The BPW810N features voice playback during and after blood pressure measurement results, as well as general instructions to help you prepare for taking measurements. When the unit has finished taking your measurement, your blood pressure readings, pulse and blood pressure classification are announced.
If you want to repeat the announcement, simply press
TALK / VOLUME.
Anytime you recall a measurement record from memory, it will also be announced. Press TALK / VOLUME if you need to repeat the playback of any record.
VOLUME CONTROL
To adjust the volume level:
1.Press and hold TALK / VOLUME until volume level flashes on the LCD.
2.Press TALK / VOLUME to adjust volume level.
| 1 | 2 |
(MUTE) | (VOLUME IS | (VOLUME IS |
| LOW) | HIGH) |
3.Press ![]() when you have finished adjusting the volume.
when you have finished adjusting the volume.
NOTE When volume level 0 is selected, the unit is on mute and you will not hear any voice messages announced.
TAKING A BLOOD PRESSURE MEASUREMENT
You can choose to take your blood pressure while sitting or lying down. Below are some helpful tips for taking a measurement:
•Be sure to set the clock before taking your first measurement, or whenever you replace the batteries, so that the date and time are stored in the memory with your history. For instructions, refer to "Setting date, time and measurement units" section.
•It is important to relax when taking your blood pressure. Try to take a
•Do not lean backward or bend your wrist inward while taking a measurement.
•Avoid talking or moving your fingers and hand while taking a measurement. Rapid movements or other
activities may alter your reading.
•Wait at least an hour before taking your blood pressure if you have just eaten a large meal.
•Do not smoke or drink alcohol before taking your blood pressure.
•Do not measure your blood pressure if you are under stress.
•Wait at least 3 minutes between measurements. This allows your blood circulation to recover.
•For a meaningful comparison, try to measure under similar conditions. For example, take daily measurements at approximately the same time, on the same wrist, or as directed by a physician.
•To stop the measurement process at any time, press ![]()
•The unit automatically switches off 1 minute after taking a measurement. To save the battery life, press ![]() as soon as you are finished to turn off the unit.
as soon as you are finished to turn off the unit.
To take a measurement:
1.Choose the position from which you wish to measure - sitting or lying down.
2.Position your body so that your wrist is parallel with your heart, using the chart and illustrations below as a guide.
IF YOU | THEN... |
ARE... |
|
S i t t i n g | Place your elbow on a table, using an object |
d o w n | as a support under your forearm. Your wrist |
with an | should be parallel to your heart,with the |
armrest | palm facing up. |
Sitting | Place your arm across your chest with |
down | the wrist parallel to your heart. Hold your |
with no | elbow with the other hand. |
armrest |
|
Lying | Position your wrist on a support, cushion, |
down | or your thigh so that it is parallel to your |
| heart with the palm facing up. |
|
|
3.Relax your hand and press ![]() to turn on the unit. A voice will prompt you to sit in the correct position. Press
to turn on the unit. A voice will prompt you to sit in the correct position. Press ![]() again. Voice will remind you to relax and remain still. Wrist cuff will begin inflating automatically to measure blood pressure.
again. Voice will remind you to relax and remain still. Wrist cuff will begin inflating automatically to measure blood pressure.
NOTE Once the pressure reaches a certain level, it will slowly deflate until the measurement results are displayed on the LCD.
NOTE This unit can intelligently adjust the cuff pressure and inflate to a
Your systolic and diastolic pressure readings flash on the LCD, followed by MAP and pulse per minute readings every 2 seconds. At the same time, your measurement results and the blood pressure classification will also be announced.
4.To repeat the announcement, simply press TALK /
VOLUME.
5.If you want to save the record to memory, press ![]()
![]()
![]() or
or ![]()
![]()
![]() and the results will be saved to User 1’s or User 2’s memory accordingly.
and the results will be saved to User 1’s or User 2’s memory accordingly.
The measurement is stored as the first (MEM 1) entry in the user record you selected; the last entry (MEM 30) is dropped, and all the entries in between move up 1 digit (e.g. 28 becomes 29, and so on).