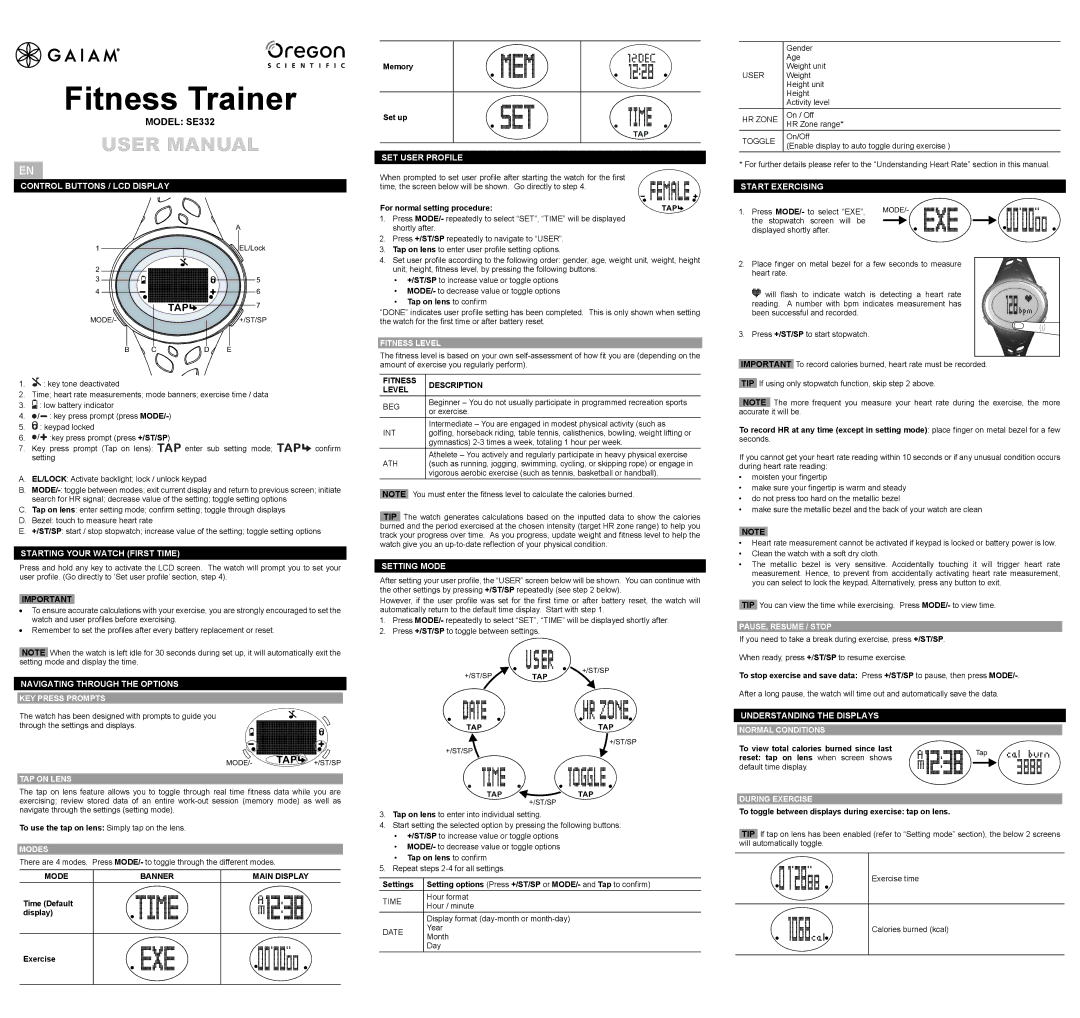
1.Press MODE/- repeatedly to select “SET”, “TIME” will be displayed shortly after.
2.Press +/ST/SP repeatedly to navigate to “USER”.
3.Tap on lens to enter user profile setting options.
4.Set user profile according to the following order: gender, age, weight unit, weight, height unit, height, fitness level, by pressing the following buttons:
•+/ST/SP to increase value or toggle options
•MODE/- to decrease value or toggle options
•Tap on lens to confirm
“DONE” indicates user profile setting has been completed. This is only shown when setting the watch for the first time or after battery reset.
Fitness level
The fitness level is based on your own self-assessment of how fit you are (depending on the amount of exercise you regularly perform).
the stopwatch screen will be |
displayed shortly after. |
2.Place finger on metal bezel for a few seconds to measure heart rate.
will flash to indicate watch is detecting a heart rate reading. A number with bpm indicates measurement has been successful and recorded.
3. Press +/ST/SP to start stopwatch.
IMPORTANT To record calories burned, heart rate must be recorded.
1.: key tone deactivated
2.Time; heart rate measurements; mode banners; exercise time / data
3.: low battery indicator
4.: key press prompt (press MODE/-)
5.: keypad locked
6.:key press prompt (press +/ST/SP)
7. Key press prompt (Tap on lens): | enter sub setting mode; | confirm |
setting | | |
A.EL/LOCK: Activate backlight; lock / unlock keypad
B.MODE/-: toggle between modes; exit current display and return to previous screen; initiate search for HR signal; decrease value of the setting; toggle setting options
C.Tap on lens: enter setting mode; confirm setting; toggle through displays
D.Bezel: touch to measure heart rate
E.+/ST/SP: start / stop stopwatch; increase value of the setting; toggle setting options
Starting your watch (first time)
Press and hold any key to activate the LCD screen. The watch will prompt you to set your user profile. (Go directly to ‘Set user profile’ section, step 4).
IMPORTANT
•To ensure accurate calculations with your exercise, you are strongly encouraged to set the watch and user profiles before exercising.
•Remember to set the profiles after every battery replacement or reset.
NOTE When the watch is left idle for 30 seconds during set up, it will automatically exit the setting mode and display the time.
Navigating through the options
Key press prompts
The watch has been designed with prompts to guide you through the settings and displays.
MODE/-+/ST/SP
Tap on lens
The tap on lens feature allows you to toggle through real time fitness data while you are exercising; review stored data of an entire work-out session (memory mode) as well as navigate through the settings (setting mode).
To use the tap on lens: Simply tap on the lens.
Modes
There are 4 modes. Press MODE/- to toggle through the different modes.
Time (Default display)
Exercise
| FITNESS | DESCRIPTION |
| LEVEL |
| |
| | |
| BEG | Beginner – You do not usually participate in programmed recreation sports |
| or exercise. |
| |
| | Intermediate – You are engaged in modest physical activity (such as |
| INT | golfing, horseback riding, table tennis, calisthenics, bowling, weight lifting or |
| | gymnastics) 2-3 times a week, totaling 1 hour per week. |
| | Athelete – You actively and regularly participate in heavy physical exercise |
| ATH | (such as running, jogging, swimming, cycling, or skipping rope) or engage in |
| | vigorous aerobic exercise (such as tennis, basketball or handball). |
| | |
NOTE You must enter the fitness level to calculate the calories burned.
TIP The watch generates calculations based on the inputted data to show the calories burned and the period exercised at the chosen intensity (target HR zone range) to help you track your progress over time. As you progress, update weight and fitness level to help the watch give you an up-to-date reflection of your physical condition.
Setting mode
After setting your user profile, the “USER” screen below will be shown. You can continue with the other settings by pressing +/ST/SP repeatedly (see step 2 below).
However, if the user profile was set for the first time or after battery reset, the watch will automatically return to the default time display. Start with step 1.
1.Press MODE/- repeatedly to select “SET”, “TIME” will be displayed shortly after.
2.Press +/ST/SP to toggle between settings.
 +/ST/SP +/ST/SP
+/ST/SP
3.Tap on lens to enter into individual setting.
4.Start setting the selected option by pressing the following buttons:
•+/ST/SP to increase value or toggle options
•MODE/- to decrease value or toggle options
•Tap on lens to confirm
5.Repeat steps 2-4 for all settings.
| Settings | Setting options (Press +/ST/SP or MODE/- and Tap to confirm) |
| | |
| TIME | Hour format |
| Hour / minute |
| |
| | |
| | Display format (day-month or month-day) |
| DATE | Year |
| Month |
| |
| | Day |
| | |
TIP If using only stopwatch function, skip step 2 above.
NOTE The more frequent you measure your heart rate during the exercise, the more accurate it will be.
To record HR at any time (except in setting mode): place finger on metal bezel for a few seconds.
If you cannot get your heart rate reading within 10 seconds or if any unusual condition occurs during heart rate reading:
•moisten your fingertip
•make sure your fingertip is warm and steady
•do not press too hard on the metallic bezel
•make sure the metallic bezel and the back of your watch are clean
NOTE
•Heart rate measurement cannot be activated if keypad is locked or battery power is low.
•Clean the watch with a soft dry cloth.
•The metallic bezel is very sensitive. Accidentally touching it will trigger heart rate measurement. Hence, to prevent from accidentally activating heart rate measurement, you can select to lock the keypad. Alternatively, press any button to exit.
TIP You can view the time while exercising. Press MODE/- to view time.
Pause, resume / stop
If you need to take a break during exercise, press +/ST/SP.
When ready, press +/ST/SP to resume exercise.
To stop exercise and save data: Press +/ST/SP to pause, then press MODE/-.
After a long pause, the watch will time out and automatically save the data.
Understanding the displays
Normal conditions
| To view total calories burned since last | Tap |
| reset: tap on lens when screen shows |
| |
| default time display. | |
During exercise
To toggle between displays during exercise: tap on lens.
TIP If tap on lens has been enabled (refer to “Setting mode” section), the below 2 screens will automatically toggle.
Exercise time
Calories burned (kcal)