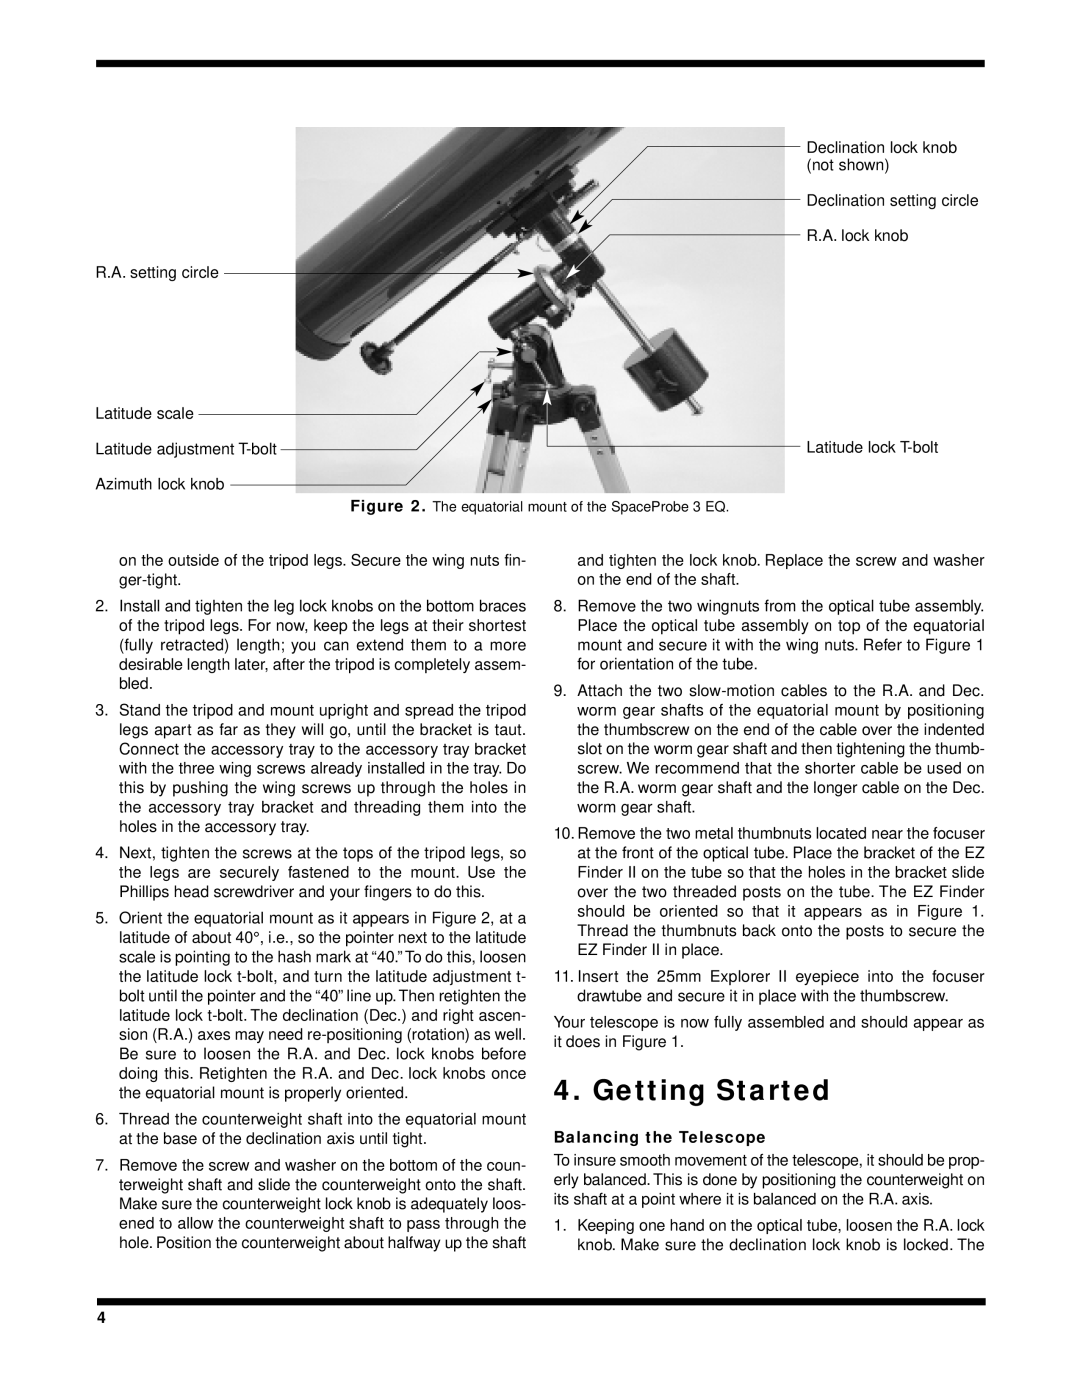
Declination lock knob (not shown)

Declination setting circle

R.A. lock knob

R.A. setting circle

Latitude scale

Latitude adjustment T-bolt


Latitude lock T-bolt


Azimuth lock knob

Figure 2. The equatorial mount of the SpaceProbe 3 EQ.

on the outside of the tripod legs. Secure the wing nuts fin- ger-tight.

2.Install and tighten the leg lock knobs on the bottom braces of the tripod legs. For now, keep the legs at their shortest (fully retracted) length; you can extend them to a more desirable length later, after the tripod is completely assem- bled.

3.Stand the tripod and mount upright and spread the tripod legs apart as far as they will go, until the bracket is taut. Connect the accessory tray to the accessory tray bracket with the three wing screws already installed in the tray. Do this by pushing the wing screws up through the holes in the accessory tray bracket and threading them into the holes in the accessory tray.

4.Next, tighten the screws at the tops of the tripod legs, so the legs are securely fastened to the mount. Use the Phillips head screwdriver and your fingers to do this.

5.Orient the equatorial mount as it appears in Figure 2, at a latitude of about 40°, i.e., so the pointer next to the latitude scale is pointing to the hash mark at “40.” To do this, loosen the latitude lock t-bolt, and turn the latitude adjustment t- bolt until the pointer and the “40” line up. Then retighten the latitude lock t-bolt. The declination (Dec.) and right ascen- sion (R.A.) axes may need re-positioning (rotation) as well. Be sure to loosen the R.A. and Dec. lock knobs before doing this. Retighten the R.A. and Dec. lock knobs once the equatorial mount is properly oriented.

6.Thread the counterweight shaft into the equatorial mount at the base of the declination axis until tight.

7.Remove the screw and washer on the bottom of the coun- terweight shaft and slide the counterweight onto the shaft. Make sure the counterweight lock knob is adequately loos- ened to allow the counterweight shaft to pass through the hole. Position the counterweight about halfway up the shaft

and tighten the lock knob. Replace the screw and washer on the end of the shaft.

8.Remove the two wingnuts from the optical tube assembly. Place the optical tube assembly on top of the equatorial mount and secure it with the wing nuts. Refer to Figure 1 for orientation of the tube.

9.Attach the two slow-motion cables to the R.A. and Dec. worm gear shafts of the equatorial mount by positioning the thumbscrew on the end of the cable over the indented slot on the worm gear shaft and then tightening the thumb- screw. We recommend that the shorter cable be used on the R.A. worm gear shaft and the longer cable on the Dec. worm gear shaft.

10.Remove the two metal thumbnuts located near the focuser at the front of the optical tube. Place the bracket of the EZ Finder II on the tube so that the holes in the bracket slide over the two threaded posts on the tube. The EZ Finder should be oriented so that it appears as in Figure 1. Thread the thumbnuts back onto the posts to secure the EZ Finder II in place.

11.Insert the 25mm Explorer II eyepiece into the focuser drawtube and secure it in place with the thumbscrew.

Your telescope is now fully assembled and should appear as it does in Figure 1.

4. Getting Started

Balancing the Telescope

To insure smooth movement of the telescope, it should be prop- erly balanced. This is done by positioning the counterweight on its shaft at a point where it is balanced on the R.A. axis.

1.Keeping one hand on the optical tube, loosen the R.A. lock knob. Make sure the declination lock knob is locked. The

4

Page 4
Image 4
Orion 3 EQ instruction manual Getting Started, Balancing the Telescope

3 EQ specifications

The Orion 3 EQ is a state-of-the-art telescope mount that caters to both amateur and professional astronomers. Renowned for its precision and user-friendly design, the Orion 3 EQ is engineered to deliver an enhanced observational experience. This equatorial mount is specifically crafted to support a variety of optical telescopes, making it a versatile choice for stargazers eager to explore the heavens.

One of the standout features of the Orion 3 EQ is its robust construction. The mount is built with high-quality materials, ensuring stability and durability during usage. A notable characteristic of the Orion 3 EQ is its smooth, adjustable movements, allowing users to easily track celestial objects as they move across the night sky. This is especially beneficial for long-exposure astrophotography, where precise tracking is essential for capturing the details of distant galaxies and nebulae.

The mount is equipped with a sophisticated setting circle and latitude adjustment knobs, facilitating accurate alignment with celestial coordinates. This capability simplifies the process of locating objects in the sky, making it an excellent choice for both beginners and experienced astronomers. Additionally, the Orion 3 EQ features slow-motion controls, providing fine adjustments that enable users to center objects with ease.

Modern technology is showcased in the Orion 3 EQ’s optional GoTo system. This innovative technology allows users to input specific celestial coordinates and automatically track objects of interest. The integrated computer system can store thousands of celestial objects, offering a guided experience that enhances the observational journey.

Furthermore, the Orion 3 EQ supports a variety of telescope tubes, accommodating accessories like finderscopes, eyepieces, and cameras for a comprehensive viewing experience. Its compatibility with different mounts means users can customize their setup to suit their particular needs, whether they are engaging in visual astronomy or astrophotography.

In summary, the Orion 3 EQ stands out in the realm of telescope mounts thanks to its robust construction, precision tracking mechanisms, user-friendly features, and optional advanced technologies. Ideal for enthusiasts eager to delve into the cosmic wonders beyond our planet, the Orion 3 EQ represents a blend of tradition and modern innovation that is essential for any serious astronomer.