Orion #8297 8" F/3.9 Operating Your Orion f/3.9 Newtonian Astrograph, Attaching the Finder Scope

Models: #8296 10" F/3.9 #8297 8" F/3.9

1 12
Download 12 pages 19.43 Kb
Page 4
Image 4
Attaching the Finder Scope

Attaching the Finder Scope

The included 9x50 crosshair finder scope (Figure 3a) is use- ful for locating objects in the sky and centering them in the main telescope’s field of view.

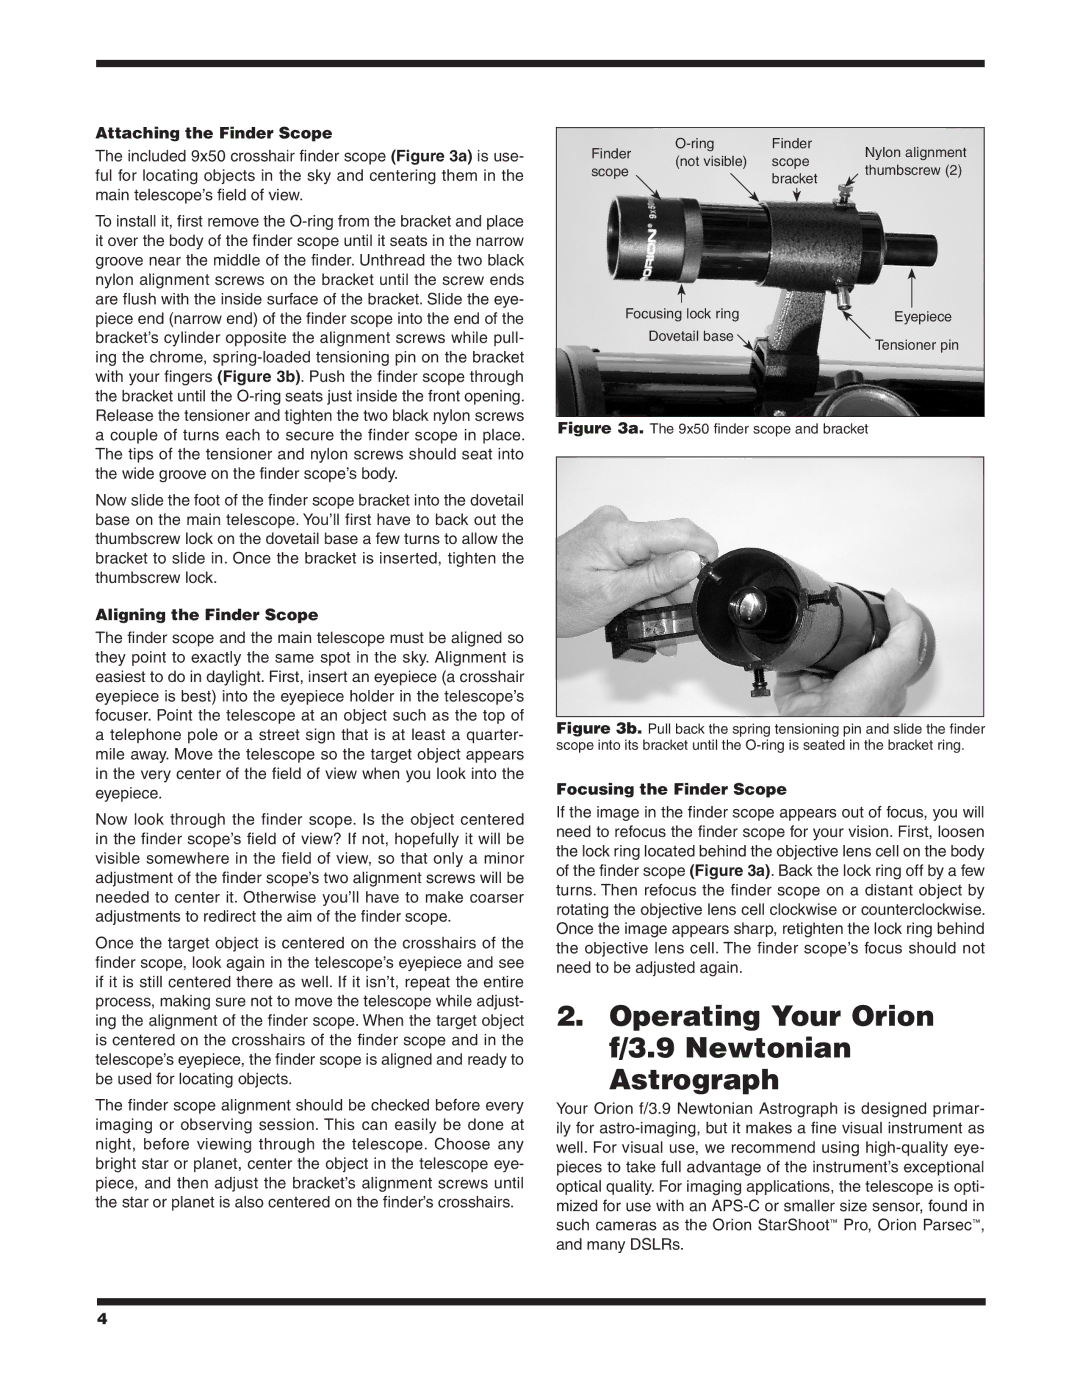
To install it, first remove the O-ring from the bracket and place it over the body of the finder scope until it seats in the narrow groove near the middle of the finder. Unthread the two black nylon alignment screws on the bracket until the screw ends are flush with the inside surface of the bracket. Slide the eye- piece end (narrow end) of the finder scope into the end of the bracket’s cylinder opposite the alignment screws while pull- ing the chrome, spring-loaded tensioning pin on the bracket with your fingers (Figure 3b). Push the finder scope through the bracket until the O-ring seats just inside the front opening. Release the tensioner and tighten the two black nylon screws a couple of turns each to secure the finder scope in place. The tips of the tensioner and nylon screws should seat into the wide groove on the finder scope’s body.

Now slide the foot of the finder scope bracket into the dovetail base on the main telescope. You’ll first have to back out the thumbscrew lock on the dovetail base a few turns to allow the bracket to slide in. Once the bracket is inserted, tighten the thumbscrew lock.

Aligning the Finder Scope

The finder scope and the main telescope must be aligned so they point to exactly the same spot in the sky. Alignment is easiest to do in daylight. First, insert an eyepiece (a crosshair eyepiece is best) into the eyepiece holder in the telescope’s focuser. Point the telescope at an object such as the top of a telephone pole or a street sign that is at least a quarter- mile away. Move the telescope so the target object appears in the very center of the field of view when you look into the eyepiece.

Now look through the finder scope. Is the object centered in the finder scope’s field of view? If not, hopefully it will be visible somewhere in the field of view, so that only a minor adjustment of the finder scope’s two alignment screws will be needed to center it. Otherwise you’ll have to make coarser adjustments to redirect the aim of the finder scope.

Once the target object is centered on the crosshairs of the finder scope, look again in the telescope’s eyepiece and see if it is still centered there as well. If it isn’t, repeat the entire process, making sure not to move the telescope while adjust- ing the alignment of the finder scope. When the target object is centered on the crosshairs of the finder scope and in the telescope’s eyepiece, the finder scope is aligned and ready to be used for locating objects.

The finder scope alignment should be checked before every imaging or observing session. This can easily be done at night, before viewing through the telescope. Choose any bright star or planet, center the object in the telescope eye- piece, and then adjust the bracket’s alignment screws until the star or planet is also centered on the finder’s crosshairs.

Finder

O-ring

Finder

Nylon alignment

(not visible)

scope

scope

thumbscrew (2)


bracket


Focusing lock ring

Eyepiece

Dovetail base

Tensioner pin


Figure 3a. The 9x50 finder scope and bracket

Figure 3b. Pull back the spring tensioning pin and slide the finder scope into its bracket until the O-ring is seated in the bracket ring.

Focusing the Finder Scope

If the image in the finder scope appears out of focus, you will need to refocus the finder scope for your vision. First, loosen the lock ring located behind the objective lens cell on the body of the finder scope (Figure 3a). Back the lock ring off by a few turns. Then refocus the finder scope on a distant object by rotating the objective lens cell clockwise or counterclockwise. Once the image appears sharp, retighten the lock ring behind the objective lens cell. The finder scope’s focus should not need to be adjusted again.

2.Operating Your Orion f/3.9 Newtonian

Astrograph

Your Orion f/3.9 Newtonian Astrograph is designed primar- ily for astro-imaging, but it makes a fine visual instrument as well. For visual use, we recommend using high-quality eye- pieces to take full advantage of the instrument’s exceptional optical quality. For imaging applications, the telescope is opti- mized for use with an APS-C or smaller size sensor, found in such cameras as the Orion StarShootPro, Orion Parsec, and many DSLRs.

4

Page 4
Image 4
Orion #8297 8" F/3.9, #8296 10" F/3.9 Operating Your Orion f/3.9 Newtonian Astrograph, Attaching the Finder Scope