Orion 90 EQ instruction manual Getting Started, Balancing the Telescope

Models: 90 EQ

1 14
Download 14 pages 25.41 Kb
Page 5
Image 5
4. Getting Started

the latitude lock t-bolt, and turn the latitude adjustment t-bolt until the pointer and the “40” line up. Then retighten the latitude lock t-bolt. The declination (Dec.) and right ascension (R.A.) axes may need re-positioning (rotation) as well. Be sure to loosen the R.A. and Dec. lock knobs before doing this. Retighten the R.A. and Dec. lock knobs once the equatorial mount is properly oriented.

7.Thread the counterweight shaft into the equatorial mount at the base of the declination axis until tight.

8.Remove the screw and washer on the bottom of the counterweight shaft and slide the counterweight onto the shaft. Make sure the counterweight lock knobs are adequately loosened to allow the counterweight shaft to pass through the hole. Position the counterweight about halfway up the shaft and tighten the lock knobs. Replace the screw and washer on the counterweight shaft.

9.Attach the 1/4"-20 adapter to the top of the equatorial mount using the bolts and washers that come with the adapter. Push the bolts, with washers attached, up through the holes in the top of the mount and thread them into the bottom of the adapter. Tighten the bolts securely with the supplied wrench.

10.Connect the optical tube assembly to the 1/4"-20 adapter on the mount by threading the adapter’s shaft into the hole in the optical tube’s mounting block. Orient the optical tube so that it is parallel to the length of the adapter, as it is in Figure 1. Tighten this connection firmly by rotating the knurled thumb wheel on the adapter counter-clockwise.

11.Now attach the two slow-motion cables to the R.A. and Dec. slow-motion shafts of the equatorial mount by positioning the thumbscrew on the end of the cable over the indented slot on the shaft, then tightening the thumb screw. A cable can be attached to either end of the R.A. shaft, whichever is most convenient for you. Use the shorter cable for the R.A. shaft.

12.To place the finder scope in its bracket, first remove the O-ring from the finder scope bracket. Loosen the three nylon thumbscrews on the bracket until the tips of the screws are flush with the inside of the bracket. Insert the objective end (the end without the rubber eyeguard) of the finder scope into the bracket ring with the three nylon thumbscrews. When the finder scope is through the second ring of the bracket and as far as it will go, push the O-Ring on the objective end of the finder scope and set it about 1" down the finder scope tube. Then pull the finder scope back gently until the O-Ring seats itself on the ridge inside the second ring of the finder scope bracket. Tighten the three nylon screws equally until they are touching the sides of the finder scope.

13.Insert the base of the finder scope bracket into the dovetail holder on the optical tube. Lock the bracket into position by tightening the knurled thumbscrew on the dovetail holder.

14.Remove the cap from the eyepiece adapter on the rear of the optical tube and insert the chrome barrel of the mirror

star diagonal. Secure the diagonal with the thumbscrews on the eyepiece adapter.

15.Now, insert the chrome barrel of the 25mm eyepiece into the star diagonal. Secure the eyepiece with the thumbscrews on the star diagonal.

The telescope system is now fully assembled. Keep the dust cover over the front end of the telescope when it is not in use. It is also a good idea to cover the eyepiece; use the cover cap that came with it.

4. Getting Started

Balancing the Telescope

To insure smooth movement of the telescope on both axes of motion (R.A. and Dec.) of the equatorial mount, it is imperative that the optical tube be properly balanced.

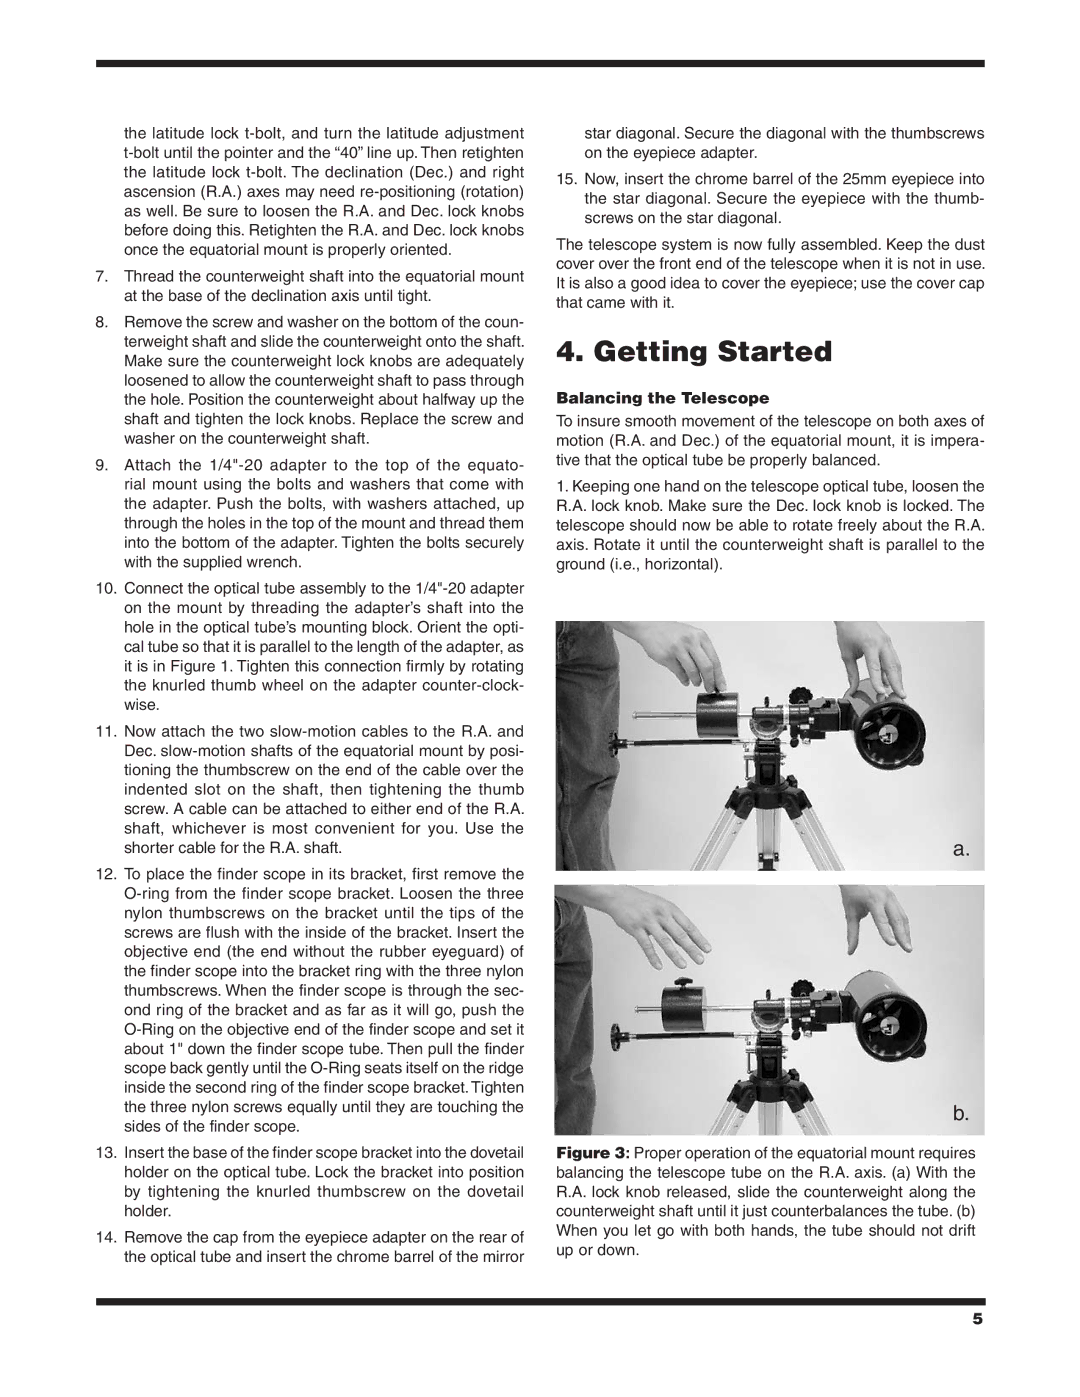
1.Keeping one hand on the telescope optical tube, loosen the R.A. lock knob. Make sure the Dec. lock knob is locked. The telescope should now be able to rotate freely about the R.A. axis. Rotate it until the counterweight shaft is parallel to the ground (i.e., horizontal).

a.

b.

Figure 3: Proper operation of the equatorial mount requires balancing the telescope tube on the R.A. axis. (a) With the R.A. lock knob released, slide the counterweight along the counterweight shaft until it just counterbalances the tube. (b) When you let go with both hands, the tube should not drift up or down.

5

Page 5
Image 5
Orion 90 EQ instruction manual Getting Started, Balancing the Telescope