drawtube

Reflection of primary mirror clip

b.c.

a.

d.

e.


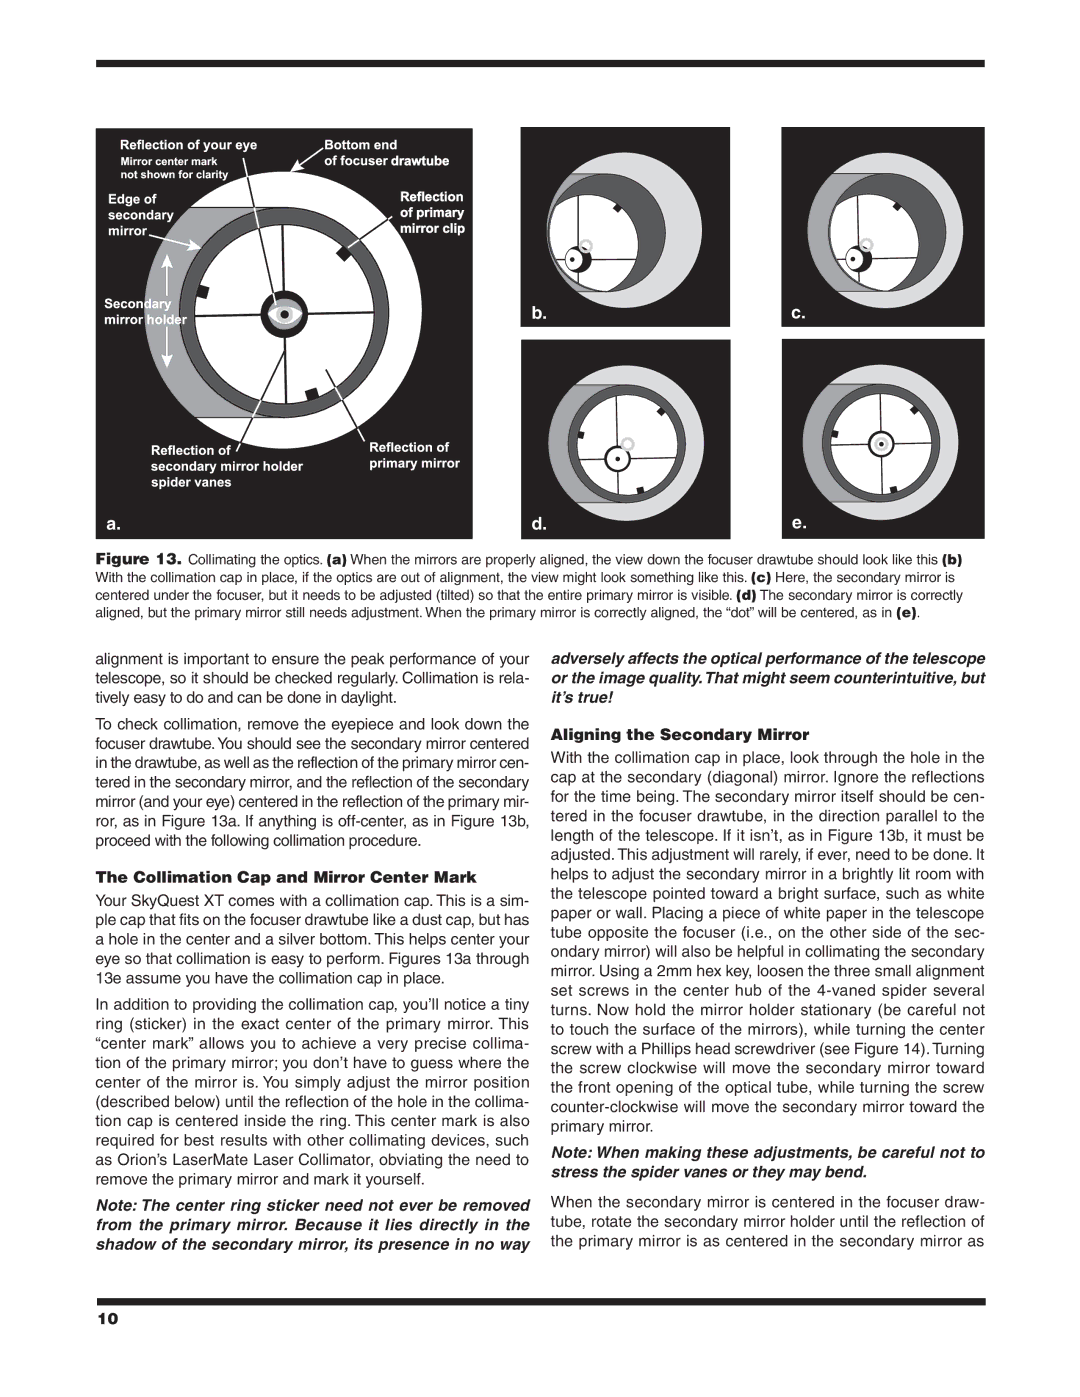
Figure 13. Collimating the optics. (a) When the mirrors are properly aligned, the view down the focuser drawtube should look like this (b) With the collimation cap in place, if the optics are out of alignment, the view might look something like this. (c) Here, the secondary mirror is centered under the focuser, but it needs to be adjusted (tilted) so that the entire primary mirror is visible. (d) The secondary mirror is correctly aligned, but the primary mirror still needs adjustment. When the primary mirror is correctly aligned, the “dot” will be centered, as in (e).

alignment is important to ensure the peak performance of your telescope, so it should be checked regularly. Collimation is rela- tively easy to do and can be done in daylight.

To check collimation, remove the eyepiece and look down the focuser drawtube.You should see the secondary mirror centered in the drawtube, as well as the reflection of the primary mirror cen- tered in the secondary mirror, and the reflection of the secondary mirror (and your eye) centered in the reflection of the primary mir- ror, as in Figure 13a. If anything is off-center, as in Figure 13b, proceed with the following collimation procedure.

The Collimation Cap and Mirror Center Mark

Your SkyQuest XT comes with a collimation cap. This is a sim- ple cap that fits on the focuser drawtube like a dust cap, but has a hole in the center and a silver bottom. This helps center your eye so that collimation is easy to perform. Figures 13a through 13e assume you have the collimation cap in place.

In addition to providing the collimation cap, you’ll notice a tiny ring (sticker) in the exact center of the primary mirror. This “center mark” allows you to achieve a very precise collima- tion of the primary mirror; you don’t have to guess where the center of the mirror is. You simply adjust the mirror position (described below) until the reflection of the hole in the collima- tion cap is centered inside the ring. This center mark is also required for best results with other collimating devices, such as Orion’s LaserMate Laser Collimator, obviating the need to remove the primary mirror and mark it yourself.

Note: The center ring sticker need not ever be removed from the primary mirror. Because it lies directly in the shadow of the secondary mirror, its presence in no way

adversely affects the optical performance of the telescope or the image quality.That might seem counterintuitive, but it’s true!

Aligning the Secondary Mirror

With the collimation cap in place, look through the hole in the cap at the secondary (diagonal) mirror. Ignore the reflections for the time being. The secondary mirror itself should be cen- tered in the focuser drawtube, in the direction parallel to the length of the telescope. If it isn’t, as in Figure 13b, it must be adjusted. This adjustment will rarely, if ever, need to be done. It helps to adjust the secondary mirror in a brightly lit room with the telescope pointed toward a bright surface, such as white paper or wall. Placing a piece of white paper in the telescope tube opposite the focuser (i.e., on the other side of the sec- ondary mirror) will also be helpful in collimating the secondary mirror. Using a 2mm hex key, loosen the three small alignment set screws in the center hub of the 4-vaned spider several turns. Now hold the mirror holder stationary (be careful not to touch the surface of the mirrors), while turning the center screw with a Phillips head screwdriver (see Figure 14). Turning the screw clockwise will move the secondary mirror toward the front opening of the optical tube, while turning the screw counter-clockwise will move the secondary mirror toward the primary mirror.

Note: When making these adjustments, be careful not to stress the spider vanes or they may bend.

When the secondary mirror is centered in the focuser draw- tube, rotate the secondary mirror holder until the reflection of the primary mirror is as centered in the secondary mirror as

10

Page 10
Image 10
Orion XT8 CLASSIC, XT10 CLASSIC instruction manual Collimation Cap and Mirror Center Mark, Aligning the Secondary Mirror

XT10 CLASSIC, XT8 CLASSIC specifications

The Orion XT10 Classic and XT8 Classic telescopes represent a perfect blend of innovative design and advanced optics, making them excellent choices for amateur astronomers. Both models are part of Orion's popular XT Classic series, known for their user-friendly features and high-quality performance.

The Orion XT10 Classic features a large 10-inch aperture, providing exceptional light-gathering capabilities. This allows users to observe faint celestial objects, such as distant galaxies, nebulae, and star clusters, with remarkable clarity and detail. The telescope's Dobsonian mount ensures smooth and stable movement, making it easy to track objects across the night sky.

The XT8 Classic, with its 8-inch aperture, also offers impressive light-gathering ability, delivering crisp views of various astronomical phenomena. Both models are equipped with a parabolic mirror design, which minimizes optical aberrations and enhances image quality. This design is a significant advancement over traditional spherical mirrors, allowing for sharper and more focused images.

One of the standout features of both Telescopes is their simplicity of use. The intuitive Dobsonian mounting system allows users to easily position the telescope and locate celestial objects without the complexity of motorized tracking systems. This makes them ideal for novices as well as experienced astronomers looking for a portable option.

Both models come with a sturdy, pre-assembled base, ensuring stability during observations. The XT10 Classic and XT8 Classic also include high-quality eyepieces, which enhance viewing experiences. Optional accessories, such as additional eyepieces and filters, can further expand the observational capabilities.

The Orion XT10 Classic offers a focal length of 1200mm, while the XT8 Classic has a focal length of 1200mm as well. This allows both telescopes to excel in a variety of observational scenarios, from lunar observations to deep-sky exploration. Additionally, both telescopes feature a single-focal point, which makes them compatible with numerous aftermarket eyepieces.

In summary, the Orion XT10 Classic and XT8 Classic telescopes are distinguished by their user-friendly design, exceptional optical performance, and robust construction. They are perfect for anyone interested in exploring the wonders of the universe, providing a gateway to breathtaking views of the night sky. Whether you choose the larger XT10 Classic or the more compact XT8 Classic, both models are bound to enhance your astronomical experience.