TWEETER INSTALLATION
The HCCA speaker system is supplied with three different tweeter mounting options. Surface, flush and angled flush mount. After you have decided which option is best suited to your installation, refer to the following sections for specific details on mounting the tweeter.
Surface mount
The preparation of the mounting surface for the tweeter involves drilling three holes. Two holes are for the mounting screws. Their centers must be spaced 15/16” / 24mm apart. Use a 1/8" / 3mm drill bit for the supplied flat head #6 X 3/4” screws to mount the cup. The third 1/4” / 7mm hole is required for the wire to pass through.
Use the template provided to locate the hole centers. Cut carpeting or fabric away from the hole locations to prevent tangling of fibers in the drill bit.
Note: The orientation of the three holes determines the installed position of the tweeter. The Orion logo on the surface mount cup will end up closest to the wiring hole as shown.
Surface mount cup mounting
Insert two #6 X 3/4" flat head sheet metal screws through the holes in the bottom of the surface mount cup. Screw the cup in place. Be sure the mounting screws are driven in straight, so the heads sit flush on the cup mounting surface. This ensures the tweeter will seat properly in the surface mount cup.
Flush mount
Check the intended installation site to be sure that there is sufficient depth behind the mounting surface for the rear cup and mounting screws. The minimum depth required behind the back of the mounting surface is 1” / 25mm.
The front cup mounts into the mounting surface through a 1 7/8” / 48mm diameter hole. Be careful that the hole does not exceed 2 1/8” / 55mm diameter at any point so that the rim of the cup will completely cover the edge of the hole.
Use the template provided to locate the hole centers. Cut carpeting or fabric away from the cutting path to prevent tangling of fibers in the saw blade.
Note: Place enough washers over the protruding screws on the back of the front cup so that their combined thickness is somewhat less than the thickness of the mounting surface. This will ensure adequate “pinching” of the mounting cups without danger of breaking the rear cup.
Flush mount and angled flush mount cup mounting
Insert two #6 X 3/4" flat head sheet metal screws through the holes in the bottom of the flush mount cup. Hold the back of the cup in place behind the hole cut in the panel and screw the front cup into the back cup. Use care not to overtighten the screws. Be sure the mounting screws are driven in straight, so the heads sit flush on the cup mounting surface. This ensures the tweeter will seat properly in the flush mount cup.
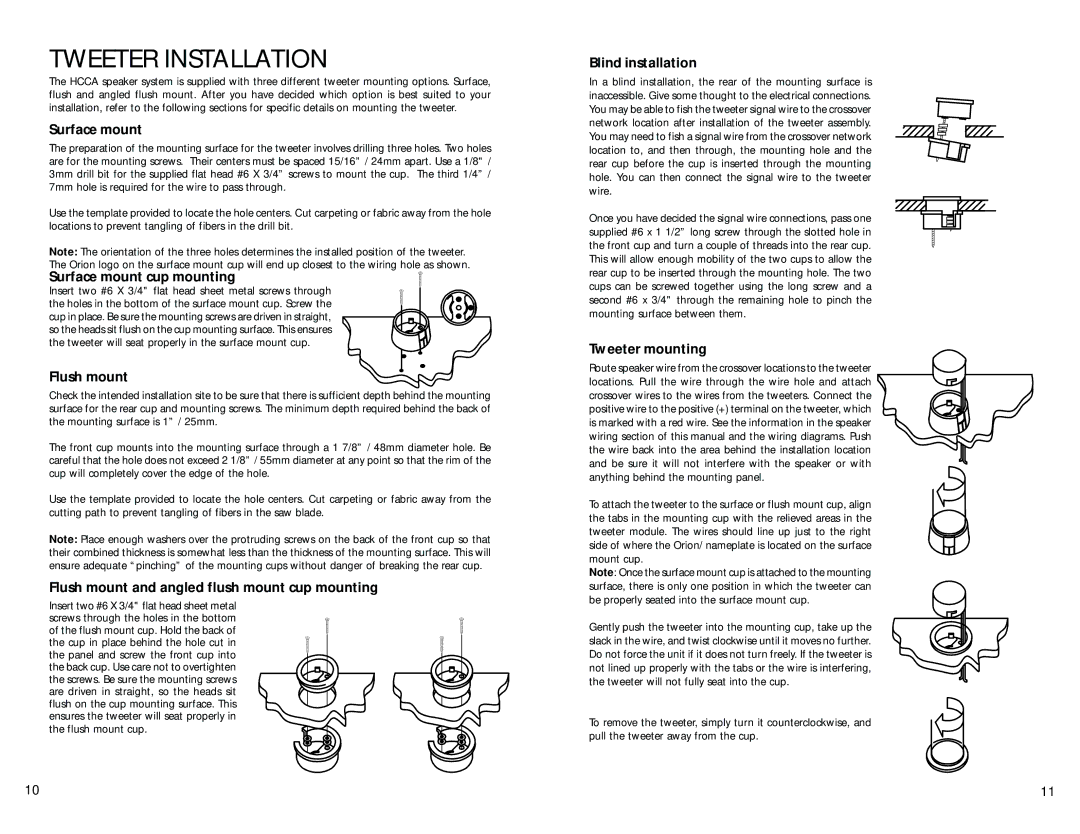
Blind installation
In a blind installation, the rear of the mounting surface is inaccessible. Give some thought to the electrical connections. You may be able to fish the tweeter signal wire to the crossover network location after installation of the tweeter assembly. You may need to fish a signal wire from the crossover network location to, and then through, the mounting hole and the rear cup before the cup is inserted through the mounting hole. You can then connect the signal wire to the tweeter wire.
Once you have decided the signal wire connections, pass one supplied #6 x 1 1/2” long screw through the slotted hole in the front cup and turn a couple of threads into the rear cup. This will allow enough mobility of the two cups to allow the rear cup to be inserted through the mounting hole. The two cups can be screwed together using the long screw and a second #6 x 3/4" through the remaining hole to pinch the mounting surface between them.
Tweeter mounting
Route speaker wire from the crossover locations to the tweeter locations. Pull the wire through the wire hole and attach crossover wires to the wires from the tweeters. Connect the positive wire to the positive (+) terminal on the tweeter, which is marked with a red wire. See the information in the speaker wiring section of this manual and the wiring diagrams. Push the wire back into the area behind the installation location and be sure it will not interfere with the speaker or with anything behind the mounting panel.
To attach the tweeter to the surface or flush mount cup, align the tabs in the mounting cup with the relieved areas in the tweeter module. The wires should line up just to the right side of where the Orion/ nameplate is located on the surface mount cup.
Note: Once the surface mount cup is attached to the mounting surface, there is only one position in which the tweeter can be properly seated into the surface mount cup.
Gently push the tweeter into the mounting cup, take up the slack in the wire, and twist clockwise until it moves no further. Do not force the unit if it does not turn freely. If the tweeter is not lined up properly with the tabs or the wire is interfering, the tweeter will not fully seat into the cup.
To remove the tweeter, simply turn it counterclockwise, and pull the tweeter away from the cup.
10 | 11 |