8-Speed


1


2


3


4

5


6


7

8


PURÉE

CHOP


MIX


PULSE

LIQUEFY

SHAKE


SMOOTHIE

ICE CRUSH


LOW


HIGH


10-Speed


1


2


3


4


5

6


7


8

9


10


EASY CLEAN


PURÉE


CHOP


WHIP

MIX

GRATE


BLEND


GRIND

LIQUEFY

ICE CRUSH


LOW


HIGH


12-Speed


1


2


3

4


5

6


7


8

9

10

11

12

EASY CLEAN

PURÉE

CREAM

CHOP

WHIP

MIX

GRATE

BLEND

SHRED

GRIND

LIQUEFY

ICE CRUSH


LOW


HIGH


14-Speed


1

2

3

4

5

6

7

8

9

10

11

12

13

14

EASY CLEAN

BEAT

PURÉE

CREAM

CHOP

WHIP

MIX

MINCE

GRATE

BLEND

SHRED

GRIND

LIQUEFY

ICE CRUSH


LOW


HIGH


16-Speed

1

2

3

4

5

6

7

8

9

10

11

12

13

14

15

16

PULSE

EASY CLEAN

STIR

BEAT

PURÉE

CHOP

WHIP

MIX

ICE CRUSH

GRATE

BLEND

SHRED

GRIND

MASH

LIQUEFY

FRAPPÉ


LOW


HIGH


USING YOUR BLENDER

1.Clean blender according to the instructions in the “Cleaning and Storing Your Blender” section.

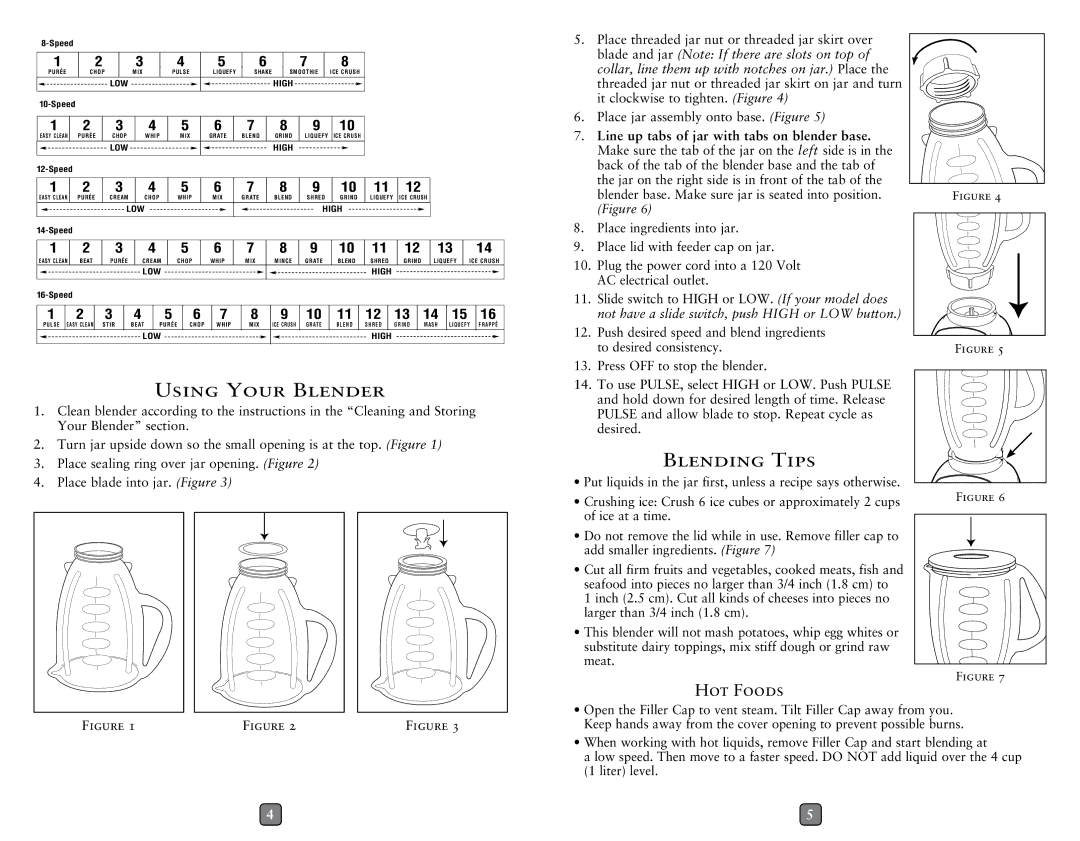
2.Turn jar upside down so the small opening is at the top. (Figure 1)

3.Place sealing ring over jar opening. (Figure 2)

4.Place blade into jar. (Figure 3)

5.Place threaded jar nut or threaded jar skirt over blade and jar (Note: If there are slots on top of collar, line them up with notches on jar.) Place the

threaded jar nut or threaded jar skirt on jar and turn it clockwise to tighten. (Figure 4)

6. Place jar assembly onto base. (Figure 5)

7.Line up tabs of jar with tabs on blender base.

Make sure the tab of the jar on the left side is in the


back of the tab of the blender base and the tab of


the jar on the right side is in front of the tab of the


blender base. Make sure jar is seated into position.

FIGURE 4

(Figure 6)


8. Place ingredients into jar.

9. Place lid with feeder cap on jar.

10. Plug the power cord into a 120 Volt AC electrical outlet.

11. Slide switch to HIGH or LOW. (If your model does not have a slide switch, push HIGH or LOW button.)

12. Push desired speed and blend ingredients


to desired consistency.

FIGURE 5

13. Press OFF to stop the blender.

14. To use PULSE, select HIGH or LOW. Push PULSE and hold down for desired length of time. Release PULSE and allow blade to stop. Repeat cycle as desired.

BLENDING TIPS

• Put liquids in the jar first, unless a recipe says otherwise.

• Crushing ice: Crush 6 ice cubes or approximately 2 cups

FIGURE 6


of ice at a time.


Do not remove the lid while in use. Remove filler cap to add smaller ingredients. (Figure 7)

• Cut all firm fruits and vegetables, cooked meats, fish and seafood into pieces no larger than 3/4 inch (1.8 cm) to

1 inch (2.5 cm). Cut all kinds of cheeses into pieces no larger than 3/4 inch (1.8 cm).

• This blender will not mash potatoes, whip egg whites or substitute dairy toppings, mix stiff dough or grind raw meat.

HOT FOODS

FIGURE 7

FIGURE 1

FIGURE 2

FIGURE 3

Open the Filler Cap to vent steam. Tilt Filler Cap away from you. Keep hands away from the cover opening to prevent possible burns.

When working with hot liquids, remove Filler Cap and start blending at

a low speed. Then move to a faster speed. DO NOT add liquid over the 4 cup (1 liter) level.

4

5

Page 3
Image 3
Oster blender user manual Using Your Blender, Blending Tips, HOT Foods

blender specifications

The Oster blender has long been a staple in kitchens around the world, known for its versatility, durability, and innovative technology. With a focus on providing users with high-performance blending solutions, Oster blenders cater to various culinary needs, ranging from smoothies to soups and sauces.

One of the standout features of the Oster blender is its powerful motor, which typically ranges between 600 to 1200 watts, allowing it to handle tough ingredients with ease. This power is complemented by an array of stainless steel blades, designed to maintain sharpness over time and facilitate smooth and consistent blending. The combination of strong motor and durable blades ensures that users can tackle everything from frozen fruits to fibrous vegetables without compromising on quality.

Another notable characteristic is the patented Oster All-Metal Drive system, which enhances durability and longevity. Unlike many competitors, which often rely on plastic components, this system uses metal gears to improve torque and overall performance. This design not only extends the lifespan of the blender but also ensures a more reliable blending experience.

Flexibility is a key attribute of the Oster blender, with various models offering multiple speed settings and pre-programmed functions. Whether it's for crushing ice, blending smoothies, or preparing soups, the adjustable speed options give users complete control over texture and consistency. The availability of pulse functions also allows for precise blending, making it easier to achieve the desired outcome.

Oster blenders often feature a large capacity pitcher, accommodating family-sized servings or meal prep needs. Many models come with BPA-free containers, ensuring safety and durability. Some designs even include a tamper, which aids in blending thick mixtures, ensuring no ingredient is left unblended.

In terms of technology, many Oster blenders are equipped with smart settings that automatically adjust blending times based on the selected program. This means users can walk away from the blender without worrying about over-processing their ingredients. Additionally, the ease of cleaning is enhanced by dishwasher-safe pitcher components, making the post-cooking cleanup hassle-free.

The Oster blender exemplifies a balance of power, durability, and versatility, making it an ideal choice for anyone looking to elevate their blending experience. Regardless of whether you are a novice cook or a seasoned chef, the Oster blender is designed to meet a broad spectrum of blending needs while maintaining high-quality results.