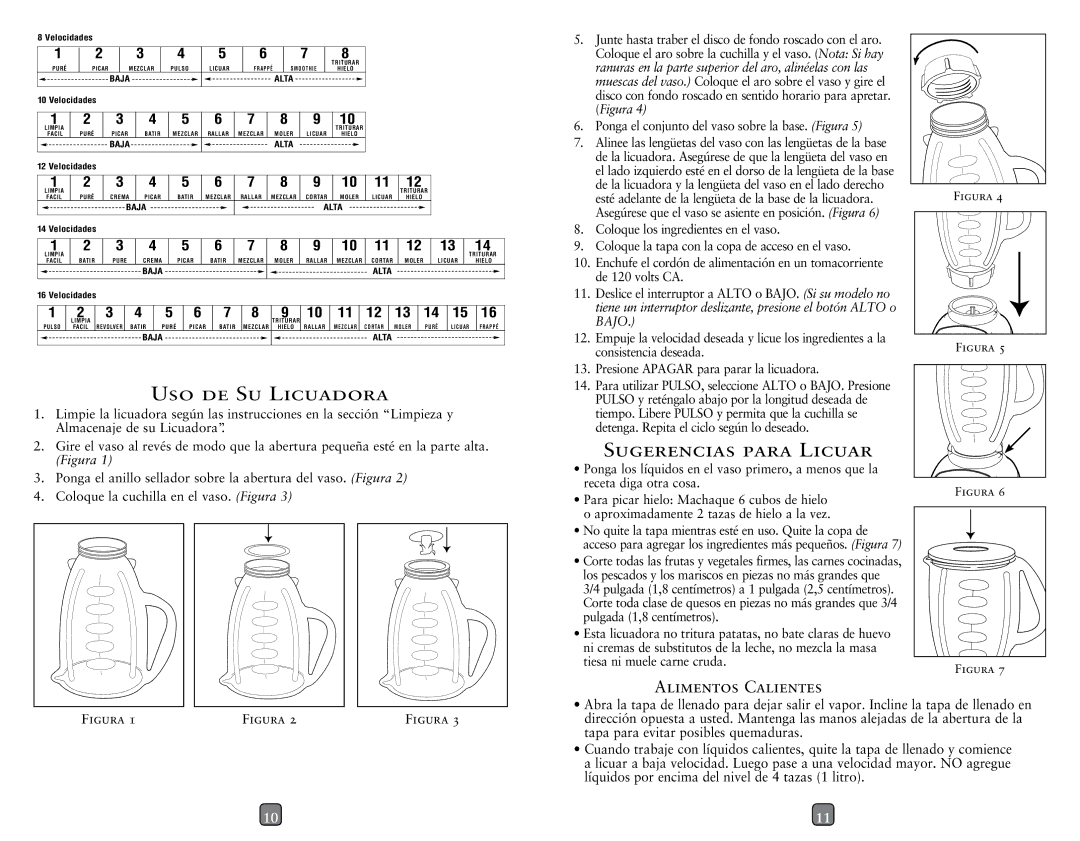
8 Velocidades

1

2

3

4

5

6

7

8


TRITURAR

PURÉ

PICAR

MEZCLAR

PULSO

LICUAR

F R A P P É S M O O T H IE

HIELO


BAJA


ALTA


10 Velocidades

1

2

3

4

5

6

7

8

9

10

LIMPIA


TRITURAR

FACIL

PURÉ

PICAR

BATIR

MEZCLAR

RALLAR

MEZCLAR

MOLER

LICUAR

HIELO


BAJA


ALTA


12 Velocidades


1

2

3

4

5

6

7

8

9

10

11

12

LIMPIA


TRITURAR

FACIL

PURÉ

CREMA

PICAR

BATIR

MEZCLAR

RALLAR

MEZCLAR

CORTAR

MOLER

LICUAR

HIELO


BAJA


ALTA


14 Velocidades


1

2

3

4

5

6

7

8

9

10

11

12

13

14

LIMPIA


TRITURAR

FACIL

BATIR

PURE

CREMA

PICAR

BATIR

MEZCLAR

MOLER

RALLAR

MEZCLAR

CORTAR

MOLER

LICUAR

HIELO


BAJA


ALTA


16 Velocidades


1

2

3

4

5

6

7

8

9

10

11

12

13

14

15

16


LIMPIA

REVOLVER


TRITURAR


PULSO

FACIL

B AT I R

P U R É

P I C A R

B AT I R

M E Z C L A R

HIELO

RALLAR

ME Z C L A R

C O RTAR

MO L E R

P U RÉ

LIC U A R

F R A P P É

BAJA ALTA

USO DE SU LICUADORA

1.Limpie la licuadora según las instrucciones en la sección “Limpieza y

Almacenaje de su Licuadora”.

2.Gire el vaso al revés de modo que la abertura pequeña esté en la parte alta.

(Figura 1)

3.Ponga el anillo sellador sobre la abertura del vaso. (Figura 2)

4.Coloque la cuchilla en el vaso. (Figura 3)

FIGURA 1

FIGURA 2

FIGURA 3

10

5. Junte hasta traber el disco de fondo roscado con el aro. Coloque el aro sobre la cuchilla y el vaso. (Nota: Si hay ranuras en la parte superior del aro, alinéelas con las muescas del vaso.) Coloque el aro sobre el vaso y gire el disco con fondo roscado en sentido horario para apretar. (Figura 4)

6.Ponga el conjunto del vaso sobre la base. (Figura 5)

7.Alinee las lengüetas del vaso con las lengüetas de la base de la licuadora. Asegúrese de que la lengüeta del vaso en el lado izquierdo esté en el dorso de la lengüeta de la base

de la licuadora y la lengüeta del vaso en el lado derecho


FIGURA 4

esté adelante de la lengüeta de la base de la licuadora.


Asegúrese que el vaso se asiente en posición. (Figura 6)


8. Coloque los ingredientes en el vaso.

9. Coloque la tapa con la copa de acceso en el vaso.

10. Enchufe el cordón de alimentación en un tomacorriente de 120 volts CA.

11. Deslice el interruptor a ALTO o BAJO. (Si su modelo no tiene un interruptor deslizante, presione el botón ALTO o BAJO.)

12. Empuje la velocidad deseada y licue los ingredientes a la

FIGURA 5

consistencia deseada.


13. Presione APAGAR para parar la licuadora.

14. Para utilizar PULSO, seleccione ALTO o BAJO. Presione

PULSO y reténgalo abajo por la longitud deseada de tiempo. Libere PULSO y permita que la cuchilla se detenga. Repita el ciclo según lo deseado.

SUGERENCIAS PARA LICUAR


• Ponga los líquidos en el vaso primero, a menos que la


receta diga otra cosa.

FIGURA 6

• Para picar hielo: Machaque 6 cubos de hielo


o aproximadamente 2 tazas de hielo a la vez.


• No quite la tapa mientras esté en uso. Quite la copa de acceso para agregar los ingredientes más pequeños. (Figura 7)

• Corte todas las frutas y vegetales firmes, las carnes cocinadas, los pescados y los mariscos en piezas no más grandes que 3/4 pulgada (1,8 centímetros) a 1 pulgada (2,5 centímetros). Corte toda clase de quesos en piezas no más grandes que 3/4 pulgada (1,8 centímetros).

Esta licuadora no tritura patatas, no bate claras de huevo ni cremas de substitutos de la leche, no mezcla la masa

tiesa ni muele carne cruda.

FIGURA 7


ALIMENTOS CALIENTES

Abra la tapa de llenado para dejar salir el vapor. Incline la tapa de llenado en dirección opuesta a usted. Mantenga las manos alejadas de la abertura de la tapa para evitar posibles quemaduras.

Cuando trabaje con líquidos calientes, quite la tapa de llenado y comience a licuar a baja velocidad. Luego pase a una velocidad mayor. NO agregue líquidos por encima del nivel de 4 tazas (1 litro).

11

Page 6
Image 6
Oster blender user manual USO DE SU Licuadora, Sugerencias Para Licuar, Alimentos Calientes

blender specifications

The Oster blender has long been a staple in kitchens around the world, known for its versatility, durability, and innovative technology. With a focus on providing users with high-performance blending solutions, Oster blenders cater to various culinary needs, ranging from smoothies to soups and sauces.

One of the standout features of the Oster blender is its powerful motor, which typically ranges between 600 to 1200 watts, allowing it to handle tough ingredients with ease. This power is complemented by an array of stainless steel blades, designed to maintain sharpness over time and facilitate smooth and consistent blending. The combination of strong motor and durable blades ensures that users can tackle everything from frozen fruits to fibrous vegetables without compromising on quality.

Another notable characteristic is the patented Oster All-Metal Drive system, which enhances durability and longevity. Unlike many competitors, which often rely on plastic components, this system uses metal gears to improve torque and overall performance. This design not only extends the lifespan of the blender but also ensures a more reliable blending experience.

Flexibility is a key attribute of the Oster blender, with various models offering multiple speed settings and pre-programmed functions. Whether it's for crushing ice, blending smoothies, or preparing soups, the adjustable speed options give users complete control over texture and consistency. The availability of pulse functions also allows for precise blending, making it easier to achieve the desired outcome.

Oster blenders often feature a large capacity pitcher, accommodating family-sized servings or meal prep needs. Many models come with BPA-free containers, ensuring safety and durability. Some designs even include a tamper, which aids in blending thick mixtures, ensuring no ingredient is left unblended.

In terms of technology, many Oster blenders are equipped with smart settings that automatically adjust blending times based on the selected program. This means users can walk away from the blender without worrying about over-processing their ingredients. Additionally, the ease of cleaning is enhanced by dishwasher-safe pitcher components, making the post-cooking cleanup hassle-free.

The Oster blender exemplifies a balance of power, durability, and versatility, making it an ideal choice for anyone looking to elevate their blending experience. Regardless of whether you are a novice cook or a seasoned chef, the Oster blender is designed to meet a broad spectrum of blending needs while maintaining high-quality results.