8 Velocidades

1

2

3

4

5

6

7

8


TRITURAR

PURÉ

PICAR

MEZCLAR

PULSO

LICUAR

F R A P P É S M O O T H IE

HIELO


BAJA


ALTA


10 Velocidades

1

2

3

4

5

6

7

8

9

10

LIMPIA


TRITURAR

FACIL

PURÉ

PICAR

BATIR

MEZCLAR

RALLAR

MEZCLAR

MOLER

LICUAR

HIELO


BAJA


ALTA


12 Velocidades


1

2

3

4

5

6

7

8

9

10

11

12

LIMPIA


TRITURAR

FACIL

PURÉ

CREMA

PICAR

BATIR

MEZCLAR

RALLAR

MEZCLAR

CORTAR

MOLER

LICUAR

HIELO


BAJA


ALTA


14 Velocidades


1

2

3

4

5

6

7

8

9

10

11

12

13

14

LIMPIA


TRITURAR

FACIL

BATIR

PURE

CREMA

PICAR

BATIR

MEZCLAR

MOLER

RALLAR

MEZCLAR

CORTAR

MOLER

LICUAR

HIELO


BAJA


ALTA


16 Velocidades


1

2

3

4

5

6

7

8

9

10

11

12

13

14

15

16


LIMPIA

REVOLVER


TRITURAR


PULSO

FACIL

B AT I R

P U R É

P I C A R

B AT I R

M E Z C L A R

HIELO

RALLAR

ME Z C L A R

C O RTAR

MO L E R

P U RÉ

LIC U A R

F R A P P É

BAJA ALTA

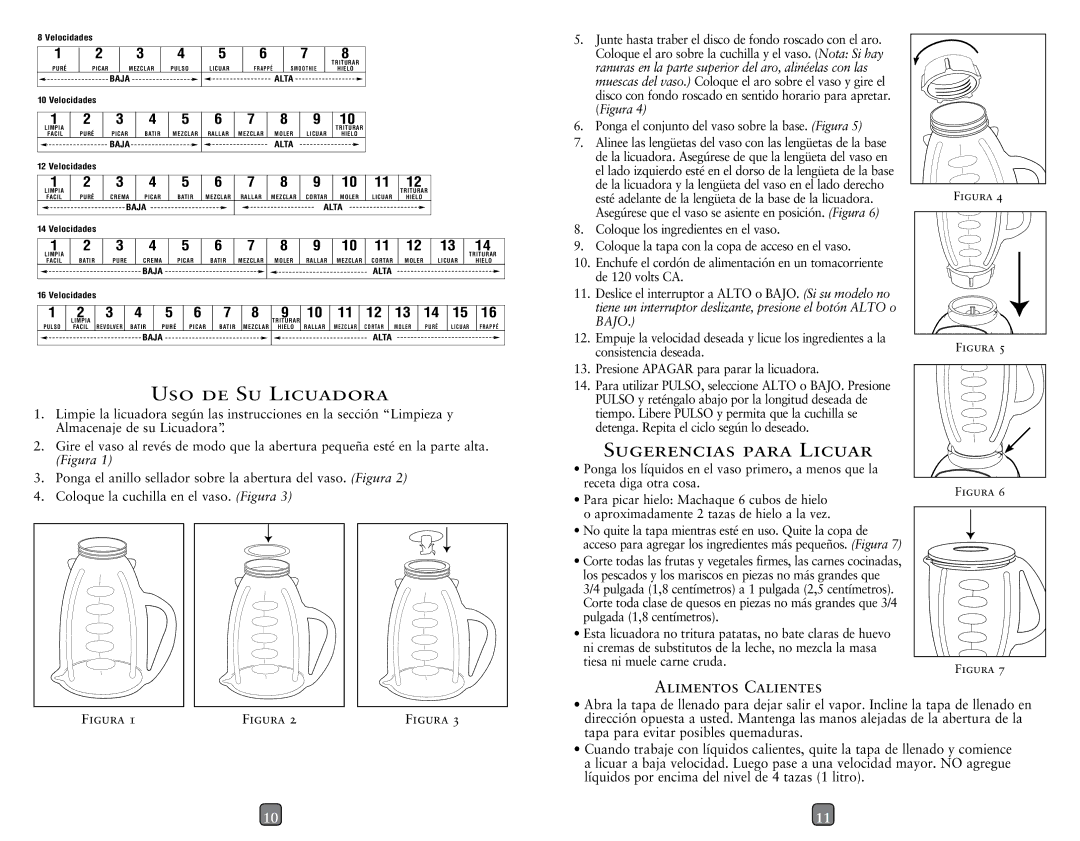
USO DE SU LICUADORA

1.Limpie la licuadora según las instrucciones en la sección “Limpieza y

Almacenaje de su Licuadora”.

2.Gire el vaso al revés de modo que la abertura pequeña esté en la parte alta.

(Figura 1)

3.Ponga el anillo sellador sobre la abertura del vaso. (Figura 2)

4.Coloque la cuchilla en el vaso. (Figura 3)

FIGURA 1

FIGURA 2

FIGURA 3

10

5. Junte hasta traber el disco de fondo roscado con el aro. Coloque el aro sobre la cuchilla y el vaso. (Nota: Si hay ranuras en la parte superior del aro, alinéelas con las muescas del vaso.) Coloque el aro sobre el vaso y gire el disco con fondo roscado en sentido horario para apretar. (Figura 4)

6.Ponga el conjunto del vaso sobre la base. (Figura 5)

7.Alinee las lengüetas del vaso con las lengüetas de la base de la licuadora. Asegúrese de que la lengüeta del vaso en el lado izquierdo esté en el dorso de la lengüeta de la base

de la licuadora y la lengüeta del vaso en el lado derecho


FIGURA 4

esté adelante de la lengüeta de la base de la licuadora.


Asegúrese que el vaso se asiente en posición. (Figura 6)


8. Coloque los ingredientes en el vaso.

9. Coloque la tapa con la copa de acceso en el vaso.

10. Enchufe el cordón de alimentación en un tomacorriente de 120 volts CA.

11. Deslice el interruptor a ALTO o BAJO. (Si su modelo no tiene un interruptor deslizante, presione el botón ALTO o BAJO.)

12. Empuje la velocidad deseada y licue los ingredientes a la

FIGURA 5

consistencia deseada.


13. Presione APAGAR para parar la licuadora.

14. Para utilizar PULSO, seleccione ALTO o BAJO. Presione

PULSO y reténgalo abajo por la longitud deseada de tiempo. Libere PULSO y permita que la cuchilla se detenga. Repita el ciclo según lo deseado.

SUGERENCIAS PARA LICUAR


• Ponga los líquidos en el vaso primero, a menos que la


receta diga otra cosa.

FIGURA 6

• Para picar hielo: Machaque 6 cubos de hielo


o aproximadamente 2 tazas de hielo a la vez.


• No quite la tapa mientras esté en uso. Quite la copa de acceso para agregar los ingredientes más pequeños. (Figura 7)

• Corte todas las frutas y vegetales firmes, las carnes cocinadas, los pescados y los mariscos en piezas no más grandes que 3/4 pulgada (1,8 centímetros) a 1 pulgada (2,5 centímetros). Corte toda clase de quesos en piezas no más grandes que 3/4 pulgada (1,8 centímetros).

Esta licuadora no tritura patatas, no bate claras de huevo ni cremas de substitutos de la leche, no mezcla la masa

tiesa ni muele carne cruda.

FIGURA 7


ALIMENTOS CALIENTES

Abra la tapa de llenado para dejar salir el vapor. Incline la tapa de llenado en dirección opuesta a usted. Mantenga las manos alejadas de la abertura de la tapa para evitar posibles quemaduras.

Cuando trabaje con líquidos calientes, quite la tapa de llenado y comience a licuar a baja velocidad. Luego pase a una velocidad mayor. NO agregue líquidos por encima del nivel de 4 tazas (1 litro).

11

Page 6
Image 6
Oster P.N. 133093-005-000 user manual USO DE SU Licuadora, Sugerencias Para Licuar, Alimentos Calientes

P.N. 133093-005-000 specifications

The Oster P.N. 133093-005-000 is a versatile appliance designed with both functionality and ease of use in mind. This product stands out in its category, combining cutting-edge technology with user-friendly features that cater to a wide range of culinary needs.

One of the main features of the Oster P.N. 133093-005-000 is its powerful motor. Capable of delivering high performance, this appliance ensures efficient blending and processing of ingredients. With various speed settings, users can achieve the desired consistency for smoothies, soups, and sauces, making it suitable for both beginners and experienced cooks.

In addition to its powerful motor, the Oster P.N. 133093-005-000 comes equipped with a robust stainless-steel blade system. The blades are designed to tackle tough ingredients with ease, including ice and frozen fruits, which are often challenging for standard blenders. This technology not only enhances blending efficiency but also ensures a thorough mix, minimizing the chances of leaving chunks behind.

Another significant characteristic of this appliance is its ergonomic and stylish design. The smooth lines and modern finish make it an attractive addition to any kitchen countertop, while the compact size ensures that it doesn’t take up too much space, appealing to those with limited kitchen areas. The easy-to-clean surfaces and dishwasher-safe components add an additional layer of convenience, simplifying post-cooking cleanup.

The Oster P.N. 133093-005-000 also features a safety lock mechanism, providing peace of mind during operation. This ensures that the lid is securely fastened while the appliance is in use, preventing spills and enhancing safety, especially in busy kitchens.

Furthermore, this blender is equipped with multiple blending modes tailored to specific recipes, ranging from smoothie cycles to pulse functions, allowing for greater culinary versatility. Users can experiment with a variety of textures and blends, making this appliance suitable for crafting everything from cocktails to baby food.

Overall, the Oster P.N. 133093-005-000 is designed to meet the demands of modern cooking, combining power, precision, and practicality in one package. Whether you are whipping up a quick breakfast smoothie or preparing a gourmet soup, this appliance proves to be an invaluable asset in the culinary space, setting the stage for endless kitchen creativity. Its blend of performance and aesthetics ensures that it stands out as a favorite among home cooks and culinary enthusiasts alike.