8 Velocidades

1

2

3

4

5

6

7

8


TRITURAR

PURÉ

PICAR

MEZCLAR

PULSO

LICUAR

F R A P P É S M O O T H IE

HIELO


BAJA


ALTA


10 Velocidades

1

2

3

4

5

6

7

8

9

10

LIMPIA


TRITURAR

FACIL

PURÉ

PICAR

BATIR

MEZCLAR

RALLAR

MEZCLAR

MOLER

LICUAR

HIELO


BAJA


ALTA


12 Velocidades


1

2

3

4

5

6

7

8

9

10

11

12

LIMPIA


TRITURAR

FACIL

PURÉ

CREMA

PICAR

BATIR

MEZCLAR

RALLAR

MEZCLAR

CORTAR

MOLER

LICUAR

HIELO


BAJA


ALTA


14 Velocidades


1

2

3

4

5

6

7

8

9

10

11

12

13

14

LIMPIA


TRITURAR

FACIL

BATIR

PURE

CREMA

PICAR

BATIR

MEZCLAR

MOLER

RALLAR

MEZCLAR

CORTAR

MOLER

LICUAR

HIELO


BAJA


ALTA


16 Velocidades


1

2

3

4

5

6

7

8

9

10

11

12

13

14

15

16


LIMPIA

REVOLVER


TRITURAR


PULSO

FACIL

B AT I R

P U R É

P I C A R

B AT I R

M E Z C L A R

HIELO

RALLAR

ME Z C L A R

C O RTAR

MO L E R

P U RÉ

LIC U A R

F R A P P É

BAJA ALTA

USO DE SU LICUADORA

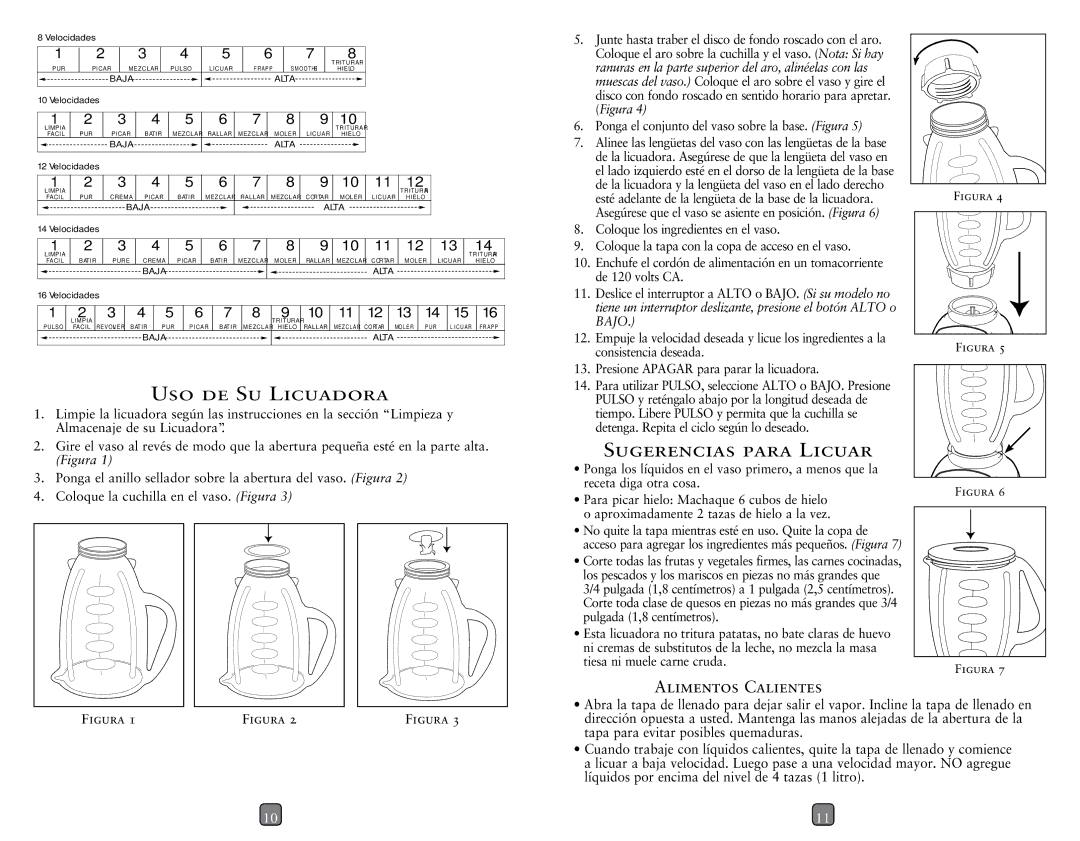
1.Limpie la licuadora según las instrucciones en la sección “Limpieza y

Almacenaje de su Licuadora”.

2.Gire el vaso al revés de modo que la abertura pequeña esté en la parte alta.

(Figura 1)

3.Ponga el anillo sellador sobre la abertura del vaso. (Figura 2)

4.Coloque la cuchilla en el vaso. (Figura 3)

FIGURA 1

FIGURA 2

FIGURA 3

10

5. Junte hasta traber el disco de fondo roscado con el aro. Coloque el aro sobre la cuchilla y el vaso. (Nota: Si hay ranuras en la parte superior del aro, alinéelas con las muescas del vaso.) Coloque el aro sobre el vaso y gire el disco con fondo roscado en sentido horario para apretar. (Figura 4)

6.Ponga el conjunto del vaso sobre la base. (Figura 5)

7.Alinee las lengüetas del vaso con las lengüetas de la base de la licuadora. Asegúrese de que la lengüeta del vaso en el lado izquierdo esté en el dorso de la lengüeta de la base

de la licuadora y la lengüeta del vaso en el lado derecho


FIGURA 4

esté adelante de la lengüeta de la base de la licuadora.


Asegúrese que el vaso se asiente en posición. (Figura 6)


8. Coloque los ingredientes en el vaso.

9. Coloque la tapa con la copa de acceso en el vaso.

10. Enchufe el cordón de alimentación en un tomacorriente de 120 volts CA.

11. Deslice el interruptor a ALTO o BAJO. (Si su modelo no tiene un interruptor deslizante, presione el botón ALTO o BAJO.)

12. Empuje la velocidad deseada y licue los ingredientes a la

FIGURA 5

consistencia deseada.


13. Presione APAGAR para parar la licuadora.

14. Para utilizar PULSO, seleccione ALTO o BAJO. Presione

PULSO y reténgalo abajo por la longitud deseada de tiempo. Libere PULSO y permita que la cuchilla se detenga. Repita el ciclo según lo deseado.

SUGERENCIAS PARA LICUAR


• Ponga los líquidos en el vaso primero, a menos que la


receta diga otra cosa.

FIGURA 6

• Para picar hielo: Machaque 6 cubos de hielo


o aproximadamente 2 tazas de hielo a la vez.


• No quite la tapa mientras esté en uso. Quite la copa de acceso para agregar los ingredientes más pequeños. (Figura 7)

• Corte todas las frutas y vegetales firmes, las carnes cocinadas, los pescados y los mariscos en piezas no más grandes que 3/4 pulgada (1,8 centímetros) a 1 pulgada (2,5 centímetros). Corte toda clase de quesos en piezas no más grandes que 3/4 pulgada (1,8 centímetros).

Esta licuadora no tritura patatas, no bate claras de huevo ni cremas de substitutos de la leche, no mezcla la masa

tiesa ni muele carne cruda.

FIGURA 7


ALIMENTOS CALIENTES

Abra la tapa de llenado para dejar salir el vapor. Incline la tapa de llenado en dirección opuesta a usted. Mantenga las manos alejadas de la abertura de la tapa para evitar posibles quemaduras.

Cuando trabaje con líquidos calientes, quite la tapa de llenado y comience a licuar a baja velocidad. Luego pase a una velocidad mayor. NO agregue líquidos por encima del nivel de 4 tazas (1 litro).

11

Page 6
Image 6
Oster Push Button Blenders, 133093-005-000 user manual USO DE SU Licuadora, Sugerencias Para Licuar, Alimentos Calientes

133093-005-000, Push Button Blenders specifications

The Oster Push Button Blender, model 133093-005-000, is a versatile kitchen appliance designed to elevate your blending experience. This powerful blender combines state-of-the-art technology with user-friendly features, making it an essential tool for both amateur and professional cooks.

At the heart of the Oster Push Button Blender is its robust motor, delivering 700 watts of power. This capability allows for efficient blending of various ingredients, from soft fruits to tougher vegetables, smoothies, and even ice for frozen drinks. Whether you're making a quick breakfast smoothie or a homemade soup, this blender provides the power needed to achieve a smooth and consistent texture.

One of the standout characteristics of the Oster Blender is its patented blade system. The stainless-steel blades are engineered for optimal performance and can easily crush ice and blend frozen fruits without hassle. This design not only enhances blending efficiency but also extends the life of the blades, making them suitable for daily use.

User convenience is a significant focus in the Oster Push Button Blender. The push-button control panel is intuitive, enabling users to select from multiple speed settings and functions with ease. This flexibility allows for customizable blending that caters to specific recipes and personal preferences. Additionally, the blender features a pulse function, providing extra control over the blending process for tasks that require precision, like chopping or mixing ingredients.

The blending jar is another highlight of the Oster Push Button Blender. Made from durable, BPA-free plastic, it can hold up to 48 ounces, perfect for family-sized servings or meal prep. The jar is designed with a wide base to ensure ingredients blend thoroughly, reducing the need for constant stopping and scraping down the sides.

For added safety, the Oster Blender comes with a lid that features a secure lock, preventing spills and splashes during operation. The jar is also dishwasher-safe, making cleanup a breeze after culinary adventures.

In summary, the Oster Push Button Blender, model 133093-005-000, combines power, versatility, and user-friendly features in one sleek appliance. Whether you're blending, chopping, or mixing, this blender is equipped to handle it all with efficiency and ease, making it a valuable addition to any kitchen. With its thoughtful design and performance, the Oster Blender is sure to become a trusted companion for all your culinary creations.