DVD-Video according to where they are
Region numbers are allocated to DVD Recorders
Example
Inside of product
If you see this symbol
Table of contents
Remote control information
Included accessories
Remote control Batteries AC mains lead RF coaxial cable
Batteries
Unit care
HDD Hard disk drive handling care
Handling care/Unit care
Included
Control reference guide
Remote control
Main unit
Standby/on switch /I
Unit’s display
Control reference guide
Regarding Viera Link Hdavi ControlTM function
Connecting a television
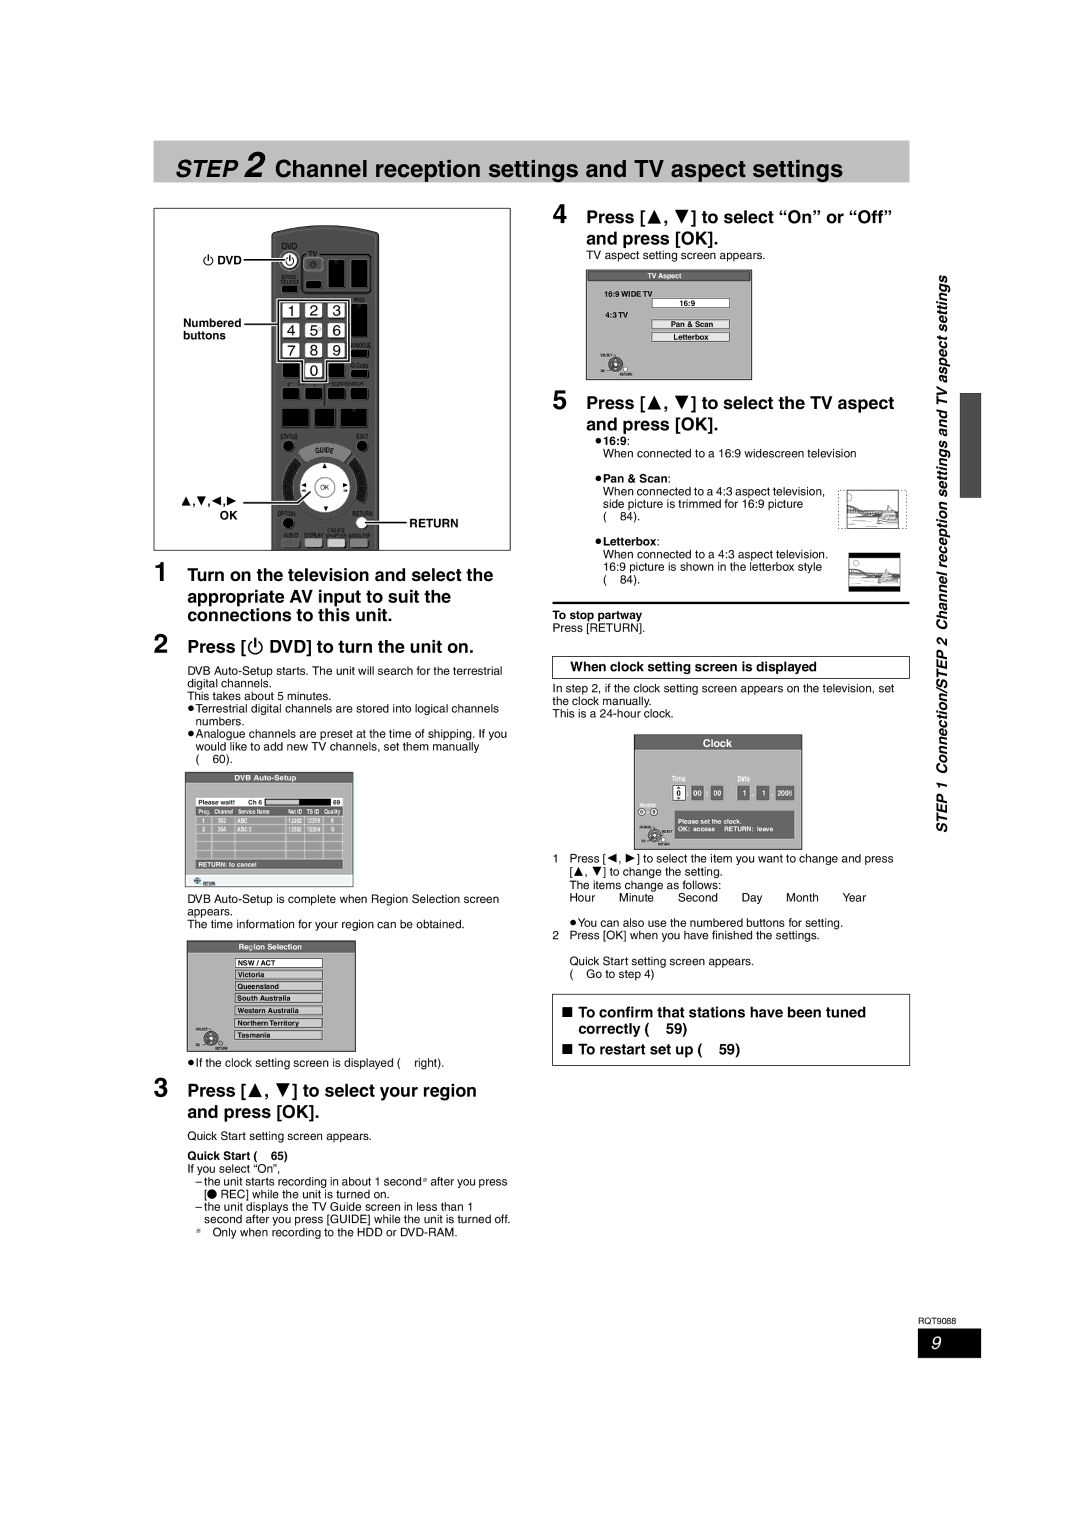
When clock setting screen is displayed
Channel reception settings and TV aspect settings
Press 3, 4 to select the TV aspect and press OK
Press 3, 4 to select your region and press OK
HDD and disc information
HDD and discs you can use for recording and play
Recording format
Play-only discs
Discs that cannot be played
HDD and disc information
USB memories you can use on this unit
USB memory and card information
Cards you can use on this unit EX88
Suitable SD cards
Structure of folders displayed by this unit
Regarding DivX files, MP3 files and still pictures Jpeg
DivX files, MP3 files and still pictures Jpeg
Information/Regarding
Inserting discs
Media handling Disc/USB memory/SD card
Inserting, removing the USB memory
Inserting, removing the SD card EX88
Watching analogue and digital broadcasts
If New service message appears
Select the channel
Digital channel information
Playing recorded video contents/Playing play-only discs
Press ¥ REC to start recording
Recording television programmes
To specify a time to stop recording
One Touch Recording
To cancel a timer recording on the TV Guide Screen
Timer recording
Timer icon
Press Guide
Deleting titles
Press Function Menu
Press 3, 4 to select Delete
Important notes for recording
When removing a recorded disc
When the format confirmation screen is displayed
Advanced recording
Recording modes and approximate recording times
Press 3, 4, 2, 1 to select Start and press OK
Flexible Recording
Playing while you are recording
Press 1 Play during recording
Manual recording
Copying from a video cassette recorder
DV automatic recording DV Auto Rec
Start play on the other equipment
Manually programming timer
Advanced timer recording
Using G- Code system to make timer
Recordings
To cancel recording when recording has already begun
To release the unit from recording standby
Check, change or delete a programme
Advanced timer recording
Relief Recording
Auto Renewal Recording
Press 3, 4, 2, 1 to select the programme
Operations in the TV Guide system
Basic operations
Selecting the programme from the desired
Operation during play
Advanced playback
Changing audio during play
Press Audio
To sort the titles for easy searching
Switching the Direct Navigator appearance
To play grouped titles HDD
To edit the group of titles HDD
Playing DivX video contents
Playing DivX, MP3 and still pictures
Showing the menu screen
Show MP3 Menu screen
Playing MP3 files
Press 1 while a track is highlighted to display Tree screen
Press 3, 4, 2, 1 to select a group and press
Show Album View screen
Playing still pictures
Press 3, 4, 2, 1 to select the album and press OK
Press 3, 4, 2, 1 to select the still picture and press OK
Useful functions during still picture play
Rotate
Playing DivX, MP3 and still pictures
To play music CD
Playing music
To play music recorded on HDD
Useful functions during music play
Convenient functions
Function Menu window
To pause the TV programme you are watching-Pause Live TV
Linked operations with the TV Viera Link Hdavi ControlTM
What is Viera Link Hdavi Control?
≥This unit supports Hdavi Control 3 function
Code etc
Using the Function
Easy control only with Viera remote control
Menu window to
Operate this unit
Editing titles/chapters and playing chapters
Editing titles/chapters
Press 3, 4, 2, 1 to select the title
Press 3, 4, 2, 1 to select the chapter
Cancel Protection §
Set up Protection §
Title operations
Partial Delete
Creating playlists
Creating, editing and playing playlists
Press 2, 1 to select the source title and press
Press Return
Playlist operations
Editing and playing playlists/chapters
Add
Chapter Move
Editing still pictures Jpeg
Editing still pictures and music
Select the album to be edited and press Option
Album still picture and picture operation
Deleting still pictures and music using Delete Navigator
Editing music
Album CD/group MP3 and track CD/ MP3 operation
Entering text
Show Enter Name screen
Press 3, 4, 2, 1 to select a character and press OK
Copying titles or playlists
Approximate copying times Max. speed
Entering text/Copying titles or playlists
Press Function Menu Press 3, 4 to select Copy and press OK
Copy
Press 3, 4 to select the title you want to copy and press
Press 2, 1 to select Start and press OK
Copying using the copying list- Advanced Copy
Set Copy Time
Setting the unit to copy according to the set time
Press 3, 4 to select Start Copying and press OK
To edit the copying list
Copying SD Video from a video equipment EX88
Copying SD Video from an SD card
VIDEO§ HDD DVD-RAM
VIDEO§
Copying still pictures
Copying using the copying list
Press 2, 1 to select Yes
Register still pictures for copy
Press OK to start copying
Copying still pictures
About the Gracenote Database
Copying music to HDD
Copying music from a CD
Copying music from a USB memory
Preparing the update data
To update the Gracenote Database
Press 2, 1 to select Yes and press OK to start copying
Updating the database on this unit
Using on-screen menus/Status message
Using on-screen menus
Press Display
Status messages
Using on-screen menus/Status message
Press Status
Sound menu-Change the DVB multi audio and sound effect
Setting the protection
Common procedures
HDD, disc and card management
Providing a name for a disc
Deleting all titles and playlists-Delete all titles
Deleting all the contents-Format
Selecting the background style-Top Menu
Enabling discs to be played on other equipment-Finalise
HDD, disc and card management
Tuning
Changing the unit’s settings
Auto-Setup Restart Download from TV
Settings for Digital Services
Settings for Analogue Services
Changing the unit’s settings
Signal Condition
Manual Tuning
Disc
Sound
Picture
Display
Changing the unit’s settings
Connection
Others
Software Update in Standby
Changing the unit’s settings System Update
Software Update Search Now
Default Settings
Other Settings
Television operation
Child Lock
Connecting a television with Component Video terminals
Connecting a television with S Video terminals
Additional connections
Video cable Audio/Video cable
Connecting a stereo amplifier
Connecting an amplifier with a digital input terminal
Connecting with an Hdmi compatible television and receiver
Additional connections
Connecting an Analogue television and VCR
Connecting a television and VCR
Additional connections
RFcoaxial cable
Connecting a Digital television and VCR
AC 220 to 240 V, 50 Hz
Included Cooling fan
Set up
Frequently asked questions
Cover
10-11
TV Guide
USB
Music
Messages
On the television
Function Menu
Messages
On the unit’s display
Troubleshooting guide
Guide
Troubleshooting guide
Troubleshooting guide
You want to cancel the ratings
Password
Play Play fails to start even when
Play is pressed
Updated
Copying, deleting and setting
Some channels. No Signal
Still pictures Cannot display Direct Navigator
Preset
To reset this unit To return all the settings other
To reset the ratings level
To restore the unit if it freezes
Specifications
Guide/Specifications
Troubleshooting
Glossary
RGB
Glossary
Safety precautions
Gracenote Corporate Description
Safety precautions
GracenoteR End-User License Agreement
USE of this Product Implies Acceptance of the Terms below
Index