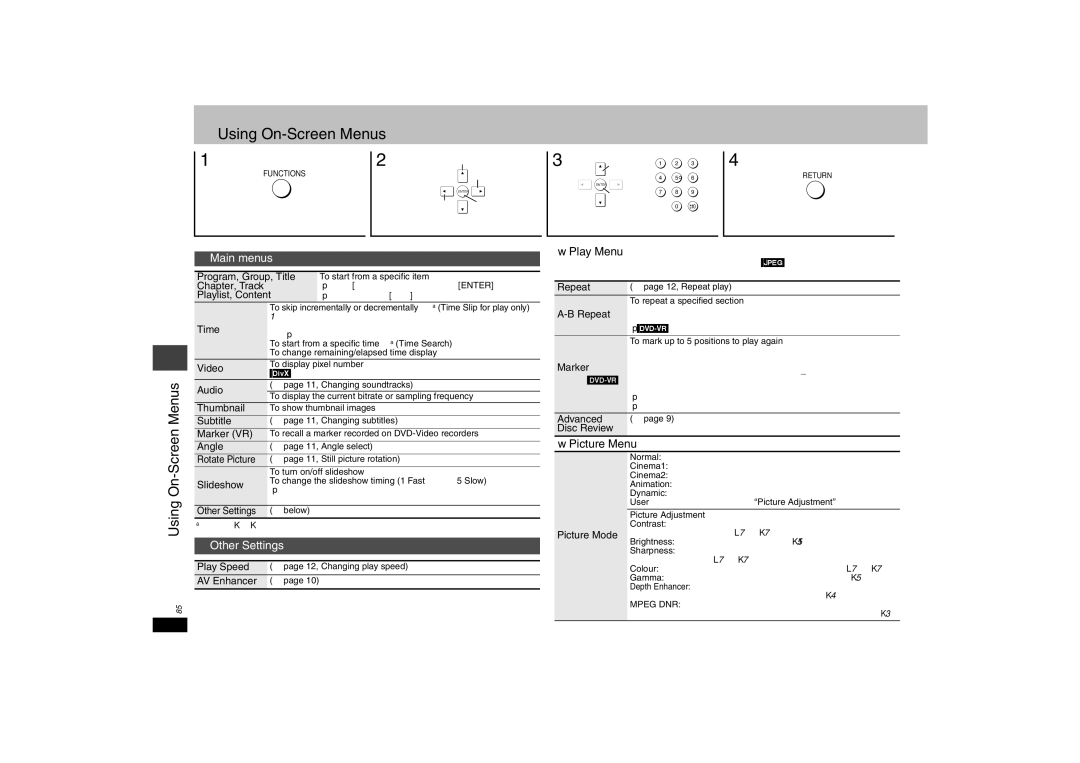
Using On-Screen Menus
1
FUNCTIONS
Press.
2 | Select Go to the next |
| menu |
ENTER
Return to the
previous menu ![]() Register
Register
Select the menu.
3 | Select | 1 | 2 | 3 |
|
| 4 | 5 | 6 |
| ENTER |
|
|
|
|
| 7 | 8 | 9 |
| Register |
| 0 | 10 |
|
|
|
Make the settings.
4
RETURN
Press to exit.
Using On-Screen Menus
RQT8509
Items shown differ depending on the type of software.
Main menus
Program, Group, Title | To start from a specific item |
Chapter, Track | ≥Press [3 4] to select and press [ENTER]. |
Playlist, Content | ≥Press and hold [34] to alter faster. |
| To skip incrementally or decrementally§ (Time Slip for play only) | |
| 1. Press [ENTER] twice to show Time Slip indicator. | |
Time | 2. Press [3 4] to select the time and press [ENTER]. | |
≥Press and hold [34] to alter faster. | ||
| ||
| To start from a specific time§ (Time Search) | |
| To change remaining/elapsed time display | |
Video | To display pixel number | |
[DivX] fps (frame per second) is also displayed. | ||
| ||
Audio | (➜ page 11, Changing soundtracks) | |
To display the current bitrate or sampling frequency | ||
| ||
Thumbnail | To show thumbnail images | |
Subtitle | (➜ page 11, Changing subtitles) | |
Marker (VR) | To recall a marker recorded on | |
Angle | (➜ page 11, Angle select) | |
Rotate Picture | (➜ page 11, Still picture rotation) | |
| To turn on/off slideshow | |
Slideshow | To change the slideshow timing (1 | |
≥When using Slideshow, Skip/Rotate picture may not work | ||
| ||
| correctly depending on the play position. | |
Other Settings | (➜ below) |
§Except iR/iRW
Other Settings
Play Speed (➜ page 12, Changing play speed)
AV Enhancer (➜ page 10)
∫Play Menu
(Only when the elapsed play time can be displayed, [JPEG] The Repeat and Marker functions can be used.)
Repeat | (➜ page 12, Repeat play) | ||
| To repeat a specified section | ||
Press [ENTER] at the starting and ending points. | |||
Press [ENTER] again to cancel. | |||
| |||
| |||
| To mark up to 5 positions to play again | ||
| Press [ENTER] (The unit is now ready to accept markers.) | ||
Marker | To mark a position: | [ENTER] (at the desired point) | |
To mark another position:[2 1] to select “¢”➜ [ENTER] | |||
Except | To recall a marker: | [2 1] ➜ [ENTER] | |
| To erase a marker: | [2 1] ➜ [CANCEL] | |
| ≥This feature doesn’t work during program and random play. | ||
| ≥Markers you add clear when you open the disc tray or switch the unit to standby. | ||
Advanced | (➜ page 9) |
| |
Disc Review |
|
| |
∫Picture Menu
Normal: Normal images
Cinema1: Mellows images and enhances detail in dark scenes.
Cinema2: Sharpens images and enhances detail in dark scenes.
Animation: Suitable for animation
Dynamic: Enhances the contrast for powerful images.
User (Press [ENTER] to select “Picture Adjustment”) (➜ below)
Picture Adjustment
Contrast: Increases the contrast between light and dark parts of
Picture Modethe picture (j7 to i7). Brightness: Brightens the picture (0 to i15).
Sharpness: Adjusts the sharpness of the edges of the horizontal lines. (j7 to i7)
Colour: Adjust the shade of the picture’s colour (j7 to i7).
Gamma: Adjusts the brightness of dark parts (0 to i5).
Depth Enhancer: Reduce the rough noise in the background to give
agreater feeling of depth (0 to i4).
MPEG DNR: Smoothes block noise and reduces the smudging that appears around contrasting sections of the picture (0 to i3).
16