3.6.Power Cord / On-Off Switch Replacement

3.6.1.Removal

1.Remove the dust cover and switch cover to expose the electrical connections of the power cord, on-off switch and wire cord.

2.Remove the flat washer and cord retainer. Remove the wire connections, and wire tie, if present.

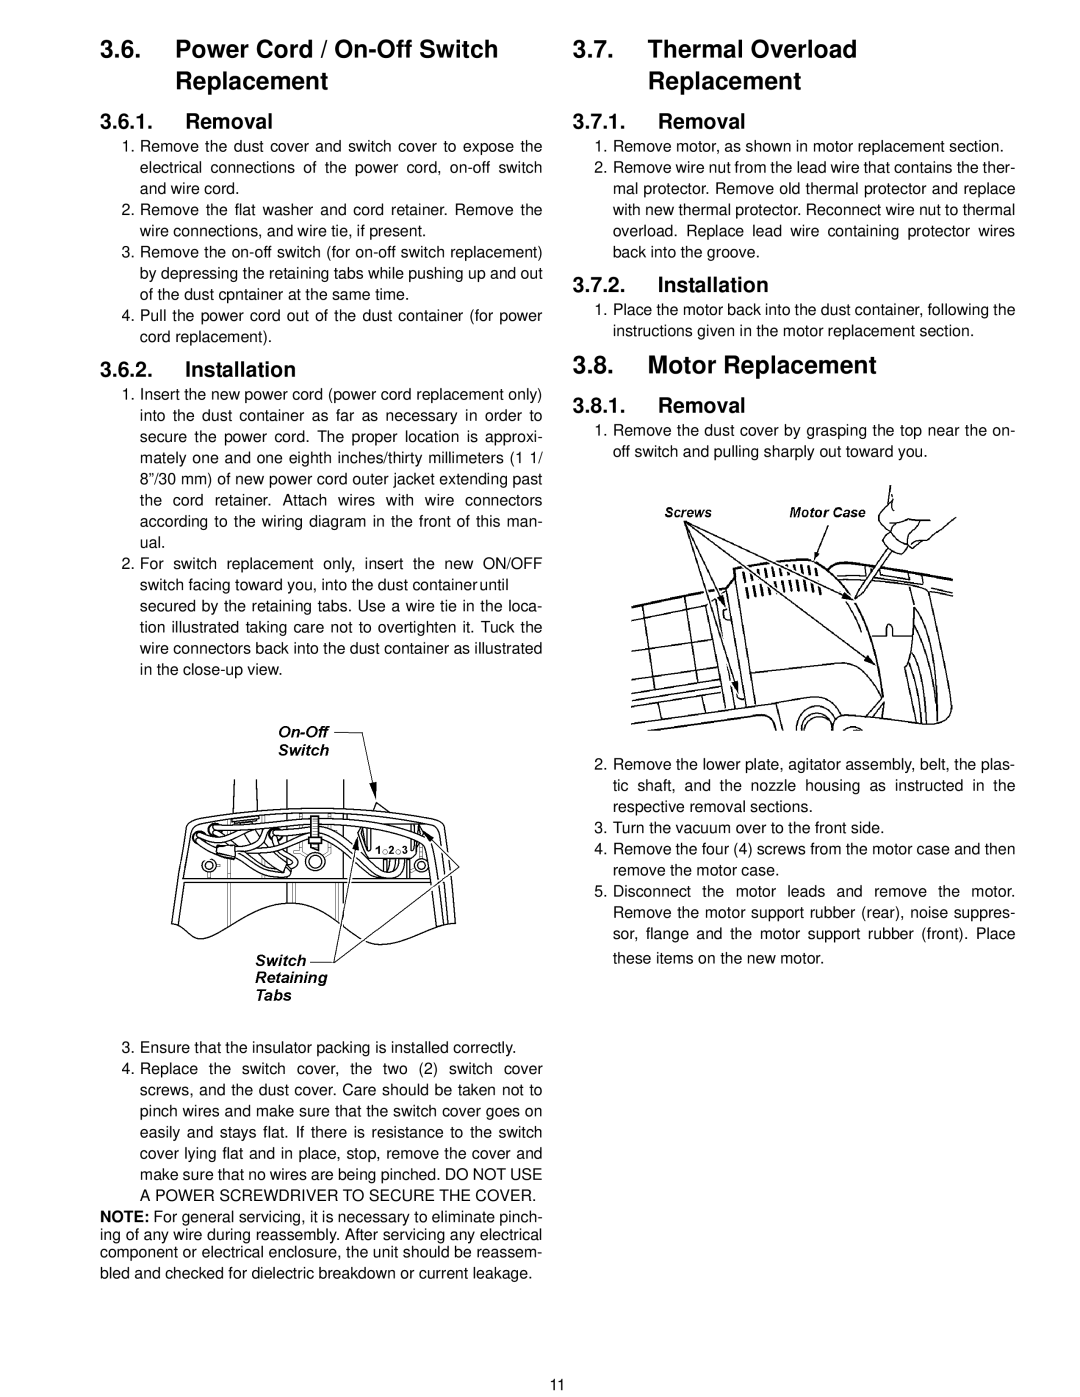
3.Remove the on-off switch (for on-off switch replacement) by depressing the retaining tabs while pushing up and out of the dust cpntainer at the same time.

4.Pull the power cord out of the dust container (for power cord replacement).

3.6.2.Installation

1.Insert the new power cord (power cord replacement only) into the dust container as far as necessary in order to secure the power cord. The proper location is approxi- mately one and one eighth inches/thirty millimeters (1 1/ 8”/30 mm) of new power cord outer jacket extending past the cord retainer. Attach wires with wire connectors according to the wiring diagram in the front of this man- ual.

2.For switch replacement only, insert the new ON/OFF switch facing toward you, into the dust container until secured by the retaining tabs. Use a wire tie in the loca- tion illustrated taking care not to overtighten it. Tuck the wire connectors back into the dust container as illustrated in the close-up view.

3.Ensure that the insulator packing is installed correctly.

4.Replace the switch cover, the two (2) switch cover screws, and the dust cover. Care should be taken not to pinch wires and make sure that the switch cover goes on easily and stays flat. If there is resistance to the switch cover lying flat and in place, stop, remove the cover and make sure that no wires are being pinched. DO NOT USE

A POWER SCREWDRIVER TO SECURE THE COVER.

NOTE: For general servicing, it is necessary to eliminate pinch- ing of any wire during reassembly. After servicing any electrical component or electrical enclosure, the unit should be reassem-

bled and checked for dielectric breakdown or current leakage.

3.7.Thermal Overload Replacement

3.7.1.Removal

1.Remove motor, as shown in motor replacement section.

2.Remove wire nut from the lead wire that contains the ther- mal protector. Remove old thermal protector and replace with new thermal protector. Reconnect wire nut to thermal overload. Replace lead wire containing protector wires back into the groove.

3.7.2.Installation

1.Place the motor back into the dust container, following the instructions given in the motor replacement section.

3.8.Motor Replacement

3.8.1.Removal

1.Remove the dust cover by grasping the top near the on- off switch and pulling sharply out toward you.

2.Remove the lower plate, agitator assembly, belt, the plas- tic shaft, and the nozzle housing as instructed in the respective removal sections.

3.Turn the vacuum over to the front side.

4.Remove the four (4) screws from the motor case and then remove the motor case.

5.Disconnect the motor leads and remove the motor. Remove the motor support rubber (rear), noise suppres- sor, flange and the motor support rubber (front). Place these items on the new motor.

11

Page 11
Image 11
Panasonic MC-V5210-00 specifications Power Cord / On-Off Switch Replacement, Motor Replacement

MC-V5210-00 specifications

The Panasonic MC-V5210-00 is a versatile and reliable vacuum cleaner designed for both residential and commercial use. This model combines powerful suction capabilities with advanced technologies that ensure efficient cleaning on various surfaces. Featuring a sleek design and user-friendly functionality, the MC-V5210-00 distributes optimal cleaning performance without compromising convenience.

One of the standout features of the Panasonic MC-V5210-00 is its robust motor system. The vacuum's high-efficiency motor generates powerful suction, allowing it to effectively capture dust, dirt, and debris from carpets, hardwood floors, and upholstery. This dynamic suction power makes it suitable for different cleaning environments, ranging from homes to offices.

Another key characteristic of the MC-V5210-00 is its multi-surface capability. Equipped with adjustable height settings, this vacuum can easily transition from cleaning low-pile carpets to delicate hard floors, ensuring no surface is left untouched. Its maneuverable design includes a long cord, allowing users to cover larger areas without constantly changing power outlets.

The MC-V5210-00 also includes a series of advanced filtration technologies, designed to improve indoor air quality. The vacuum features a HEPA filter that captures allergens and fine particulates, making it an ideal choice for allergy sufferers. By trapping 99.97% of particles as small as 0.3 microns, this filtration system ensures cleaner air is circulated back into the environment.

Durability and ease of maintenance are additional highlights of the Panasonic MC-V5210-00. Constructed with high-quality materials, this vacuum is built to withstand regular use. Its easy-to-empty dust canister minimizes downtime and simplifies the cleaning process.

Moreover, the lightweight design of the MC-V5210-00 ensures that users can easily carry and maneuver the vacuum around the house or office. The ergonomic handle enhances comfort during use, reducing the strain on the user's wrist.

In summary, the Panasonic MC-V5210-00 is not just a vacuum cleaner; it is a comprehensive cleaning solution that delivers efficiency, versatility, and superior performance. From its robust motor and multi-surface capabilities to advanced filtration systems and user-friendly design, this model stands out as a reliable choice for anyone in need of an effective cleaning device. Whether for everyday cleanups or more demanding cleaning tasks, the MC-V5210-00 proves to be a strong ally in maintaining a clean and healthy environment.