Preparations for G-Code Programming

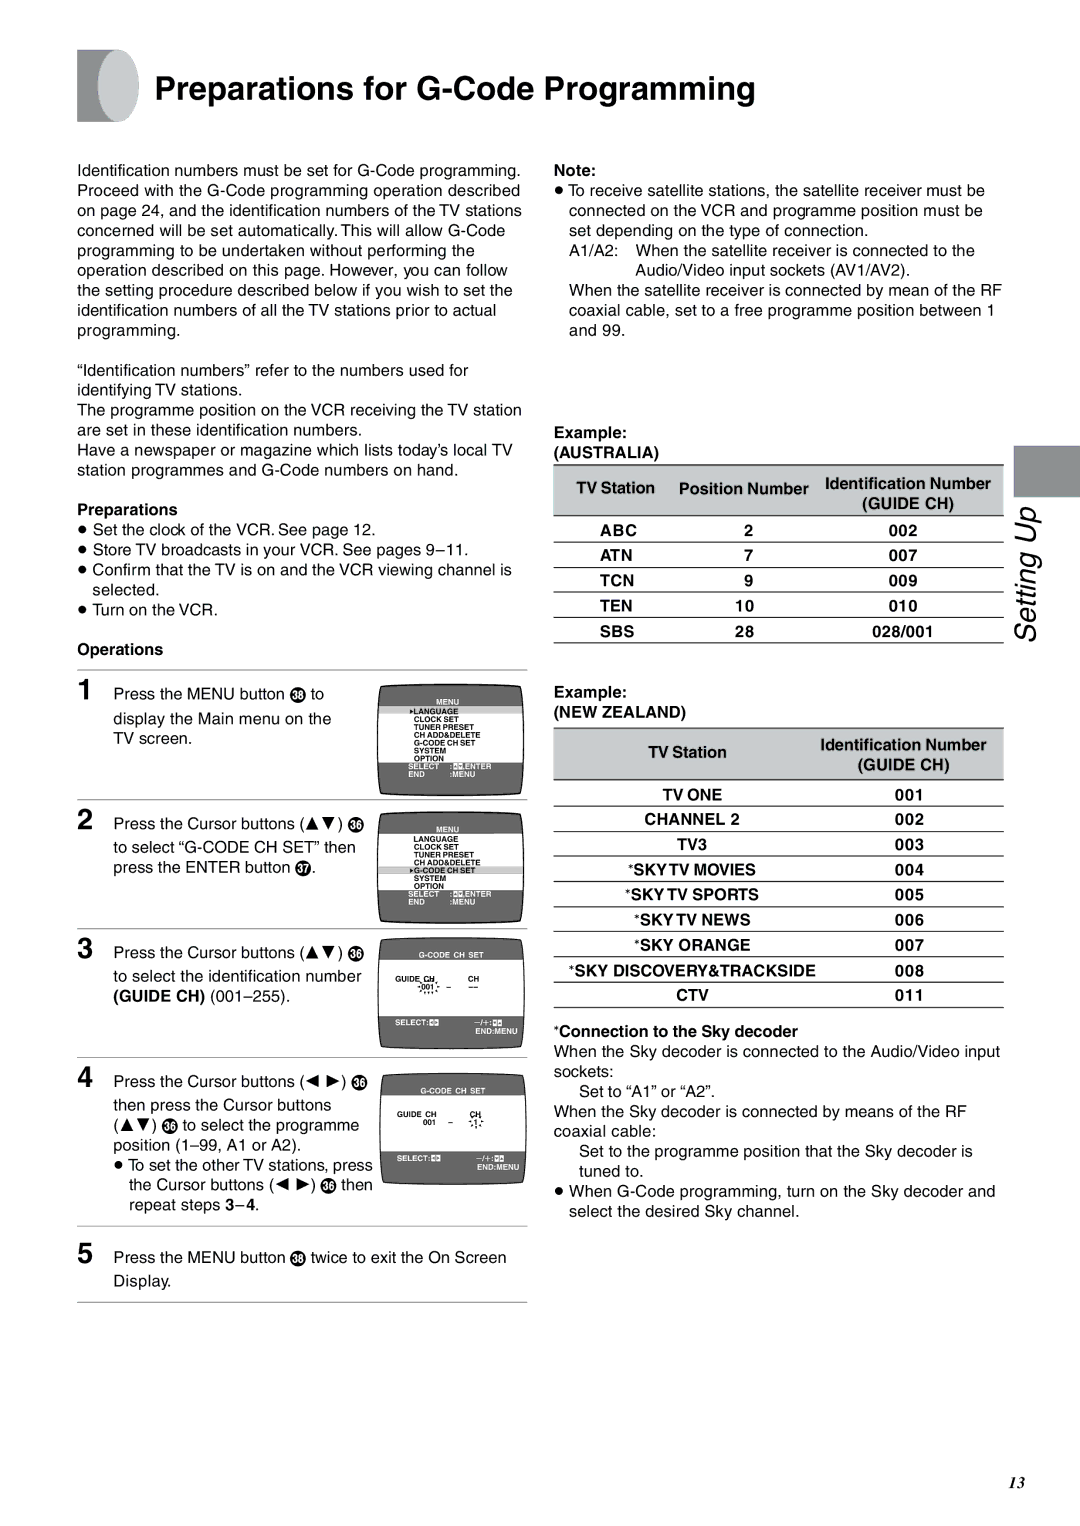
Identification numbers must be set for G-Code programming. Proceed with the G-Code programming operation described on page 24, and the identification numbers of the TV stations concerned will be set automatically. This will allow G-Code programming to be undertaken without performing the operation described on this page. However, you can follow the setting procedure described below if you wish to set the identification numbers of all the TV stations prior to actual programming.

“Identification numbers” refer to the numbers used for identifying TV stations.

The programme position on the VCR receiving the TV station are set in these identification numbers.

Have a newspaper or magazine which lists today’s local TV station programmes and G-Code numbers on hand.

Preparations

Set the clock of the VCR. See page 12.

Store TV broadcasts in your VCR. See pages 9–11.

Confirm that the TV is on and the VCR viewing channel is selected.

Turn on the VCR.

Operations

1 Press the MENU button V to


MENU


display the Main menu on the

LANGUAGE


CLOCK SET


TV screen.

TUNER PRESET

CH ADD&DELETE

G-CODE CH SET


SYSTEM


OPTION


SELECT

:


,ENTER


END

:MENU


2 Press the Cursor buttons (34) T


MENU


to select “G-CODE CH SET” then

LANGUAGE


TUNER PRESET


CLOCK SET


press the ENTER button U.

CH ADD&DELETE

G-CODE CH SET


SYSTEM


OPTION


SELECT

:


,ENTER


END

:MENU


3 Press the Cursor buttons (34) T

G-CODE CH SET

to select the identification number

GUIDE CH


CH

(GUIDE CH) (001–255).

001


--


SELECT:


/µ:


END:MENU

Note:

To receive satellite stations, the satellite receiver must be connected on the VCR and programme position must be set depending on the type of connection.

A1/A2: When the satellite receiver is connected to the

Audio/Video input sockets (AV1/AV2).

When the satellite receiver is connected by mean of the RF coaxial cable, set to a free programme position between 1 and 99.

Example:

(AUSTRALIA)

TV Station

Position Number

Identification Number


(GUIDE CH)

Up

ABC

2

002


ATN

7

007

Setting


TCN

9

009


TEN

10

010


SBS

28

028/001


Example:


(NEW ZEALAND)


TV Station

Identification Number


(GUIDE CH)


TV ONE

001


CHANNEL 2

002


TV3

003


°SKYTV MOVIES

004


°SKY TV SPORTS

005


°SKY TV NEWS

006


°SKY ORANGE

007


°SKY DISCOVERY&TRACKSIDE

008


CTV

011


°Connection to the Sky decoder

4 Press the Cursor buttons (2 1) T

then press the Cursor buttons

(34) T to select the programme position (1–99, A1 or A2).

To set the other TV stations, press the Cursor buttons (2 1) T then repeat steps 34.

G-CODE CH SET

GUIDE CH

CH

001 –

1

SELECT: /µ:

END:MENU

When the Sky decoder is connected to the Audio/Video input sockets:

Set to “A1” or “A2”.

When the Sky decoder is connected by means of the RF coaxial cable:

Set to the programme position that the Sky decoder is tuned to.

When G-Code programming, turn on the Sky decoder and select the desired Sky channel.

5 Press the MENU button V twice to exit the On Screen

Display.

13

Page 13
Image 13
Panasonic NV-SJ400A manual Preparations for G-Code Programming

NV-SJ400A specifications

The Panasonic NV-SJ400A is a standout model in the realm of VHS video cassette recorders, showcasing impressive technology and features that made it a sought-after option during its time. Released in the late 1990s, the NV-SJ400A was designed to meet the needs of home users seeking reliable video recording capabilities with enhanced playback quality.

One of the key features of the NV-SJ400A is its high-performance recording capabilities, which utilize advanced video heads to ensure exceptional image clarity. The model supports both standard play (SP) and long play (LP) formats, allowing users to choose between higher quality recordings or extended recording time. This versatility was particularly advantageous for households with varied viewing habits, enabling the flexibility to record full-length movies or multiple television shows on a single tape.

The NV-SJ400A also boasts built-in noise reduction technologies, which help in minimizing tape hiss and improving overall audio clarity. This feature was particularly beneficial for users who wanted to ensure that dialogue and sound effects were crisp and clear during playback. The inclusion of the dynamic tracking system further enhances the playability of tapes, ensuring that even worn or older cassettes could be played back smoothly without compromising on quality.

Another notable characteristic of the NV-SJ400A is its user-friendly interface, complete with an intuitive remote control. The remote allows for easy navigation of playback functions, programmable timers, and channel selection, making it convenient for users to operate the device from a distance. The device also includes a variety of input and output connections, ensuring compatibility with external devices such as camcorders and televisions.

The timer recording feature is a major highlight of the NV-SJ400A, enabling users to set recordings in advance while they are away. This functionality was particularly popular among busy households, allowing for the effortless capture of favorite shows or events without the need for manual intervention.

Lastly, the compact design of the NV-SJ400A makes it a space-saving addition to any home entertainment setup. With its blend of reliable performance, user-centric features, and advanced recording technologies, the Panasonic NV-SJ400A remains a memorable model in the history of VHS technology, representing an era of home video recording that laid the groundwork for future innovations in digital media.