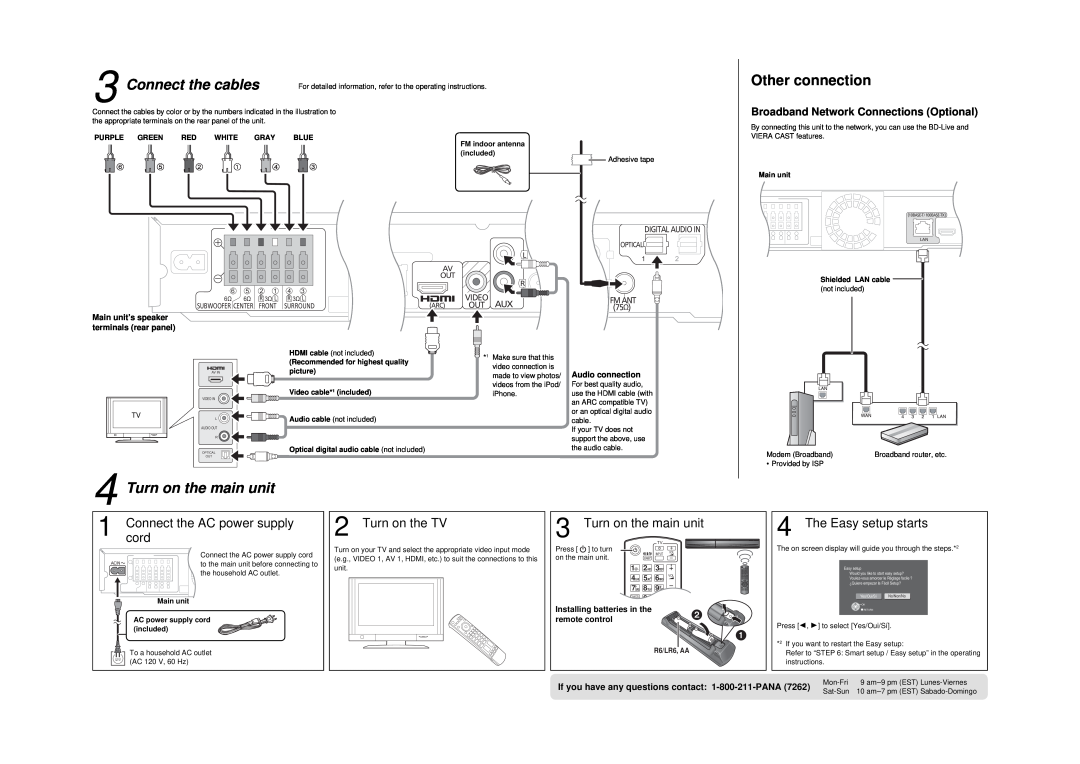
3 Connect the cables | For detailed information, refer to the operating instructions. | Other connection |
|
|
Connect the cables by color or by the numbers indicated in the illustration to | Broadband Network Connections (Optional) | ||||||
the appropriate terminals on the rear panel of the unit. |
| By connecting this unit to the network, you can use the | |||||
|
|
|
|
|
| ||
PURPLE | GREEN | RED | WHITE | GRAY | BLUE | VIERA CAST features. | |
|
|
|
|
|
| FM indoor antenna | |
|
|
|
|
|
| (included) | |
| | | | | | Adhesive tape | |
Main unit | |||||||
|
|
|
|
|
| ||
|
|
|
|
|
|
|
|
|
|
|
| DIGITAL AUDIO IN | 5 |
|
|
| ||
|
|
|
|
|
|
|
|
|
|
|
|
|
|
| 6Ω |
|
| LAN |
|
| |
|
|
|
|
|
| OP |
| OPTICAL |
|
|
| ENTER |
|
| |
|
|
|
|
|
|
|
|
|
|
|
|
|
|
| ||||
|
|
|
|
|
|
|
|
|
|
|
|
|
|
|
|
| ||
|
|
|
|
|
|
|
|
| L |
| 1 |
| 2 |
|
|
|
| |
|
|
|
|
|
|
|
|
|
|
|
|
|
|
|
| |||
|
|
|
|
|
|
| AV |
|
|
|
|
|
|
|
|
|
|
|
|
| |
|
|
|
| OUT |
| R |
|
|
|
|
|
|
| Shielded LAN cable | |
|
|
|
|
|
|
|
|
|
|
|
|
|
|
| ||||
|
|
|
|
|
|
|
|
|
|
|
|
|
|
|
| |||
|
| 6 | 5 | 2 1 | 4 3 |
|
| VIDEO |
|
|
|
|
|
|
|
| (not included) | |
|
| 6Ω | 6Ω | R 3Ω L | R 3Ω L |
| AN | AUX |
| FM ANT |
|
|
|
|
|
|
| |
Main unit’s speaker | SUBWOOFER CENTER | FRONT | SURROUND |
| (ARC) | OUT |
| (75Ω) |
|
|
|
|
|
|
| |||
|
|
|
|
|
|
|
|
|
|
|
|
|
|
|
|
| ||
terminals (rear panel) |
|
|
|
|
|
|
|
|
|
|
|
|
|
|
|
|
| |
|
|
|
|
| HDMI cable (not included) | *1 | Make sure that this |
|
|
|
|
|
|
|
|
| ||
|
|
|
|
| (Recommended for highest quality |
| video connection is |
|
|
|
|
|
|
|
|
| ||
|
| AV IN |
|
| picture) |
|
|
|
| Audio connection |
|
|
|
|
|
|
| |
|
|
|
|
|
|
| made to view photos/ |
|
|
|
|
|
|
| ||||
|
|
|
|
|
|
|
|
|
|
|
|
|
|
|
| |||
|
|
|
|
| Video cable*1 (included) |
| videos from the iPod/ | For best quality audio, |
|
|
|
|
|
|
| |||
|
| VIDEO IN |
|
|
| iPhone. |
| use the HDMI cable (with |
|
|
|
|
|
| ||||
|
|
|
|
|
|
|
|
|
| an ARC compatible TV) |
|
|
|
|
|
| ||
|
|
|
|
|
|
|
|
|
|
|
|
|
|
|
|
| ||
| TV |
|
|
| Audio cable (not included) |
|
|
| or an optical digital audio |
|
|
|
|
|
| |||
| L |
|
|
|
|
| cable. |
|
|
|
|
|
|
| ||||
|
|
|
|
|
|
|
|
|
|
|
|
|
|
| ||||
|
| AUDIO OUT |
|
|
|
|
|
|
|
| If your TV does not |
|
|
|
|
|
|
|
|
| R |
|
|
|
|
|
|
|
| support the above, use |
|
|
|
|
|
| |
|
|
|
|
|
|
|
|
|
|
|
|
|
|
|
|
|
| |
|
| OPTICAL |
|
| Optical digital audio cable (not included) |
|
|
| the audio cable. |
|
|
| Modem (Broadband) | Broadband router, etc. | ||||
|
| OUT |
|
|
|
|
|
|
|
|
|
|
|
| ||||
4 Turn on the main unit |
|
|
|
|
|
|
|
|
|
| • Provided by ISP |
| ||||||
|
|
|
|
|
|
|
|
|
|
|
|
|
| |||||
1 | Connect the AC power supply | 2 | Turn on the TV |
|
| 3 | Turn on the main unit | 4 | The Easy setup starts | |||||||||
cord |
|
|
|
|
|
|
|
|
| TV |
|
|
|
| ||||
|
| Connect the AC power supply cord | Turn on your TV and select the appropriate video input mode | Press [ ] to turn |
| INPUT | VOL | The on screen display will guide you through the steps.*2 | ||||||||||
|
| (e.g., VIDEO 1, AV 1, HDMI, etc.) to suit the connections to this | on the main unit. |
|
|
|
|
|
| |||||||||
AC IN |
| to the main unit before connecting to | unit. |
|
|
|
| 1@. | 2ABC | 3DEF |
|
|
|
|
| |||
|
|
|
|
|
|
|
|
|
|
|
|
|
| |||||
|
| the household AC outlet. |
|
|
|
|
|
|
|
| Easy setup | |||||||
|
|
|
|
|
|
|
| 4GHI | 5JKL | 6MNO VOL |
|
|
| |||||
|
|
|
|
|
|
|
|
|
|
|
|
|
|
|
|
|
| Would you like to start easy setup? |
|
|
|
|
|
|
|
|
|
|
| P | 8TUV | W |
|
|
|
| ¿Quiere empezar la Fácil Setup? |
|
|
|
|
|
|
|
|
|
|
|
|
|
|
|
| |||
|
|
|
|
|
|
|
|
|
|
| 7QRS | 9XYZ | MUTE |
|
|
|
| |
|
|
|
|
|
|
|
|
|
|
| CANCEL | 0_, |
|
|
|
| Yes/Oui/Sí No/Non/No | |
| Main unit |
|
|
|
|
|
|
|
|
|
|
|
|
|
| |||
|
|
|
|
|
|
|
|
| Installing batteries in the |
|
|
|
|
| OK | |||
|
|
|
|
|
|
|
|
|
|
| |
|
|
| RETURN | |||
| AC power supply cord |
|
|
|
|
|
|
| remote control |
|
|
|
|
|
| |||
|
|
|
|
|
|
|
|
|
|
| Press [, ] to select [Yes/Oui/Sí]. | |||||||
| (included) |
|
|
|
|
|
|
|
|
|
|
|
|
| ||||
|
|
|
|
|
|
|
|
|
|
|
|
|
| |
|
|
| |
|
|
|
|
|
|
|
|
|
|
|
|
|
|
|
|
|
| |
| To a household AC outlet |
|
|
|
|
|
|
|
|
|
| R6/LR6, AA | *2 If you want to restart the Easy setup: | |||||
|
|
|
|
|
|
|
|
|
|
| Refer to “STEP 6: Smart setup / Easy setup” in the operating | |||||||
| (AC 120 V, 60 Hz) |
|
|
|
|
|
|
|
|
|
|
|
|
| instructions. |
| ||
|
|
|
|
|
|
|
|
|
| If you have any questions contact: | 9 | |||||||
|
|
|
|
|
|
|
|
|
| 10 | ||||||||
|
|
|
|
|
|
|
|
|
|
|
|
|
|
|
|
| ||