Recording


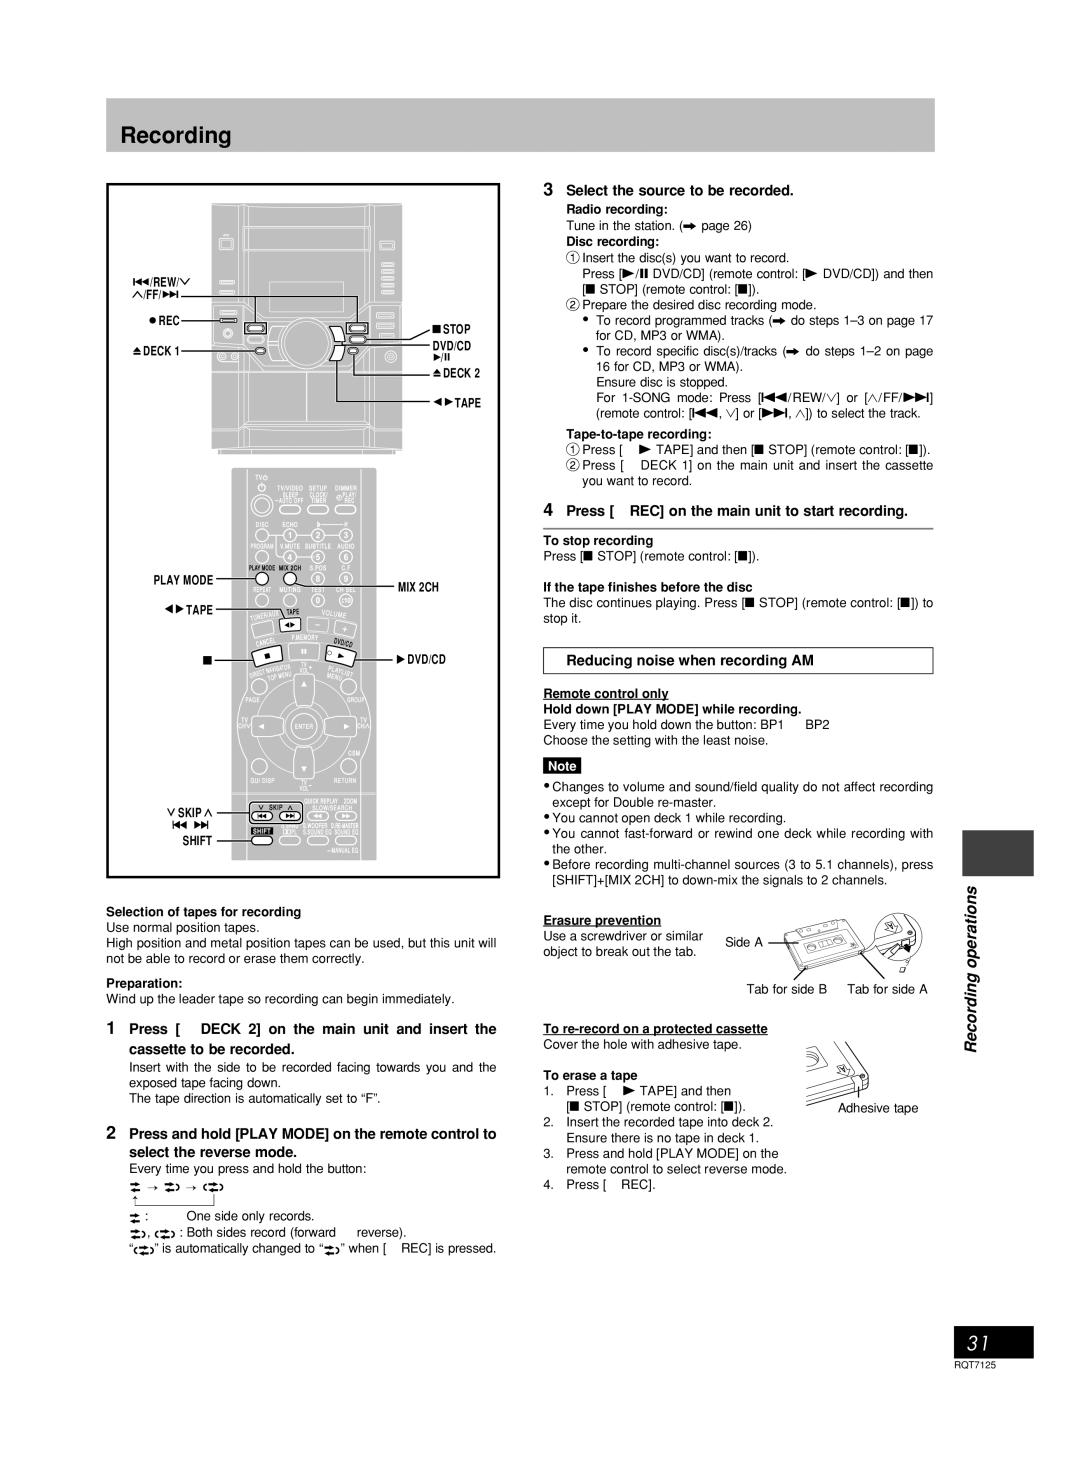
3 Select the source to be recorded.


Radio recording:


Tune in the station. (A page 26)


Disc1

recording:


Insert the disc(s) you want to record.

/REW/


Press [-/JDVD/CD] (remote control: [- DVD/CD]) and then


2[L STOP] (remote control: [L]).

/FF/


Prepare the desired disc recording mode.


REC


STOP

To record programmed tracks (A do steps 1–3 on page 17


for CD, MP3 or WMA).


DECK 1


DVD/CD

To record specific disc(s)/tracks (A do steps 1–2 on page


/


16 for CD, MP3 or WMA).


DECK 2


Ensure disc is stopped.


TAPE


For 1-SONG mode: Press [g/REW/4] or [3/FF/ f]


(remote control: [g, 4] or [f, 3]) to select the track.


Tape1-to-tape recording:


2Press [/ - TAPE] and then [L STOP] (remote control: [L]).


Press [c DECK 1] on the main unit and insert the cassette

TV


you want to record.


TV/VIDEO

SETUP

DIMMER


SLEEP

C LOCK/

PL AY/


A UTO OFF

TI MER

REC

4 Press [[ REC] on the main unit to start recording.


DISC

ECHO


#


PROGRAM V.MUTE SUBTITLE AUDIO

To stop recording


Press [L STOP] (remote control: [L]).


PLAY MODE

MIX 2CH

S.POS


C.F


PLAY MODE


MIX 2CH

If the tape finishes before the disc

REPEAT

MUTING

TEST

CH SEL


TAPE


/AUX

TA PE

VOLUM


The disc continues playing. Press [L STOP] (remote control: [L]) to


E


stop it.


NER


TU


CEL

P.MEMORY

DV

D/


AN


CD

C


VIGATOR

TV

PL

AY


DVD/CD


TNA


VOL


LI


EC


ENU


ME


ST


IR


D


P M


NU


TO


PAGE


GROUP


TV


TV


CH


ENTER


CH


CSM


GUI DISP


TV


RETURN

VOL


SKIP

QUICK REPLAY ZOOM

SKIP

SLOW/SEARCH


S.SRND S.WOOFER D.RE-MASTER


SHIFT

PL S.SOUND EQ SOUND EQ

SHIFT

MANUAL EQ

Reducing noise when recording AM

Remote control only

Hold down [PLAY MODE] while recording.

Every time you hold down the button: BP1 BP2

Choose the setting with the least noise.

Note

Changes to volume and sound/field quality do not affect recording except for Double re-master.

You cannot open deck 1 while recording.

You cannot fast-forward or rewind one deck while recording with the other.

Before recording multi-channel sources (3 to 5.1 channels), press [SHIFT]+[MIX 2CH] to down-mix the signals to 2 channels.

Selection of tapes for recording

Use normal position tapes.

High position and metal position tapes can be used, but this unit will not be able to record or erase them correctly.

Preparation:

Wind up the leader tape so recording can begin immediately.

1Press [c DECK 2] on the main unit and insert the cassette to be recorded.

Insert with the side to be recorded facing towards you and the exposed tape facing down.

The tape direction is automatically set to “F”.

2Press and hold [PLAY MODE] on the remote control to select the reverse mode.

Every time you press and hold the button:

:One side only records.

,

: Both sides record (forward reverse).

” is automatically changed to “ ” when [[ REC] is pressed.

Erasure prevention


Use a screwdriver or similar

Side A


object to break out the tab.


Tab for side B

Tab for side A

To re-record on a protected cassette


Cover the hole with adhesive tape.


To erase a tape


1. Press [/ - TAPE] and then


[L STOP] (remote control: [L]).

Adhesive tape

2.Insert the recorded tape into deck 2. Ensure there is no tape in deck 1.

3.Press and hold [PLAY MODE] on the remote control to select reverse mode.

4.Press [[ REC].

Recording operations

31

RQT7125

Page 31
Image 31
Panasonic SC-VK80D Select the source to be recorded, Press REC on the main unit to start recording, MIX 2CH, Tape

SC-VK70D, SC-VK80D, SC-VK90D specifications

The Panasonic SC-VK series, comprising the SC-VK90D, SC-VK80D, and SC-VK70D, represents a robust line of audio systems designed for music enthusiasts seeking high-quality sound and versatility in their listening experience.

The SC-VK90D stands at the top of the lineup, boasting an impressive 3000 watts of total power output. This model is equipped with a sophisticated DJ function that includes various sound effects, making it ideal for parties and gatherings. One of its standout features is the Bluetooth connectivity, allowing users to stream music wirelessly from their devices. Additionally, it supports an array of audio formats, including MP3 and WMA, ensuring compatibility with most digital music libraries. The inclusion of a built-in FM tuner enhances its functionality, providing access to a diverse array of radio stations.

Moving to the SC-VK80D, this model retains many of the performance characteristics of its more powerful counterpart while offering a slightly reduced power output of 2200 watts. This model is perfect for home use, striking a balance between power and energy efficiency. The SC-VK80D also features Bluetooth connectivity, a USB port for direct playback, and a CD player, making it a versatile choice for users who want multiple ways to experience their music. Its compact design facilitates easy placement in various living spaces without compromising sound quality.

The SC-VK70D is an entry-level model that still delivers an impressive audio performance, with a total power output of 1000 watts. It is designed to meet the needs of those seeking a reliable sound system without excessive power. The SC-VK70D includes basic Bluetooth functionality and supports USB connections for playback, making it user-friendly. Additionally, it features a variety of sound modes, allowing listeners to customize their audio experience whether they are enjoying music, watching movies, or hosting parties.

All three models in the SC-VK series incorporate advanced audio technologies such as the Clear Sound and Dynamic Bass features, which enhance overall sound clarity and produce deep, resonant bass lines. They also employ a sleek, modern design with easy-to-use interfaces, emphasizing usability alongside aesthetic appeal.

In summary, the Panasonic SC-VK90D, SC-VK80D, and SC-VK70D cater to a wide range of audio preferences, making them suitable for various settings—be it a small gathering or a large event. Each model offers distinct features, yet all share a common goal: to deliver a powerful and immersive listening experience.