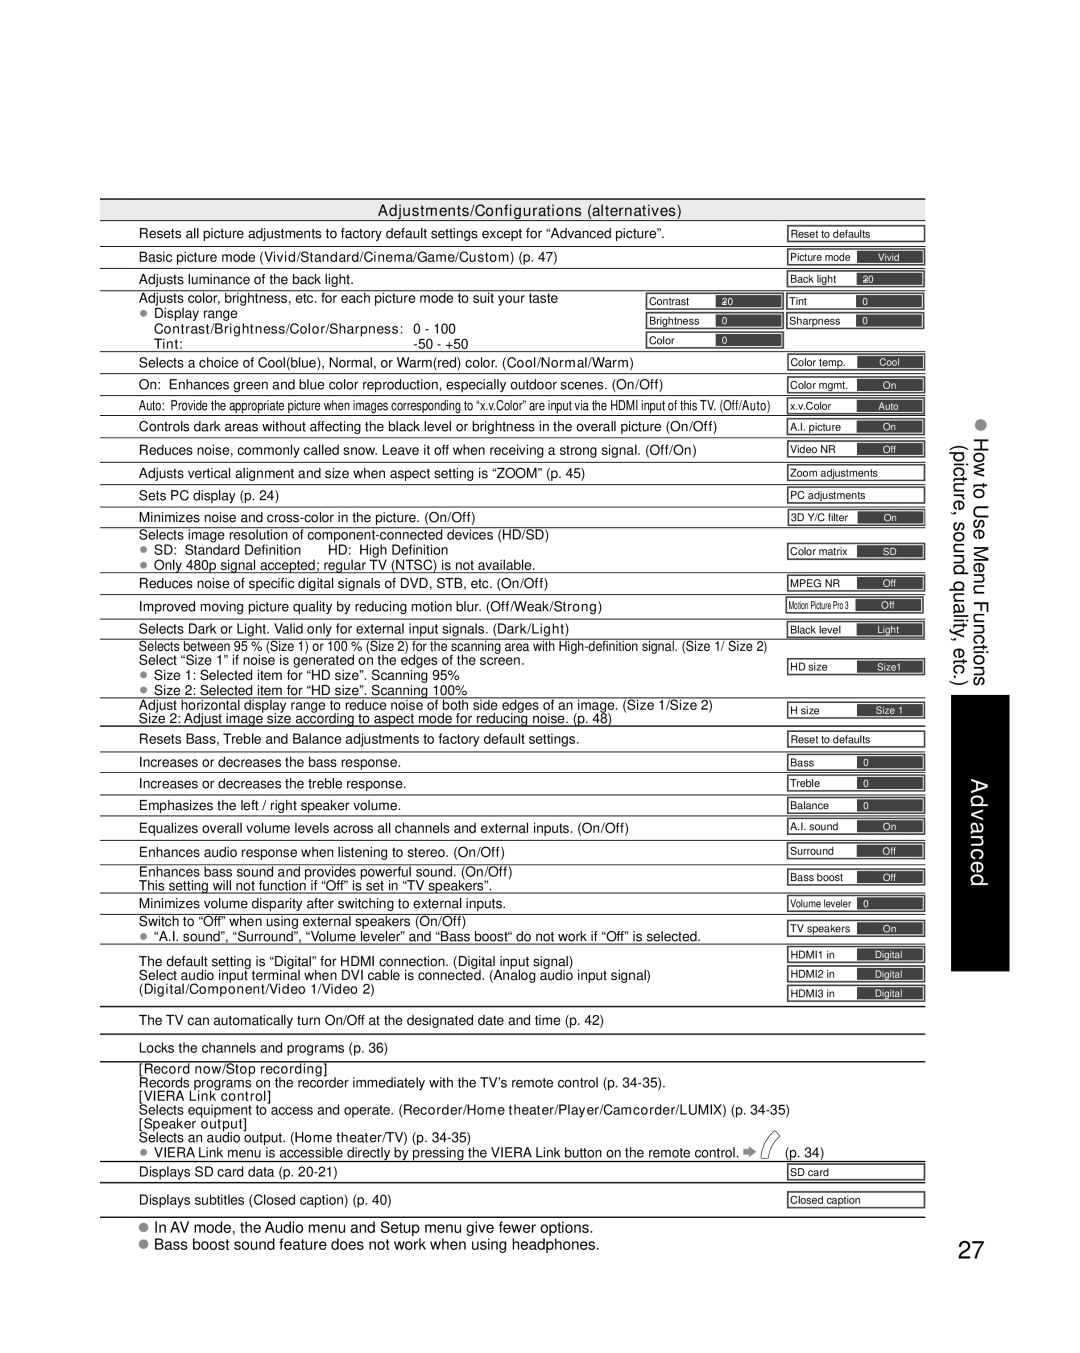
Adjustments/Configurations (alternatives)
Resets all picture adjustments to factory default settings except for “Advanced picture”. |
|
| Reset to defaults |
| ||||||
|
|
|
|
|
|
|
|
|
|
|
Basic picture mode (Vivid/Standard/Cinema/Game/Custom) (p. 47) |
|
|
|
|
|
|
|
| ||
|
|
| Picture mode | Vivid |
| |||||
|
|
|
|
|
|
|
|
|
|
|
|
|
|
|
|
|
|
|
|
|
|
Adjusts luminance of the back light. |
|
|
|
|
|
|
|
|
| |
|
|
|
| Back light | +20 |
| ||||
|
|
|
|
|
|
|
|
|
|
|
|
|
|
|
|
|
|
|
|
|
|
Adjusts color, brightness, etc. for each picture mode to suit your taste |
|
|
|
|
|
|
|
| ||
Contrast | +20 |
| Tint |
| 0 |
| ||||
• Display range |
|
|
|
|
|
|
|
|
|
|
|
|
|
|
|
|
|
|
|
| |
|
| Brightness | 0 |
| Sharpness |
| 0 |
| ||
Contrast/Brightness/Color/Sharpness: | 0 - 100 |
|
|
|
|
|
|
|
| |
|
|
|
|
|
|
|
| |||
Tint: |
|
| Color | 0 |
|
|
|
|
|
|
|
|
|
|
|
|
|
|
|
|
|
Selects a choice of Cool(blue), Normal, or Warm(red) color. (Cool/Normal/Warm) |
|
|
|
|
|
|
|
| ||
|
|
| Color temp. | Cool |
| |||||
|
|
|
|
|
|
|
|
|
|
|
|
|
|
|
|
|
|
|
|
|
|
On: Enhances green and blue color reproduction, especially outdoor scenes. (On/Off) |
|
|
|
|
|
|
| |||
|
| Color mgmt. | On |
| ||||||
|
|
|
|
|
|
|
|
|
|
|
|
|
|
|
|
|
|
|
|
|
|
Auto: Provide the appropriate picture when images corresponding to “x.v.Color” are input via the HDMI input of this TV. (Off/Auto) |
|
|
|
|
| |||||
x.v.Color | Auto |
| ||||||||
Controls dark areas without affecting the black level or brightness in the overall picture (On/Off) |
|
|
|
|
|
|
| |||
|
| A.I. picture | On |
| ||||||
|
|
|
|
|
|
|
|
|
|
|
|
|
|
|
|
|
|
|
|
|
|
Reduces noise, commonly called snow. Leave it off when receiving a strong signal. (Off/On) |
|
|
|
|
|
|
| |||
|
| Video NR | Off |
| ||||||
|
|
|
|
|
|
|
|
|
|
|
|
|
|
|
|
|
|
|
|
|
|
Adjusts vertical alignment and size when aspect setting is “ZOOM” (p. 45) |
|
|
|
|
|
|
|
| ||
|
|
| Zoom adjustments |
| ||||||
|
|
|
|
|
|
|
|
|
|
|
Sets PC display (p. 24) |
|
|
|
|
|
|
|
|
|
|
|
|
|
|
| PC adjustments |
| ||||
|
|
|
|
|
|
|
|
|
|
|
Minimizes noise and |
|
|
|
|
|
|
|
| ||
|
|
| 3D Y/C filter | On |
| |||||
|
|
|
|
|
|
|
|
|
|
|
|
|
|
|
|
|
|
|
|
|
|
Selects image resolution of |
|
|
|
|
|
|
|
| ||
• SD: Standard Definition | HD: High Definition |
|
|
|
|
|
|
|
| |
|
|
| Color matrix | SD |
| |||||
• Only 480p signal accepted; regular TV (NTSC) is not available. |
|
|
|
|
|
|
|
| ||
|
|
|
|
|
|
|
| |||
Reduces noise of specific digital signals of DVD, STB, etc. (On/Off) |
|
|
| MPEG NR | Off |
| ||||
|
|
|
|
|
|
|
|
|
|
|
|
|
|
|
|
|
|
|
|
|
|
Improved moving picture quality by reducing motion blur. (Off/Weak/Strong) |
|
|
|
|
|
|
|
| ||
|
|
| Motion Picture Pro 3 |
|
| Off |
| |||
|
|
|
|
|
|
|
|
|
|
|
Selects Dark or Light. Valid only for external input signals. (Dark/Light) |
|
|
|
|
|
|
| |||
|
|
| Black level |
| Light |
| ||||
Selects between 95 % (Size 1) or 100 % (Size 2) for the scanning area with |
|
|
|
|
| |||||
Select “Size 1” if noise is generated on the edges of the screen. |
|
|
|
|
|
|
|
| ||
• Size 1: Selected item for “HD size”. Scanning 95% |
|
|
| HD size | Size1 |
| ||||
|
|
|
|
|
|
|
| |||
|
|
|
|
|
|
|
| |||
• Size 2: Selected item for “HD size”. Scanning 100% |
|
|
|
|
|
|
|
| ||
Adjust horizontal display range to reduce noise of both side edges of an image. (Size 1/Size 2) |
|
|
|
|
| |||||
|
| H size | Size 1 |
| ||||||
Size 2: Adjust image size according to aspect mode for reducing noise. (p. 48) |
|
|
|
|
|
|
|
| ||
|
|
|
|
|
|
|
| |||
Resets Bass, Treble and Balance adjustments to factory default settings. |
|
|
|
|
|
| ||||
|
|
| Reset to defaults |
| ||||||
|
|
|
|
|
|
|
|
|
|
|
Increases or decreases the bass response. |
|
|
|
|
|
|
| |||
|
|
|
| Bass | 0 |
| ||||
|
|
|
|
|
|
|
|
|
|
|
|
|
|
|
|
|
|
|
|
|
|
Increases or decreases the treble response. |
|
|
|
|
|
|
| |||
|
|
|
| Treble | 0 |
| ||||
|
|
|
|
|
|
|
|
|
|
|
|
|
|
|
|
|
|
|
|
|
|
Emphasizes the left / right speaker volume. |
|
|
|
|
|
|
| |||
|
|
|
| Balance | 0 |
| ||||
|
|
|
|
|
|
|
|
|
|
|
|
|
|
|
|
|
|
|
|
|
|
Equalizes overall volume levels across all channels and external inputs. (On/Off) |
|
|
|
|
|
| ||||
|
|
| A.I. sound | On |
| |||||
|
|
|
|
|
|
|
|
|
|
|
Enhances audio response when listening to stereo. (On/Off) |
|
|
|
|
|
| ||||
|
|
| Surround | Off |
| |||||
|
|
|
|
|
|
|
|
|
|
|
Enhances bass sound and provides powerful sound. (On/Off) |
|
|
|
|
|
| ||||
|
|
| Bass boost | Off |
| |||||
This setting will not function if “Off” is set in “TV speakers”. |
|
|
|
|
|
|
|
| ||
|
|
|
|
|
|
|
| |||
Minimizes volume disparity after switching to external inputs. |
|
|
|
|
|
| ||||
|
|
| Volume leveler | 0 |
| |||||
|
|
|
|
|
|
|
|
|
|
|
|
|
|
|
|
|
|
|
|
|
|
Switch to “Off” when using external speakers (On/Off) |
|
|
|
|
|
|
|
| ||
• “A.I. sound”, “Surround”, “Volume leveler” and “Bass boost“ do not work if “Off” is selected. |
|
| TV speakers | On |
| |||||
|
|
|
|
|
|
| ||||
|
|
|
|
|
|
| ||||
The default setting is “Digital” for HDMI connection. (Digital input signal) |
|
|
| HDMI1 in | Digital |
| ||||
|
|
|
|
|
|
|
| |||
|
|
|
|
|
|
|
| |||
Select audio input terminal when DVI cable is connected. (Analog audio input signal) |
|
| HDMI2 in | Digital |
| |||||
(Digital/Component/Video 1/Video 2) |
|
|
|
|
|
| ||||
|
|
|
| HDMI3 in | Digital |
| ||||
|
|
|
|
|
|
|
|
|
|
|
|
|
|
|
|
|
|
|
|
|
|
The TV can automatically turn On/Off at the designated date and time (p. 42)
Locks the channels and programs (p. 36)
[Record now/Stop recording]
Records programs on the recorder immediately with the TV’s remote control (p.
[VIERA Link control]
Selects equipment to access and operate. (Recorder/Home theater/Player/Camcorder/LUMIX) (p.
[Speaker output] |
|
|
Selects an audio output. (Home theater/TV) (p. |
|
|
• VIERA Link menu is accessible directly by pressing the VIERA Link button on the remote control. | (p. 34) | |
Displays SD card data (p. |
|
|
| SD card | |
|
|
|
Displays subtitles (Closed caption) (p. 40) |
|
|
| Closed caption | |
How to Use Menu Functions (picture, sound quality, etc.)
Advanced
In AV mode, the Audio menu and Setup menu give fewer options. | 27 |
Bass boost sound feature does not work when using headphones. | |
|